Windows Azure and Cloud Computing Posts for 3/28/2012+
| A compendium of Windows Azure, Service Bus, EAI & EDI, Access Control, Connect, SQL Azure Database, and other cloud-computing articles. |
Note: This post is updated weekly or more frequently, depending on the availability of new articles in the following sections:
- Windows Azure Blob, Drive, Table, Queue, HDInsight and Media Services
- Windows Azure SQL Database, Federations and Reporting, Mobile Services
- Marketplace DataMarket, Cloud Numerics, Big Data and OData
- Windows Azure Service Bus, Caching, Access Control, Active Directory, Identity and Workflow
- Windows Azure Virtual Machines, Virtual Networks, Web Sites, Connect, RDP and CDN
- Live Windows Azure Apps, APIs, Tools and Test Harnesses
- Visual Studio LightSwitch and Entity Framework v4+
- Windows Azure Infrastructure and DevOps
- Windows Azure Platform Appliance (WAPA), Hyper-V and Private/Hybrid Clouds
- Cloud Security, Compliance and Governance
- Cloud Computing Events
- Other Cloud Computing Platforms and Services
Azure Blob, Drive, Table, Queue, HDInsight and Media Services
Avkash Chauhan (@avkashchauhan) posted HDInsight (Hadoop on Azure) Demo: Submit MapReduce job, process result from Pig and filter final results in Hive on 3/28/2013:
In this demo we will submit a WordCount map reduce job to HDInsight cluster and process the results in Pig and then filter the results in Hive by storing structured results into a table.
Step 1: Submitting WordCount MapReduce Job to 4 node HDInsight cluster:
c:\apps\dist\hadoop-1.1.0-SNAPSHOT\bin\hadoop.cmd jar c:\apps\Jobs\templates\635000448534317551.hadoop-examples.jar wordcount /user/admin/DaVinci.txt /user/admin/outcount
The results are stored @ /user/admin/outcount
Verify the results at Interactive Shell:
js> #ls /user/admin/outcount
Found 2 items
-rwxrwxrwx 1 admin supergroup 0 2013-03-28 05:22 /user/admin/outcount/_SUCCESS
-rwxrwxrwx 1 admin supergroup 337623 2013-03-28 05:22 /user/admin/outcount/part-r-00000
Step 2: loading /user/admin/outcount/part-r-00000 results in the Pig:
First we are storing the flat text file data as words, wordCount format as below:
Grunt>mydata = load '/user/admin/output/part-r-00000′ using PigStorage('\t') as (words:chararray, wordCount:int);
Grunt>first10 = LIMIT mydata 10;
Grunt>dump first10;
Note: This shows results for the words with frequency 1. We need to reorder to results on descending order to get words with top frequency.
Grunt>mydatadsc = order mydata by wordCount DESC;
Grunt>first10 = LIMIT mydatadsc 10;
Grunt>dump first10;
Now we have got the result as expected. Lets stored the results into a file at HDFS.
Grunt>Store first10 into '/user/avkash/myresults10' ;
Step 3: Filtering Pig Results in to Hive Table:
First we will create a table in Hive using the same format (words and wordcount separated by comma)
hive> create table wordslist10(words string, wordscount int) row format delimited fields terminated by ',' lines terminated by '\n';
Now once table is created we will load the hive store file '/user/admin/myresults10/part-r-00000′ into wordslist10 table we just created:
hive> load data inpath '/user/admin/myresults10/part-r-00000′ overwrite into table wordslist10;
That's all as you can see the results now in table:
hive> select * from wordslist10;


<Return to section navigation list>
Windows Azure SQL Database, Federations and Reporting, Mobile Services
Brian Hitney continued his Microsoft DevRadio: (Part 3) Using Windows Azure to Build Back-End Services for Windows 8 Apps – ASP.NET Web API series on 3/29/2013:
Abstract:
Back for part 3 in their series for “Using Windows Azure to Build Back-End Services for Windows 8 apps”, Peter Laudati, Brian Hitney and Andrew Duthie show us how easy it is to host services built with the ASP.NET Web API using the new Windows Azure Web Sites feature. Check out the full article here.
After watching this video, follow these next steps:
Step #1 – Try Windows Azure: No cost. No obligation. 90-Day FREE trial.
Step #2 – Download the Tools for Windows 8 App Development
Step #3 – Start building your own Apps for Windows 8
Subscribe to our podcast via iTunes or RSS
If you're interested in learning more about the products or solutions discussed in this episode, click on any of the below links for free, in-depth information:
Register for our Windows Azure Hands-on Lab Online (HOLO) events today!
Blogs:
Videos:
- Microsoft DevRadio: How to Get Started with Windows Azure
- Microsoft DevRadio: (Part 1) What is Windows Azure Web Sites?
- Microsoft DevRadio: (Part 2) Windows Azure Web Sites Explained
- Microsoft DevRadio: How to Integrate TFS Projects with Windows Azure Web Sites
Virtual Labs:
Download
- MP3 (Audio only)
- MP4 (iPod, Zune HD)
- High Quality MP4 (iPad, PC)
- Mid Quality MP4 (WP7, HTML5)
- High Quality WMV (PC, Xbox, MCE)

By Brian Hitney on March 29, 2013 at 12:10 PM
Tagged: uscloud, windows 8, asp.net, web API, DevRadio
Grant Fritchey (@GFritchey) wrote Azure SQL Database Maintenance and Red Gate Software’s ACloudyPlace blog posted on 3/21/2013 (missed when pubished):
It is increasingly likely that DBAs are now given responsibility for maintaining Azure SQL databases as well as conventional SQL Server databases. What is likely to be required by way of maintenence? What are the differences?
While there are many similarities between Azure SQL Database and SQL Server, there are also a large number of differences. The main point of contention is that none of the operating system is available to you. This means that all sorts of monitoring and maintenance tasks associated with the operating system and the server are no longer necessary or available. That said, you’re still dealing with a SQL Server database, and there are maintenance tasks that may still be applicable to that Azure SQL Database. Let’s discuss a few of the possibilities and mention those places where you just can’t go.
Backups
Initially there was no facility to perform a backup at all. To a degree, the need for backups has been somewhat mitigated by the architecture of the Azure offering which creates three copies of your database on three different machines. However, this hasn’t eliminated the need for backups by any means. Because of this, Microsoft has now relented, and provided a mechanism to backup and restore your database, called the bacpac. Further, this bacpac takes advantage of Windows Azure Storage: As long as you transfer data between datacenters in the same region, you won’t actually incur a data transfer cost. You need to be aware that the bacpac is not really a backup in the traditional sense. You’re not taking a page-by-page copy of the database. Instead, you’re exporting the schema and performing a bulk copy of the data out to the bacpac file. Because of this process, the data may not be transactionally consistent if you take a backup of a database that is being updated in any way. This would lead to you losing data or finding problems with your referential integrity. To avoid this, you take a copy of the live database and create a bacpac from the copy.
To make a bacpac backup happen, you have to first use a function that copies your database:
CREATE DATABASE MovieManagement_CopyAS COPY OF myserver.MovieManagement;That’s a T-SQL statement. You can run it from the Portal or from SSMS. You just supply the appropriate database and server names in place of my examples. Oh yeah, and you get charged for the database copy. You also need to be sure you’re connected to the master database on the Azure server in order to run this.
Once it’s done, you now have a copy of your database that you can use to create the bacpac by running the Import/Export wizard either from the Azure Management Portal, or from your SSMS. If you’re going to use Hosted Storage you’ll need to set that up ahead of time. After that, it’s just a matter of using the URLs and Access Key values supplied from the Storage Account. You’ll have a backup. When you’re done, you can then get rid of the database copy.
To bring that database back online, you just run the Import process, more or less reversing the steps you just completed.
Index Fragmentation
While each of the individual databases within Azure SQL Database are likely to be somewhat small, the current max is only 150gb, fragmentation of the indexes within the database could still occur. That can cause performance to suffer which could, in turn, lead to long running queries which may cause throttling on your system. Further, fragmented indexes take up more room which means more storage so you could be using up a precious resource and costing your company money just by having fragmented indexes.
Luckily, because indexes are all within the database, the functionality here is exactly the same as it is within SQL Server running on your local instance. You’ll have the same DMO queries that you can use to ascertain the status of your indexes.
SELECT o.name AS ObjectName,
   i.name AS IndexName,
   ddips.avg_fragmentation_in_percent,
   ddips.page_count,
   ddips.compressed_page_count,
   ddips.index_depth,
   ddips.record_count
FROM sys.dm_db_index_physical_stats(DB_ID('MovieManagement'),

OBJECT_ID('dbo.MovieStage'), DEFAULT,
   DEFAULT,
'DETAILED') AS ddips
   JOIN sys.objects AS o
   ON ddips.object_id = o.object_id
   JOIN sys.indexes AS i
   ON ddips.index_id = i.index_id
      AND ddips.object_id = i.object_id;
You can run it with the ‘DETAILED’ option as I have if your indexes aren’t very large; but if you are dealing with a larger index, there’s a good chance that running this might end up getting throttled, so I’d strongly recommend you only use LIMITED or SAMPLED, just in case.
Once you identify an index that is fragmented, you can use the ALTER INDEX command to rebuild it:
ALTER INDEX AgentPK
ON dbo.Agent
REBUILD;
You can even pass in some commands through the WITH statement:
ALTER INDEX AgentPK
ON dbo.Agent
REBUILD
WITH (STATISTICS_NORECOMPUTE = ON);
But, you need to know that some operations require access to the OS, so they won’t be available. These include popular and useful commands like ONLINE or SORT_IN_TEMPDB. You’ll need to think about how you’re planning on doing your index defragmentation because of it.
Statistics
Because, under the covers, this is SQL Server, you’re going to be very dependent on statistics, exactly the same way you should be when working with your local instance. Statistics determine the decisions made by the optimizer and have every bit as much impact on the performance of your queries. While you can’t run consistency checks on the databases (more on that in The No-Go Zone below), that doesn’t mean you can’t use DBCC commands (remember, DBCC doesn’t mean DataBase Consistency Checker any more, but instead DataBase Command Console):
DBCC SHOW_STATISTICS(Agent, AgentPK);The output is exactly the same. And when you decide that your statistics are out of date, your options for updating them are exactly the same too. You can run sp_updatestats or you can issue UPDATE STATISTICS commands. This is just another example of how the things you already know are immediately applicable when working with Azure SQL Database.
Automation
SQL Agent is gone. Well, it’s not available within Azure SQL Database. So, while we have identified a few places where standard database maintenance is going to be helpful and necessary, your simple method of automating this maintenance is gone. In order to automate these processes, you’re going to have to write some code and use a scheduler to run that code from somewhere on your local instances. It’s not neat. Most importantly, and this applies to any code you write around Azure, you can’t count on connectivity, so you need to be sure have very good logic for attempting retries. Microsoft has a good document on the necessary retry logic.
The No-Go Zone
There are a lot of things you just can’t do. They all go back to the fact that you have no access to the underlying server and operating system. You’re not going to be maintaining your log files and log backups. It’s just not a possibility. You also won’t be able to maintain your data files. In general, if you need more files, you’re going to go to Federated databases. You don’t have to worry about the tempdb, at all. You no longer need to sweat excess data within the MSDB either. One that is both great and worrisome, you no longer have to worry about consistency checks. You can’t run consistency checks.
Conclusion
As long as you’re clear about whether your operations are totally within a database or could possibly include operations within the operating system, it’s easy to know which of your maintenance tasks you can perform within Azure SQL Databases. Most of what you already know will transfer smoothly to the cloud, so you should be able to get your job done. Just be ready to supply some code in order to make it all happen.
To learn even more about creating, managing and maintaining Azure SQL Databases, attend the all day pre-conference seminar, How to Be a Successful DBA in the Changing World of Cloud and On-Premise Data, that I’ll be putting on with Tom LaRock and Dandy Weyn at the TechEd conference in New Orleans and again in Madrid, Spain in June 2013.
For other ways to perform some of the maintenance routines on your Azure SQL Databases, be sure to check out Red Gate Software’s Cloud Services offerings.


Full disclosure: I’m a paid contributor to ACloudyPlace and Red Gate Software’s Plain-Talk newsletter.
Rick Saling (@RickAtMicrosoft) wrote These ARE the Androids you've been looking for! on 3/8/2013 (missed when published):
That's the title of my latest post over on Larry Franks' Silver Lining Blog. It deals with using Windows Azure Mobile Services to hook up an Android phone to an Azure back-end data store. And in some cases, to Google Cloud Messaging, in order to enable push notifications. Go check it out! There's a lot of links to tutorials that will get you started. You don't even have to own an Android phone, you can use the device emulator.
If you have read prior posts from me, you may wonder what an enterprise-oriented back end database guy like me is doing messing around with non-Microsoft phones. I have to confess to having always had kind of a technical split personality. I wound up writing the original Accounts Services pages at MSN because I was the only one in our group that knew bits of HTML. And I was very interested in Java, prior to the creation of C#, at a time when there wasn't much scope for that skill inside Microsoft.
I'm also very interested in understanding issues that arise for our open-source oriented customers who want to connect with Windows Azure. Microsoft has put an increasing focus on addressing open source issues in the last 2-3 years or so, it's been an amazing transformation to watch (I will simply confine myself to saying that way back in 1995 when I started contracting here, the attitude towards open source was not a warm one...). Basically I like to get outside the Microsoft culture I've been living in, and try to see things from other perspectives.
In particular, those of us embedded in the Microsoft ecosystem have our ways of doing things with Visual Studio and other tools and languages that don't map automatically to what happens in the open source world. In the Android tutorials, we use open source tools (Eclipse, Google api's, etc), but it is possible that I occasionally do so with a "Visual Studio flavor". We'd like this stuff to be useful to open source developers, so if you are one, and see something that makes you say "well no one I know would do it that way, that's just not how you do things in Eclipse", please let us know! We think our technology is sound, and that it successfully integrates multiple software worlds together, but if something jars you as being "too Microsoft style" or just not the best way to accomplish a task in Eclipse, let me know!


<Return to section navigation list>
Marketplace DataMarket, Cloud Numerics, Big Data and OData
The WCF Data Services Team reported WCF Data Services 5.4.0 Prerelease on 3/26/2013:
Recently we uploaded an RC for our upcoming 5.4.0 release. This release will be NuGet packages only.
What is in the release:
Client deserialization/serialization hooks
We have a number of investments planned in the “request pipeline” area. In 5.4.0 we have a very big set of hooks for reaching into and modifying data as it is being read from or written to the wire format. These hooks provide extensibility points that enable a number of different scenarios such as modifying wire types, property names, and more.
Instance annotations on atom payloads
As promised in the 5.3.0 release notes, we now support instance annotations on Atom payloads. Instance annotations are an extensibility feature in OData feeds that allow OData requests and responses to be marked up with annotations that target feeds, single entities (entries), properties, etc. We do still have some more work to do in this area, such as the ability to annotate properties.
Client consumption of instance annotations
Also in this release, we have added APIs to the client to enable the reading of instance annotations on the wire. These APIs make use of the new deserialization/serialization pipelines on the client (see above). This API surface includes the ability to indicate which instance annotations the client cares about via the Prefer header. This will streamline the responses from OData services that honor the
odata.include-annotationspreference.Simplified transition between Atom and JSON formats
In this release we have bundled a few less-noticeable features that should simplify the transition between the Atom and (the new) JSON format. (See also the bug fixes below on type resolver fixes.)
Bug fixes
In addition to the features above, we have included fixes for the following notable bugs:
- Fixes an issue where reading a collection of complex values would fail if the new JSON format was used and a type resolver was not provided
- Fixes an issue where ODataLib was not escaping literal values in IDs and edit links
- Fixes an issue where requesting the service document with application/json;odata=nometadata would fail
- Fixes an issue where using the new JSON format without a type resolver would create issues with derived types
- (Usability bug) Makes it easier to track the current item in ODataLib in many situations
- Fixes an issue where the LINQ provider on the client would produce $filter instead of a key expression for derived types with composite keys
- (Usability bug) Fixes an issue where the inability to set EntityState and ETag values forced people to detach and attach entities for some operations
- Fixes an issue where some headers required a case-sensitive match on the WCF DS client
- Fixes an issue where 304 responses were sending back more headers than appropriate per the HTTP spec
- Fixes an issue where a request for the new JSON format could result in an error that used the Atom format
- Fixes an issue where it was possible to write an annotation value that was invalid according to the term
- Fixes an issue where PATCH requests for OData v1/v2 payloads would return a 500 error rather than 405
What to expect over the next six months:
We will blog about this in more detail soon, but we have multiple releases planned that have some level of overlap. We should be publishing a 5.5.0 alpha soon (with additional URI parser functionality for Web API’s OData stack) and in a couple of months you should see a very early alpha of 6.0.0. We’re not ready to say much about 6.0.0 yet other than the fact that it will support OData v4 and will probably have some breaking changes, so we want to get it out there as soon as possible because…
We want your feedback
We always appreciate your comments on the blog posts, forums, Twitterverse and e-mail (mastaffo@microsoft.com). We do take your feedback seriously and prioritize accordingly. We would encourage you strongly to start pulling down these early bits, testing with your existing services, and telling us where things break, where we’ve gone too far, and where we haven’t gone far enough.
<Return to section navigation list>
Windows Azure Service Bus, Caching Access Control, Active Directory, Identity and Workflow
Robbin Cremers (@RobbinCremers) described Customizing the Windows Azure Access Controle Service identity providers login page to something feasible in a 3/21/2013 post (missed when published)
About a year ago, I wrote a blog post about how to easily integrate some external identity providers like Facebook, Google, Hotmail into your web application through the Windows Azure Access Control Service (ACS). You can find the information here:
Using Windows Azure Access Control Service to provide a single sign-on experience with popular identity providers
I will not explain what ACS is or what it is used for. You can find all that information in the previous post. The only thing that is different these days is the layout of the Windows Azure portal, which now looks a bit different because of the HTML5 layout. The Windows Azure Access Control itself has not changed, so it shouldn’t be much of a problem to create an ACS namespace and manage it.
As discussed in my previous post about ACS, you can download the ACS login page and customize this within your own web application. Using the identity providers login page hosted on ACS itself is not much of an option to be honest, because it simply doesn’t fit properly into your application. As shown in the previous post, you can download an HTML sample page that will manage the identity providers you have enabled into ACS. This post will prolong onto that specific topic.
When you download the ACS HTML login page, you get an HTML page with a bunch mumbo jumbo javascript in which will just hurt your eyes. By default the login page will look like this:
Making it look like something like this is a bit more feasible:
It will only take you about 3 minutes to generate the layout above, but you’ll need some external tools to do so.
- jQuery: Feature-rich javascript library (http://jquery.com/)
- Bootstrap: Front-end framework for easier web development. You’ll need the bootstrap CSS and JS for the container layout and the tooltip. (http://twitter.github.com/bootstrap/)
- Knockout.js: Managing javascript UI’s with MVVM (http://knockoutjs.com/)
To do so, you will basically have to throw away the entire ACS sample login page. The only thing you’ll need from that page is the location of the ACS script that will load your enabled identity providers for your web application in the Access Control Service. It will look like something like this:
https://mynamespace.accesscontrol.windows.net/v2/metadata/IdentityProviders.js?
protocol=wsfederation&realm=http%3a%2f%2flocalhost%3a50029%2f&
reply_to=&context=&request_id=&version=1.0&callback=showSigninPageTake the location of the script and put it in your web.config appSettings and give it a name like ’AcsLoginPageIdentityProvidersScript’. Change the callback function name:
The HTML you need to show your ACS identity providers like the image shown above will look like this:
Basically it will generate a list of enabled ACS identity providers through knockoutjs template binding. If you don’t know about knockoutjs, you can find the documentation and tutorials on the website of knockoutjs. The data-bind attributes and the script are being used by knockoutjs to databind the JSON results to the web page.
The javascript will look like this:
Notice the callbackIdentityProviders function. This is the function that will be called when the ACS script has been loaded. The script will query ACS which identity providers are enabled for your application and it will return these returns in JSON. These results are passed on through a callback function, which you can define through the callback parameter in the script url. In our the callbackIdentityProviders function will be triggered when the results are retrieved from ACS and a JSON result will be passed on to this function, containing the information we need about the identity providers.
Basically we will parse the returned JSON (enabled identity providers) from ACS to our own identityProvider class and we will map the list of identity providers to the knockout.js template. Within the /Images/user/ folder I have the following images:
Due to the computed imageUrl function we created with knockoutjs, in the knockout template we can bind this imageUrl to the image source.
To attach the tooltip to the identity providers, you can use some of the bootstrap functionality:
You add the data-toggle=’tooltip’ attribute to the item you want to use the tooltip for, through knockoutjs we databind the name of the identity provider to the title attribute of the image, which is being used for the tooltip. Finally we attach the tooltip on the identity provider images through javascript. You can also find all this in the bootstrap documentation.
After having logged in with an external identity provider, you will be returned to your root page defined in your relying party application in ACS. If you want your user to return to a specific page, you can change the reply_to parameter in the script url. In your web.config you can add a placeholder for the reply_to parameter and change the parameter in your view depending on where you want to customer to be redirected to after being logged in at the identity provider:
The only thing you have to make sure of is that the url you place in the reply_to parameter is url-encoded or you’ll have an invalid request to ACS.
Yes, the example code is a bit robust and could be improved. If you found this information useful, make sure to support me by leaving a comment.


Abishek Lal (@AbhishekRLal) described Receiving messages using NetMessagingBinding with custom formats in a 3/15/2013 post (missed when published):
As a follow up to my earlier post on Formatting the content for Service Bus messages where we walked through the BrokeredMessage APIs that allow you to have custom formats for message content, I wanted to cover how you can use NetMessagingBinding (WCF) to receive such messages. This scenario would be relevant when your clients/senders are using REST API or non-.NET SDKs like Java, Python, PHP and Node.js and you server/receivers want to use WCF to process the messages.
NetMessagingBinding always builds a channel stack with BinaryMessageEncodingBindingElement+NetMessagingTransportBindingElement. If the BrokeredMessages in your ServiceBus Queue/Subscription are plain text, xml, then BinaryMessageEncoding won’t work, using WCF you’d have use a CustomBinding with TextMessageEncoder and NetMessagingTransportBindingElement instead.
You need to use a CustomBinding with TextMessageEncodingBindingElement (with MessageVersion = None) and a NetMessagingTransportBindingElement, make sure Action=”*”, and set AddressFilterMode=Any on your ServiceBehavior.
Here are two ways to read a plain XML message using NetMessagingTransportBindingElement:
Solution #1 Use System.ServiceModel.Channels.Message in the ServiceContract and call Message.GetBody()
namespace MessagingConsole
{
    static class Constants {
        public const string ContractNamespace = "http://contoso";
    }

    [DataContract(Namespace = Constants.ContractNamespace)]
    class Record
    {
        [DataMember]
        public string Id { get; set; }
    }

    [ServiceContract]
    interface ITestContract
    {
        [OperationContract(IsOneWay = true, Action="*")]
        void UpdateRecord(Message message);
    }

    [ServiceBehavior(
        AddressFilterMode = AddressFilterMode.Any)] // This is another way to avoid “The message with To ” cannot be processed at the receiver…”
    class TestService : ITestContract
    {
        [OperationBehavior]
        public void UpdateRecord(Message message)
        {
            Record r = message.GetBody<Record>();
            Console.WriteLine("UpdateRecord called! " + r.Id);
        }
    }

    class ServiceProgram
    {
        static void Main(string[] args)
        {
            string connectionString = "Endpoint=sb://<Service Bus connection string from Azure portal>";
            string topicPath = "Topic2";
            string subscriptionName = "Sub0";

            MessagingFactory factory = MessagingFactory.CreateFromConnectionString(connectionString);
            TopicClient sender = factory.CreateTopicClient(topicPath);
            SubscriptionClient receiver = factory.CreateSubscriptionClient(topicPath, subscriptionName, ReceiveMode.ReceiveAndDelete);

            string interopPayload = "<Record xmlns='" + Constants.ContractNamespace + "'><Id>4</Id></Record>";
            BrokeredMessage interopMessage = new BrokeredMessage(new MemoryStream(Encoding.UTF8.GetBytes(interopPayload)), true);
            sender.Send(interopMessage);

            CustomBinding binding = new CustomBinding(
                new TextMessageEncodingBindingElement { MessageVersion = MessageVersion.None },
                new NetMessagingTransportBindingElement());
            ServiceHost serviceHost = new ServiceHost(typeof(TestService), new Uri(solution));
            ServiceEndpoint endpoint = serviceHost.AddServiceEndpoint(typeof(ITestContract), binding, topicPath + "/Subscriptions/" + subscriptionName);
            endpoint.Behaviors.Add(new TransportClientEndpointBehavior(tokenProvider));
            serviceHost.Open();
            Console.WriteLine("Service is running");
            Console.ReadLine();
        }
    }
}
Solution #2 Define a MessageContract data type to make the expected Soap contract match what the interop client is sending:
namespace MessagingConsole
{
    static class Constants
    {
        public const string ContractNamespace = "http://contoso";
    }

    [DataContract(Namespace = Constants.ContractNamespace)]
    class Record
    {
        [DataMember]
        public string Id { get; set; }
    }

    [MessageContract(IsWrapped=false)]
    class RecordMessageContract
    {
        [MessageBodyMember(Namespace = Constants.ContractNamespace)]
        public Record Record { get; set; }
    }

    [ServiceContract]
    interface ITestContract
    {
        [OperationContract(IsOneWay = true, Action="*")]
        void UpdateRecord(RecordMessageContract recordMessageContract);
    }

    class ServiceProgram
    {
        static void Main(string[] args)
        {
            string connectionString = "Endpoint=sb://<Service Bus connection string from Azure portal>"
            MessagingFactory factory = MessagingFactory.CreateFromConnectionString(connectionString);
            TopicClient sender = factory.CreateTopicClient(topicPath);
            SubscriptionClient receiver = factory.CreateSubscriptionClient(topicPath, subscriptionName, ReceiveMode.ReceiveAndDelete);

            string interopPayload = "<Record xmlns='" + Constants.ContractNamespace + "'><Id>5</Id></Record>";
            BrokeredMessage interopMessage = new BrokeredMessage(new MemoryStream(Encoding.UTF8.GetBytes(interopPayload)), true);
            sender.Send(interopMessage);

            CustomBinding binding = new CustomBinding(
                new TextMessageEncodingBindingElement { MessageVersion = MessageVersion.None },
                new NetMessagingTransportBindingElement());
            ServiceHost serviceHost = new ServiceHost(typeof(TestService), new Uri(solution));
            ServiceEndpoint endpoint = serviceHost.AddServiceEndpoint(typeof(ITestContract), binding, topicPath + "/Subscriptions/" + subscriptionName);
            endpoint.Behaviors.Add(new TransportClientEndpointBehavior(tokenProvider));
            serviceHost.Open();
            Console.WriteLine("Service is running");
            Console.ReadLine();
        }
    }

    [ServiceBehavior(
        AddressFilterMode = AddressFilterMode.Any
        )]
    class TestService : ITestContract
    {
        [OperationBehavior]
        public void UpdateRecord(RecordMessageContract recordMessageContract)
        {
            Record r = recordMessageContract.Record;
            Console.WriteLine("UpdateRecord called! " + r.Id);
        }
    }
}


<Return to section navigation list>
Windows Azure Virtual Machines, Virtual Networks, Web Sites, Connect, RDP and CDN
Brady Gaster (@bradygaster) explained Running SSL with Windows Azure Web Sites Today on 3/29/2013:
If you’re a web developer working with ASP.NET, Node.js, PHP, Python, or you have plans on building your site in C++, Windows Azure Web Sites is the best thing since sliced bread. With support for virtually every method of deployment and with support for most of the major web development models you can’t beat it. Until recently, SSL was the only question mark for a lot of web site owners, as WAWS doesn’t yet support SSL out of the box (trust me, it’s coming, I promise). The good news is that there’s a method of achieving SSL-secured sites now. In this blog post I’ll introduce the idea of a workaround my engineering friends in the Web Sites team call the SSL Forwarder, and to demonstrate how you can get up and running with an SSL-protected Windows Azure-hosted web site in just a few minutes’ work.
Disclaimer
First, I’d like to point out one very important point about the SSL Forwarder solution. This solution works, and we have a handful of community members actively using this solution to provide an SSL front-end for their web sites. So feel comfortable using it, but understand that this isn’t something you’ll have to do forever, as SSL is indeed coming as an in-the-box feature for Web Sites. If you love the idea of Windows Azure Web Sites but the lack of in-the-box SSL support is a deal-breaker for you and your organization, this is a viable option to get you up and running now. However, the SSL Forwarder isn’t an officially supported solution, in spite of one being actively used by numerous customers. So if you set this up and you experience anything weird, feel free to contact me directly via the comment form below, or on Twitter, or by email (and I’ll give you my email address on Twitter if you need it). All that being said, I’ve heard from quite a few in the community who are using this solution that it has mitigated their concern and they appear to be running quite well with this in place.
Architectural Overview
Don’t panic when you see this solution. Do read the introduction, once you see grok how it all works, the SSL Forwarding solution is a whole lot less intimidating. I admit to having freaked out with fear when I first saw this. I’m no expert at most of the things involved in this exercise, but the Web Sites team literally put together a “starter project” for me to use, and it took me 1 hour to get it working. If I can do this, you can do this.
The idea of the SSL Forwarder is pretty simple. You set up a Cloud Service using the Windows Azure portal that redirects traffic to your Windows Azure Web Site. You can use all the niceties of Web Sites (like Git deployment, DropBox integration, and publishing directly to your site using Visual Studio or WebMatrix) to actually build your web site, but the requests actually resolve to your Cloud Service endpoint, which then proxies HTTP traffic into your Web Site.
The diagram to the right shows how this solution works, at a high level. The paragraph below explains it in pretty simple terms. I think you’ll agree that it isn’t that complicated and that the magic that occurs works because of tried-and-true IIS URL Rewrite functionality. In order to obtain the 99.9% uptime as outlined in the Windows Azure SLA, you’ll need to deploy at least 2 instances of the Cloud Service, so the diagram shows 2 instances running. As well, the code provided with this blog post as a starting point is defaulted to start 2 instances. You can back this off or increase it however you want, but the 99.9% uptime is only guaranteed if you deploy the Cloud Service in 2 instances or more (and there’s no SLA in place yet for Web Sites, since it’s still in preview at the time of this blog post’s release, so you can host your Web Site on as many or as few instances as you like).
You map your domain name to your Cloud Service. Traffic resolves to the Cloud Service, and is then reverse-proxied back to your Web Site. The Cloud Service has 1 Web Role in it, and the Web Role consists of a single file, the Web.config file. The Web.config in the Web Role contains some hefty IISRewrite rules that direct traffic to the Web Site in which your content is hosted. In this way, all traffic – be it HTTP or HTTPS traffic – comes through the Cloud Service and resolves onto the Web Site you want to serve. Since Cloud Services support the use of custom SSL certificates, you can place a certificate into the Cloud Service, and serve up content via an HTTPS connection.
Setup
To go along with this blog post, there’s a GitHub.com repository containing a Visual Studio 2012 solution you can use to get started. This solution contains three projects:
- A Windows Azure Cloud Project
- A web site that’s used as a Web Role for the Cloud Project
- A web site that’s deployed to Windows Azure Web Sites (you’ll want to replace this one with the project you’re deploying or just remove it, it’s just there as part of the sample)
Create the Cloud Service and Web Site
First thing is, I’ll need to create a Web Site to host the site’s code. Below is a screen shot of me creating a simple web site myself using the Windows Azure portal.
Obviously, I’ll need to create a Windows Azure Cloud Service, too. In this demo, I’ll be using a new Cloud Service called SSLForwarder, since I’m not too good at coming up with funky names for things that don’t end in a capital R (and when I do, Phil teases me, so I’ll spare him the ammunition). Below is another screen shot of the Windows Azure portal, with the new Cloud Service being created.
If you’re following along at home work, leave your browser open when you perform the next step, if you even need to perform the next step, as it is an optional one.
Create a Self-signed Certificate
This next step is optional, and only required if you don’t already have an SSL certificate in mind that you’d like to use. I’ll use the IIS Manager to create my own self-signed certificate. In the IIS Manager I’ll click the Server Certificates applet, as shown below.
When I browse this site secured with this certificate, there’ll be an error message in the browser informing me that this cert isn’t supposed to be used by the domain name from where it’s being served. Since you’ll be using a real SSL certificate, you shouldn’t have to worry about that error when you go through this process (and I trust you’ll forgive a later screen shot where the error is visible).
Once that applet loads up in the manager, I’ll click the link in the actions pane labeled Create Self-Signed Certificate.
I’ll name my certificate SSLForwarderTesting, and then it appears in the list of certificates I have installed on my local development machine. I select that certificate from the list and click the link in the Actions pane labeled Export to save the cert somewhere as a file.
Then I find the location where I’ll save the file and provide it with a password (which I’ll need to remember for the next step).
Now that this [optional] step is complete I have a *.PFX file I can use to install my certificate in the Cloud Service.
Install the SSL Certificate into a Cloud Service
To activate SSL on the Cloud Service I’ll need to install an SSL certificate into the service using the Windows Azure portal. Don’t panic, this is easier than it sounds. Promise. Five minutes, tops.
Back in my browser, on the Windows Azure portal page, I’ll click the Cloud Service that’ll be answering HTTP/S requests for my site. The service’s dashboard page will open up.
I’ll click the Certificates tab in the navigation bar.
I’m going to want to upload my certificate, so this next step should be self-explanatory.
The next dialog gives me a pretty hard-to-screw-up dialog. Unless I forgot that password.
(cue the sound of hands ruffling through hundreds of post-its)
Once the certificate is uploaded, I’ll click the new cert and copy the thumbprint to my clipboard, maybe paste it into Notepad just for the moment…
Configuring the Cloud Service’s SSL Certificate
With the SSL cert installed and the thumbprint copied, I’ll open up the ServiceConfiguration.cloud.cscfg file in Visual Studio 2012 and set the thumbprint’s configuration. I could also do this using the built-in Windows Azure tools in Visual Studio, but since I’ve got the thumbprint copied this is just as easy to do directly editing the files. Plus, the Web Sites team made it pretty obvious where to put the thumbprint, as you’ll see from the screen shot below.
Configuring the URL Rewrite Rules in the Web Role
Remember the architectural overview from earlier. The main thing this Cloud Service does is to answer HTTP/S requests and then reverse-proxy that traffic back to the Web Site I’m happily hosting in Windows Azure. Setting up this proxy configuration isn’t too bad, especially when I’ve got the code the team handed me. I just look for all the places in the Web.config file from the Web Role project that mentions foo.com or foo.azurewebsites.net or foo…well, you get the idea.
Here’s the Web.config file from the Web Role project before I edit it to comply with the Web Site and Cloud Service I created to demonstrate this solution open in Visual Studio 2012. I’ve marked all the spots you’ll need to change in the screen shot.
Here’s the file after being edited. Again, I’ll indicate the places where I made changes.
Now that the Cloud Service and the Web.config file of the Web Role project’s been configured to redirect traffic to another destination, the proxy is ready for deployment. The solution’s Cloud project is defaulted to run at 2 instances, so that’s something you’ll want to remember – you’ll be paying for 2 instances of the Cloud Service you’ll be using to forward HTTP/S traffic to your Web Site.
Publish the Cloud Service
Within Visual Studio 2012, I right-click the Cloud project and select the Publish context menu item.
A dew dialogs will walk me through the process of publishing the SSLForwarder service into Windows Azure. It may take a few minutes to complete, but once it publishes the Cloud Service will be running in your subscription and ready to respond to HTTP/S requests.
To verify everything’s working, try hitting the Cloud Service URL – in my case sslforwarder.cloudapp.net, to see if it’s answering requests or spewing errors about unreachable hosts, either of which wouldn’t be surprising – we’ve redirected the Cloud Service’s Web Role to a Web Site. That web site probably isn’t set up yet, so you could see some unpredictable results.
If you actually pre-configured your SSLForwarder Cloud Service to direct traffic to a *.azurewebsites.net you’re already running you’re pretty much finished, and you’re probably running behind HTTPS without any problems right now. If not, and the idea of publishing Web Sites from Visual Studio is new to you, you’ll have a chance to use that technique here.
Publish a Windows Azure Web Site
I’ll go back into the Windows Azure portal and go specifically to the SSLForwarder Web Site I created earlier on in the post.
Once the site’s dashboard opens up, I’ll find the link labeled download publishing profile. This file will be used by Visual Studio during publishing to make the process very simple.
Publishing and Browsing an SSL-encrypted Web Site
Once the publish settings file has been downloaded, it’s easy to push the site to Web Sites using Visual Studio 2012 or WebMatrix. With the sample project provided I’ll open up the Web Application project I want to publish to Web Sites. Then, I’ll right-click the web site project and select the Publish menu item.
Then, the publish process will make the remainder of the publishing experience pretty simple.
Remember to thank Sayed Hashimi if you need him out and about, he loves to hear thoughts on publishing and uses suggestions to make the experience an improved one for you. He also has a stupendous team of people working with him to execute great publishing experiences, who love feedback.
The publish process dialogs will walk you through the simple act of publishing your site up to Windows Azure. Once it completes (which usually takes 30-60 seconds for a larger site) the site will open up in a web browser.
Note the URL still shows HTTP, and it also shows the URL of the Windows Azure Web Site you created. You’ll need to manually enter in the URL for the Cloud Service you created.
For me, that’s www.sslforwarder.com. So long as the domain name you enter resolves to Cloud Service you should be alright. You can also opt for the *.cloudapp.net approach too, as the domain name of the site you want to put out. Whatever your preference for solving this particular issue.
I’m going to go ahead and change the domain name and the protocol, so our hit to the site being hosted in Web Sites will respond to it receiving an SSL-encrypted request, then load the site in the browser.
Note – this is when you’ll need to forgive me for showing you something that causes a warning in the browser. It’s just that way since I used a self-signed cert in a Windows Azure service, so we should expect to see an error here. It’s right there in the browser’s address bar, where it says “Certificate Error.” If I’d used a real SSL cert, from a real authority, the error wouldn’t be there.
Summary
So for many months I’ve heard users request SSL on Web Sites, saying everything about it is awesome. Then they stare at me and wait about 3 seconds and usually follow it up with “but you’ve gotta get me SSL man, I’m over here and I gotta have my SSL”. I understand their desire for us to support it, and luckily, the Web Sites team and our engineering organization is so willing to share their solutions publicly. This is a great solution, but it won’t work in every situation and isn’t as good as what the Web Sites teams have in plans for the future. The SSL Forwarder solution is a good stop-gap, a good temporary solution to a problem we’ve had a lot of requests about.
Hopefully this helps in your decision to give Windows Azure Web Sites a shot. If SSL has been your sole reason for not wanting to give it a try, now you have a great workaround in place that you can facilitate to get started right now.


Maarten Balliauw (@MaartenBalliauw) described Running unit tests when deploying ASP.NET to Windows Azure Web Sites in a 3/26/2013 post:
One of the well-loved features of Windows Azure Web Sites is the fact that you can simply push our ASP.NET application’s source code to the platform using Git (or TFS or DropBox) and that sources are compiled and deployed on your Windows Azure Web Site. If you’ve checked the management portal earlier, you may have noticed that a number of deployment steps are executed: the deployment process searches for the project file to compile, compiles it, copies the build artifacts to the web root and has your website running. But did you know you can customize this process?
Customizing the build process
To get an understanding of how to customize the build process, I want to explain you how this works. In the root of your repository, you can add a .deployment file, containing a simple directive: which command should be run upon deployment.
1 [config]
2 command = build.bat
This command can be a batch file, a PHP file, a bash file and so on. As long as we can tell Windows Azure Web Sites what to execute. Let’s go with a batch file.
1 @echo off
2 echo This is a custom deployment script, yay!
When pushing this to Windows Azure Web Sites, here’s what you’ll see:
In this batch file, we can use some environment variables to further customize the script:
DEPLOYMENT_SOURCE - The initial "working directory"
- DEPLOYMENT_TARGET - The wwwroot path (deployment destination)
- DEPLOYMENT_TEMP - Path to a temporary directory (removed after the deployment)
- MSBUILD_PATH - Path to msbuild
After compiling, you can simply xcopy our application to the %DEPLOYMENT_TARGET% variable and have your website live.
Generating deployment scripts
Creating deployment scripts can be a tedious job, good thing that the azure-cli tools are there! Once those are installed, simply invoke the following command and have both the .deployment file as well as a batch or bash file generated:
1 azure site deploymentscript --aspWAP "path\to\project.csproj"
For reference, here’s what is generated:
 1 @echo off
 2
 3 :: ----------------------
 4 :: KUDU Deployment Script
 5 :: ----------------------
 6
 7 :: Prerequisites
 8 :: -------------
 9
10 :: Verify node.js installed
11 where node 2>nul >nul
12 IF %ERRORLEVEL% NEQ 0 (
13   echo Missing node.js executable, please install node.js, if already installed make sure it can be reached from current environment.
14   goto error
15 )
16
17 :: Setup
18 :: -----
19
20 setlocal enabledelayedexpansion
21
22 SET ARTIFACTS=%~dp0%artifacts
23
24 IF NOT DEFINED DEPLOYMENT_SOURCE (
25   SET DEPLOYMENT_SOURCE=%~dp0%.
26 )
27
28 IF NOT DEFINED DEPLOYMENT_TARGET (
29   SET DEPLOYMENT_TARGET=%ARTIFACTS%\wwwroot
30 )
31
32 IF NOT DEFINED NEXT_MANIFEST_PATH (
33   SET NEXT_MANIFEST_PATH=%ARTIFACTS%\manifest
34
35   IF NOT DEFINED PREVIOUS_MANIFEST_PATH (
36     SET PREVIOUS_MANIFEST_PATH=%ARTIFACTS%\manifest
37   )
38 )
39
40 IF NOT DEFINED KUDU_SYNC_COMMAND (
41   :: Install kudu sync
42   echo Installing Kudu Sync
43   call npm install kudusync -g --silent
44   IF !ERRORLEVEL! NEQ 0 goto error
45
46   :: Locally just running "kuduSync" would also work
47   SET KUDU_SYNC_COMMAND=node "%appdata%\npm\node_modules\kuduSync\bin\kuduSync"
48 )
49 IF NOT DEFINED DEPLOYMENT_TEMP (
50   SET DEPLOYMENT_TEMP=%temp%\___deployTemp%random%
51   SET CLEAN_LOCAL_DEPLOYMENT_TEMP=true
52 )
53
54 IF DEFINED CLEAN_LOCAL_DEPLOYMENT_TEMP (
55   IF EXIST "%DEPLOYMENT_TEMP%" rd /s /q "%DEPLOYMENT_TEMP%"
56   mkdir "%DEPLOYMENT_TEMP%"
57 )
58
59 IF NOT DEFINED MSBUILD_PATH (
60   SET MSBUILD_PATH=%WINDIR%\Microsoft.NET\Framework\v4.0.30319\msbuild.exe
61 )
62
63 ::::::::::::::::::::::::::::::::::::::::::::::::::::::::::::::::::::::::::::::::::::::::::::::::::::::::::::::::::::::::::::::::::
64 :: Deployment
65 :: ----------
66
67 echo Handling .NET Web Application deployment.
68
69 :: 1. Build to the temporary path
70 %MSBUILD_PATH% "%DEPLOYMENT_SOURCE%\path.csproj" /nologo /verbosity:m /t:pipelinePreDeployCopyAllFilesToOneFolder /p:_PackageTempDir="%DEPLOYMENT_TEMP%";AutoParameterizationWebConfigConnectionStrings=false;Configuration=Release
71 IF !ERRORLEVEL! NEQ 0 goto error
72
73 :: 2. KuduSync
74 echo Kudu Sync from "%DEPLOYMENT_TEMP%" to "%DEPLOYMENT_TARGET%"
75 call %KUDU_SYNC_COMMAND% -q -f "%DEPLOYMENT_TEMP%" -t "%DEPLOYMENT_TARGET%" -n "%NEXT_MANIFEST_PATH%" -p "%PREVIOUS_MANIFEST_PATH%" -i ".git;.deployment;deploy.cmd" 2>nul
76 IF !ERRORLEVEL! NEQ 0 goto error
77
78 ::::::::::::::::::::::::::::::::::::::::::::::::::::::::::::::::::::::::::::::::::::::::::::::::::::::::::::::::::::::::::::::::::
79
80 goto end
81
82 :error
83 echo An error has occured during web site deployment.
84 exit /b 1
85
86 :end
87 echo Finished successfully.
88
This script does a couple of things:
- Ensure node.js is installed on Windows Azure Web Sites (needed later on for synchronizing files)
- Setting up a bunch of environment variables
- Run msbuild on the project file we specified
- Use kudusync (a node.js based tool, hence node.js) to synchronize modified files to the wwwroot of our site
Try it: after pushing this to Windows Azure Web Sites, you’ll see the custom script being used. Not much added value so far, but that’s what you have to provide.
Unit testing before deploying
Unit tests would be nice! All you need is a couple of unit tests and a test runner. You can add it to your repository and store it there, or simply download it during the deployment. In my example, I’m using the Gallio test runner because it runs almost all test frameworks, but feel free to use the test runner for NUnit or xUnit instead.
Somewhere before the line that invokes msbuild and ideally in the “setup” region of the deployment script, add the following:
 1 IF NOT DEFINED GALLIO_COMMAND (
 2   IF NOT EXIST "%appdata%\Gallio\bin\Gallio.Echo.exe" (
 3     :: Downloading unzip
 4     echo Downloading unzip
 5     curl -O http://stahlforce.com/dev/unzip.exe
 6     IF !ERRORLEVEL! NEQ 0 goto error
 7
 8     :: Downloading Gallio
 9     echo Downloading Gallio
10     curl -O http://mb-unit.googlecode.com/files/GallioBundle-3.4.14.0.zip
11     IF !ERRORLEVEL! NEQ 0 goto error
12
13     :: Extracting Gallio
14     echo Extracting Gallio
15     unzip -q -n GallioBundle-3.4.14.0.zip -d %appdata%\Gallio
16     IF !ERRORLEVEL! NEQ 0 goto error
17   )
18
19   :: Set Gallio runner path
20   SET GALLIO_COMMAND=%appdata%\Gallio\bin\Gallio.Echo.exe
21 )
See what happens there? We check if the local system on which your files are stored in WindowsAzure Web Sites already has a copy of the Gallio.Echo.exetest runner. If not, let’s download a tool which allows us to unzip. Next, the entire Gallio test runner is downloaded and extracted. As a final step, the %GALLIO_COMMAND% variable is populated with the full path to the test runner executable.
Right before the line that calls “kudusync”, add the following:
1 echo Running unit tests
2 "%GALLIO_COMMAND%" "%DEPLOYMENT_SOURCE%\SampleApp.Tests\bin\Release\SampleApp.Tests.dll"
3 IF !ERRORLEVEL! NEQ 0 goto error
Yes, the name of your test assembly will be different, you should obviously change that. What happens here? Well, we’re invoking the test runner on our unit tests. If it fails, we abort deployment. Push it to Windows Azure and see for yourself. Here’s what is displayed on success:
All green! And on failure, we get:
In the portal, you can clearly see that deployment was aborted:
That’s it. Enjoy!


<Return to section navigation list>
Live Windows Azure Apps, APIs, Tools and Test Harnesses
![]() No significant articles today
No significant articles today

<Return to section navigation list>
Visual Studio LightSwitch and Entity Framework 4.1+
Chris Rummel described Using SharePoint Lists as LightSwitch Entities and with CSOM in a 3/28/2013 post to the LightSwitch Team blog:
Hi, I’m Chris Rummel, a tester on the LightSwitch team. I work mostly on SharePoint features. Brian has already gone over a lot of the benefits of SharePoint development with LightSwitch in his article A quick & easy LightSwitch app for SharePoint. In this post I wanted to go a little more in depth on using SharePoint data like lists in LightSwitch. If you haven’t read his article I encourage you to do so first.
Lists as Entities
Brian already covered attaching to a SharePoint list and modeling its entities in a SharePoint-enabled LightSwitch application. There's more than that though - you can attach to an on-premises SharePoint site in any LightSwitch app using either a given username and password (so you could lock down the list so that only your LightSwitch app has access to it), or as the user using the LightSwitch app.
If you enable SharePoint in your LightSwitch application you’re indicating to LightSwitch that the app should be deployed to SharePoint and can work with SharePoint assets. You do this on the SharePoint Properties page:
If you point at an Office 365 site, you can also attach to lists on that Office 365 site, but only by letting LightSwitch choose the user identity for you. At runtime, this is whoever launched the app from SharePoint. While debugging, this is probably you or your test account. So if you see an error message like “[…] does not appear to be a valid site. SharePoint 2010 (or later) with an installation of WCF Data Services is required” when attempting to attach to a list on Office 365, then the problem is likely to be either SharePoint not being enabled, not using automatic identity, or you’re trying to attach to a different site than the one specified in the SharePoint properties. If you are deploying to an Office 365 site, then that’s the only Office 365 site you can attach to with LightSwitch.
So what’s the advantage of using SharePoint lists as entities? You can now treat the list data like any other LightSwitch data source – including using custom code in the save pipeline. So using Brian’s example, after we add the customer list to the site, let’s make a few changes. When a customer calls in, if one of our sales reps recently talked to them about something we’d like to be able to direct them to that same representative – they know the most about what’s going on and the customer will probably be more comfortable talking to them. So let’s edit the list a bit. Click on the Customers app tile and then on “Edit this list”:
Click on the add column plus sign, and then select “Date or Time”:
Call this column “Last Contact Date”. Then add another column, this time a String called “Last Contact Person”. Your list should look something like this:
Then select “Stop editing this list”. Back in LightSwitch, if you already added the SharePoint site as a data source, right-click on it and select “Update Datasource”:
And just click “Finish”. Then you can open up the Customer entity and see the new fields:
While we’re here, if you haven’t already changed the summary property of the Customer to be “FirstName”, now is a good time to do so. This will make LightSwitch show the customer's first name in summary view that is used by default when you add a screen. Be sure to click on the Client view button first:
Since we’re keeping track of our customer calls, let’s make a table for that. Mine looks something like this:
That is; I added a new table with the name “CustomerCall”, and then added a relationship to the Customer list:
Then I added some additional fields. Type is a choice list with the options of Refund, Purchase, Quote, and Other:
I also added ContactPerson for the person who talked to the customer and Notes for any general information. We’ll keep this screen simple, just a Browse screen for CustomerCalls with an AddAndEditNew button sending us to an AddEditCustomerCall dialog.
So far this really isn’t anything new, but now let’s open up the CustomerCall entity again and write some code. Drop down the “Write Code” button at the top of the Data Designer and select the Inserting method:
Then we can add this code:
(C#)
partial void CustomerCalls_Inserting(CustomerCall entity)
{
entity.Customer.LastContactDate = DateTime.Now;
entity.Customer.LastContactPerson = entity.ContactPerson;
ServerApplicationContext.Current.DataWorkspace.SharePoint_SiteData.SaveChanges();
}(Visual Basic)
Private Sub CustomerCalls_Inserting(entity As CustomerCall)
 entity.Customer.LastContactDate = DateTime.Now
 entity.Customer.LastContactPerson = entity.ContactPerson
 ServerApplicationContext.Current.DataWorkspace.SharePoint_SiteData.SaveChanges()
End Sub
Note that you'll have to change the highlighted portion to match your data source name.
Now we can F5 the project and log a new customer call:
Then if you go back to your Customer list you should see something like this:
A pretty simple example, but it’s cool to see that SharePoint lists work a lot like every other entity type in LightSwitch. We’ll do more like this in just a bit.
List Manipulation with CSOM
But let’s say the simple life is not for you. If you want to be able to control every aspect of how LightSwitch is interfacing with SharePoint, you have access to the SharePoint Client-Side Object Model (CSOM). One scenario this might come up in is a SharePoint-enabled LightSwitch app – you can add SharePoint lists to your project, but LightSwitch can’t attach to them because they don’t actually exist until the app is installed on a SharePoint site.
Building off Brian’s app again, we have Browse and Edit Customer screens already. Customer information is sensitive, so we’re going to audit any changes to it. Let’s add a list to our SharePoint project to capture this information.
Note that you may not want to do it this way - lists you add to your SharePoint project belong to the app web, which means they are created when the app is installed with the LightSwitch application and deleted when it is uninstalled, losing all the data. This is different from the Customers list – which belongs to the host web and isn't related to a specific app. MSDN has more information here on Host webs, app webs, and SharePoint components in SharePoint 2013.
This is just an example though, so we won't worry about keeping this data forever. Switch to file view in project explorer, right-click on your SharePoint project, and select Add –> New Item:
“List” should be selected by default here; name it “AuditEntry” and click “Add”. On the next screen LightSwitch will ask you what kind of list you want. An audit log isn’t one of the defaults, so leave it as “Default (Custom List)” and we’ll set it up ourselves:
The list columns design will come up next. Here we’ll want to add a Number field for the Customer ID of the customer being changed, a Text field for the user making the change, Date that the change happened, and a text field for the action taken:
If you try to update the SharePoint data source now, you wouldn’t see this list, because it doesn’t exist on the site until the project is either F5’d or deployed from a published SharePoint app package. But CSOM will let us work with it anyway! Open up the Customer entity and choose to write an Updating method:
Fill in your SharePoint_SiteDataService class (or whatever name you chose again) like so:
(C#)
using Microsoft.SharePoint.Client;
public partial class SharePoint_SiteDataService
{
partial void Customers_Updating(Customer entity)
{
LogAuditEntry(entity, "Update");
}partial void Customers_Deleting(Customer entity)
{
LogAuditEntry(entity, "Delete");
}private void LogAuditEntry(Customer entity, string actionDescription)
{
using (ClientContext ctx = Application.SharePoint.GetAppWebClientContext())
{
Web web = ctx.Web;
ListCollection lists = web.Lists;
List auditLog = lists.GetByTitle("AuditEntry");
ListItemCreationInformation ci = new ListItemCreationInformation();
ListItem auditEntry = auditLog.AddItem(ci);
auditEntry["Title"] = "Audit entry";
auditEntry["CustomerID1"] = entity.Id;
auditEntry["User1"] = Application.User.FullName;
auditEntry["Date1"] = DateTime.Now;
auditEntry["Action"] = actionDescription;
auditEntry.Update();
ctx.ExecuteQuery();
}
}
}(Visual Basic)
Imports Microsoft.SharePoint.Client


Public Class SharePoint_SiteDataService
 Private Sub Customers_Updating(entity As Customer)
 LogAuditEntry(entity, "Update")
 End Sub
Private Sub Customers_Deleting(entity As Customer)
LogAuditEntry(entity, "Delete")
End Sub
Private Sub LogAuditEntry(entity As Customer, actionDescription As String)
Using ctx As ClientContext = Application.SharePoint.GetAppWebClientContext()
Dim web As Web = ctx.Web
Dim lists As ListCollection = Web.Lists
Dim auditLog As List = lists.GetByTitle("AuditEntry")
Dim ci As New ListItemCreationInformation()
Dim auditEntry As ListItem = auditLog.AddItem(ci)
auditEntry("Title") = "Audit entry"
auditEntry("CustomerID1") = entity.Id
auditEntry("User1") = Application.User.FullName
auditEntry("Date1") = DateTime.Now
auditEntry("Action") = actionDescription
auditEntry.Update()
ctx.ExecuteQuery()
End Using
End Sub
End ClassNow if you F5 your project again and make a change to a customer, this is written out into the list that we added to the SharePoint project – when you F5’d, LightSwitch deployed your project to SharePoint, which includes creating items that you’ve added to the SharePoint project. Now where is the list? Take your SharePoint site URL, including the Developer site collection name if you have one, then add your app name and “/Lists/AuditEntry”. For example, https://example.sharepoint.com/sites/Developer/ListAttachDemo/Lists/AuditEntry is mine. This will look something like this:
So we can use lists outside of LightSwitch’s list attach too. The other thing you may have noticed is the inconsistent column names for the list entry – “User1” vs. just plain “Action”. I wanted to mention this since it stumped me at first – the column name SharePoint shows either in the list designer or on the web is sometimes misleading. If you use a column name that SharePoint also thinks of as a type name or other reserved word, it’ll append a number to disambiguate. So how do you know what the real column name is? I use this:
(C#)
using (ClientContext ctx = Application.SharePoint.GetAppWebClientContext())
{
Web web = ctx.Web;
ListCollection lists = web.Lists;
List auditLog = lists.GetByTitle("AuditEntry");
ctx.Load(auditLog.Fields);
ctx.ExecuteQuery();
}(Visual Basic)
Using ctx As ClientContext = Application.SharePoint.GetAppWebClientContext()
 Dim web As Web = ctx.Web
 Dim lists As ListCollection = Web.Lists
 Dim auditLog As List = lists.GetByTitle("AuditEntry")

 ctx.Load(auditLog.Fields)
 ctx.ExecuteQuery()
End Using
You can set a breakpoint after this and look at the contents of auditLog.Fields to see what SharePoint actually thinks the names of the columns are. If you get an error like “Column <ColumnName> does not exist. It may have been deleted by another user”, then this is the first thing I would try.
There’s a lot of interesting things you can do with CSOM – just check out the MSDN reference page for more. Adding and changing lists themselves, doing site administration tasks, uploading documents, and user and group management are all available through CSOM. If there’s anything in particular you’re interested in, let me know and we’ll see if I can whip something up with it.


Andy Kung completed his Signed-In Part 5 – Search Screen and Dynamic UI on 3/26/2013:
Welcome to the last installment of the Signed-In app walkthrough! In case you missed the previous posts:
- Signed-In Part 1 – Introduction
- Signed-In Part 2 – Upcoming Events Screen
- Signed-In Part 3 – Guest List Screen
- Signed-In Part 4 – Authentication and Branding
We have built a cross-platform mobile app in the 4 part series. There are 2 more topics I’d like to cover with the Signed-In app: creating a search screen and dynamic UI.
Create a Search Screen
It is fairly common to have a search box on a list, allowing the user to quickly filter a list of items. Let’s see how we can add a search box to our Upcoming Events screen.
Open Upcoming Events screen. Click Edit Query next to the GroupEvents data.
It will take us to the Screen Query Designer. In Part 2, we added a filter to show only upcoming events. Now, we need to add another filter and tie that to a textbox on the screen. In other words, we need a filter that says “show me events that contain the search text in the event title.”
Click Add Filter to create a new And filter. Select Title and contains. We need to wire it up with a query parameter, so select Parameter.
Select Add New to create a new parameter.
New query parameter called Title will show up at the bottom of the designer.
Select the newly created query parameter, check Is Optional in the Properties window. This indicates that if the user does not type anything in the search box, we will show all the upcoming events.
Go back to Upcoming Events screen by clicking Back button.
You will see the query parameter Title as part of the GroupEvents data.
Now, we need to wire up a textbox to the query parameter. Drag the query parameter to the screen content tree, right above the tile list. It will add a UI element using Text control.
Since we want it to be a search box, change the control from Text to Text Box.
Press F5 and run the application. Try the search functionality we just implemented.
Return to Visual Studio by closing the browser.
There is another trick here. We can hide the search box’s title and add a watermark instead. This will save us some space as well. Select Title on the screen content tree.
In Properties window, set Placeholder to Search. This will create a watermark in the textbox. Also, change Label Position to None. This will hide the label Title.
The search box will now look like this:
Dynamically Show and Hide UI
Another common scenario is to show and hide a piece of UI based on some other values on the screen. For example, if a guest selects “Other” for the question “How did you hear about this event,” we’d like to get more information by showing an additional text field in the dialog.
First, we need to add an optional field in the Guest table to capture this data. Open Guest table in the designer and add a Note field. Uncheck Required box to make it an optional field. In Properties window, set Maximum Length to 500.
Open Sign In screen. Drag and drop Note from Guest data to the content tree. This will create a textbox for Note in the dialog. Change the control from Text Box to Text Area.
Select Note node. Uncheck Is Visible in Properties window. This will hide the text area by default.
Since we want to show the text area only when HowFound field is set to Other, let’s write some logic for that.
Select the Screen node. Open the Write Code dropdown in the toolbar and select created.
Write the following code in the code editor.
myapp.SignIn.created = function (screen) {
// Write code here.
screen.Guest.addChangeListener("HowFound", function (e) {
var contentItem = screen.findContentItem("Guest_Note");
contentItem.isVisible = (screen.Guest.HowFound == "Other");
});
};
Our logic says that when the HowFound field is changed, check its value. If the value is Other, show the text area, otherwise hide it.
If we run the app now, the Note text area will hide and show based on what the guest choses in the previous question.
Conclusion
This concludes our Signed-In series. If you have other topics in mind, please let us know. We will do our best to cover them in future posts. Thank you very much for following!


Andy Kung continued his series with Signed-In Part 4 – Authentication and Branding (Andy Kung) on 3/25/2013:
Welcome to the 4th installment of the Signed-In app walkthrough! Here are the previous posts:
- Signed-In Part 1 – Introduction
- Signed-In Part 2 – Upcoming Events Screen
- Signed-In Part 3 – Guest List Screen
We have implemented all the functionalities of our Signed-In app. But, after all, this is an app for the alumni association. We can’t call it complete until we brand it with some school colors, right?
Enable Authentication
First, let me show you how to enable authentication. We’d only like organizers to have access to the app.
Double click Properties node in Solution Explorer.
Select Access Control tab and pick Use Forms authentication. Check Granted for debug.
Press F5 to run the application. You will now see a Log out button on the home screen.
Since we’re in debug mode, you (as a developer) is always logged in. To see the login page. Type LogIn.aspx (under localhost) in the URL.
We will customize this page later in the walkthrough. Close the browser and return to Visual Studio.
Use the Dark Theme
Let’s talk a little bit about theme. By default, LightSwitch uses the Light Theme that you currently see. There is also a Dark Theme you can choose.
In Solution Explorer, select Signed-In node and open the Toggle View dropdown menu. You will see Logical View and File View.
You are currently in Logical View, which structures your assets in a simple and logical manner and hides other things that you don’t use as often such as image, JavaScript, and CSS files. To access theme files (which are essentially a set of CSS), we need to switch to File View. So let’s select File View.
Expand the HTMLClient node. You will see a default.htm, which is the starting point of your app. There is also a Scripts folder for JavaScript files and a Contents folder for images and CSS files.
Double click on default.htm. Find the line that says:
<linkrel="stylesheet"type="text/css"href="Content/light-theme.css"/>
<linkrel="stylesheet"type="text/css"href="Content/msls-light.css"/>
Replace light with dark:
<linkrel="stylesheet"type="text/css"href="Content/dark-theme.css"/>
<linkrel="stylesheet"type="text/css"href="Content/msls-dark.css"/>
Basically you are referencing a different set of CSS files that came with the LightSwitch project under the Content folder.
Press F5 and run the application. Your app now uses the Dark Theme!
This is quite nice. But let’s see how we can customize it with our school colors. Close the browser and return to Visual Studio.
Customize Theme
LightSwitch leverages jQuery Mobile, which is a popular touch-optimized web framework. jQuery Mobile has a great theme tool called ThemeRoller. You can import an existing theme and customize it, or you can create a brand new theme from scratch. Let’s customize our Dark Theme with some colors.
Double click on dark-theme.css (under Content folder). Select all (CTRL + A) and copy (CTRL + C) the CSS content from the code editor.
From your web browser, go to http://jquerymobile.com/themeroller/.
Click Import button on top.
Paste (CTRL + V) the CSS content into the dialog and click Import.
LightSwitch’s Dark Theme now shows up in ThemeRoller.
You can drag and drop the colors to customize your theme. Mine looks like this.
When you’re done. Click Download button on top. Name it my-theme and click Download Zip.
Save the zip file to your computer and extract the files. In Solution Explorer, right click on Content folder. Select Add, then Existing Item.
Navigate to my-theme.css you extracted from the zip and click Add.
The new theme now appears in the Content folder.
All we need to do now is indicating which theme we’d like to use. Double click default.htm. Replace dark-theme with my-theme.
Press F5 and run the application. We have successfully customized our theme.
Change Logo
Now, we need a fancy logo. In Solution Explorer, you will find user-logo.png and user-splash-screen.png under Content/Images. These are basically the default logo and splash screen image you current see in the app.
Replace them with images of your own (make sure they have the same name). The new images will show up when you run the application.
Customize Login Page
Go to the login page again by typing in Login.aspx in the URL. You will find it is still using the Light Theme.
Why is that? Well, it is actually not using the jQuery Mobile theme at all. In fact, the LogIn.aspx is an independent artifact. It doesn not exist under HTMLClient, but under Server.
When authentication is enabled, everything under the HTMLClient is now protected by default, including theme files. So think of the login page as a separate thing, a redirect page if you will.
If you open LogIn.aspx in Visual Studio, you will find the CSS code relating to colors are all part of the file.
To customize it, we will manually update these color codes. You can copy and paste the color codes from ThemeRoller and paste them here. For example, I used #3e81af as background in ThemeRoller. I will update the background CSS in LogIn.aspx with that color code.
Do the same for other elements on the login page (textbox, checkbox, button, etc). You can also add other HTML, CSS, JavaScript code here if you like. It’s yours to play with.
This is what I did for mine:
What’s Next?
That’s it! We have successfully created a cross-platform mobile app from scratch with only a couple lines of code!
Next, in the final part of the series, I will show you some other tips and tricks to improve our Signed-In 2.0.


The Microsoft All-In-One Code Framework team described How to implement the Between operator in the EF on 3/22/2013 (missed when published):
Introduction
This sample demonstrates how to implement the Between operator in Entity Framework.
In this sample, we use two ways to implement the Entity Framework Between operator:
- Use the Entity SQL;
- Use the extension method and expression tree.
Building the Sample
Before you run the sample, you need to finish the following steps:
Step1. Attach the database file MySchool.mdf under the folder _External_Dependecies to your SQL Server 2008 database instance.
Step2. Modify the connection string in the App.config file according to your SQL Server 2008 database instance name.
Running the Sample
Press F5 to run the sample, the following is the result.
First, we get the courses by Entity SQL. In the Entity SQL statement, we select the courses on the Department column which the value is between 1 and 5.
Then we get the courses by extension method. In this statement, we select the courses on the CourseID column which the value is between C1050 and C3141.
Using the Code
1. Get the Courses by Entity SQL.
We select the courses on the Department column by Entity SQL.
C#
Edit|Remove
return school.Courses.Where( "it.DepartmentID between @lowerbound And @highbound", new ObjectParameter("lowerbound", 1), new ObjectParameter("highbound", 5)).ToList();2. Get the Courses by Extension Method.
We select the courses on the CourseID column by the Bwtween extension method. In this method, we need pass three parameters: lambda expression, low boundary of the value, high boundary of the value.
C#
Edit|Remove
return school.Courses.Between(c => c.CourseID, "C1050", "C3141").ToList();In the extension method, we use two expressions to implement the Between operation, and so we need to use the Expression.LessThanOrEqual and Expression.GreaterThanOrEqual methods to return the two expressions.
Expression.LessThanOrEqual and Expression.GreaterThanOrEqua method are only used inthe numeric comparision. If we want to compare the non-numeric type, we can't directly use the two methods.
So we first use the Compare method to compare the objects, and the Compare method will return an int number. Then we can use the LessThanOrEqual and GreaterThanOrEqua method.
For this reason, we ask all the TKey types implement the IComparable<> interface.
C#
Edit|Remove
public static IQueryable<TSource> Between<TSource, TKey> (this IQueryable<TSource> source, Expression<Func<TSource, TKey>> keySelector, TKey low, TKey high) where TKey : IComparable<TKey> { ParameterExpression sourceParameter = Expression.Parameter(typeof(TSource)); Expression body = keySelector.Body; ParameterExpression parameter = null; if (keySelector.Parameters.Count>0) parameter = keySelector.Parameters[0]; MethodInfo compareMethod = typeof(TKey).GetMethod("CompareTo", new[] { typeof(TKey) }); Expression upper = Expression.LessThanOrEqual( Expression.Call(body, compareMethod, Expression.Constant(high)), Expression.Constant(0, typeof(int))); Expression lower = Expression.GreaterThanOrEqual( Expression.Call(body, compareMethod, Expression.Constant(low)), Expression.Constant(0, typeof(int))); Expression andExpression = Expression.And(upper, lower); MethodCallExpression whereCallExpression = Expression.Call( typeof(Queryable), "Where", new Type[] { source.ElementType }, source.Expression, Expression.Lambda<Func<TSource, bool>>(andExpression, new ParameterExpression[] { parameter })); return source.Provider.CreateQuery<TSource>(whereCallExpression); } More Information


Return to section navigation list>
Windows Azure Infrastructure and DevOps
 Bill Hilf (@bill_hilf) described Windows Azure: What’s in it for the Enterprise? on 3/29/2013:
In my role on the Windows Azure team, I get two questions all the time from our enterprise IT customers. For the ones who haven’t gotten comfortable with the cloud yet, they ask “why do I want this?” For those who have, they ask “but who should I trust when implementing a cloud platform?” The good news is that there are straightforward answers to both questions.
For the first – why should enterprise IT change the way they’re doing business and adopt the cloud – the answer is rooted in history. In the past, enterprise IT has been about IT bringing technology to its employees, and working hard to develop a stable and predictable computing environment. But the last few years has changed all that, and those of us with enterprise IT experience know the tremendous pressure we’re under to respond.
Now, we’re seeing a wave of mass change, this time because of developers who are finding it easier and faster to work with cloud infrastructures than traditional models. These developers are delivering immediate solutions for the business with server infrastructure via cloud providers, claiming equivalent or better security, performance and scalability – and as a result, IT needs to accommodate the new trend or else be left behind.
When it comes down to it, there are three chief driving forces behind the move to the cloud -- Speed, Scale and Economics. We all know these words, but in the last few years their definitions have changed radically. Speed equals minutes, not weeks or months. Scale equals global, on-demand and in real time. Economics equals the ability to pay for what you need when you need it instead of over provisioning for insurance purposes.
So what’s an enterprise customer to do with the cloud? Find ways to enable the cloud and foster innovation rather than block it or you will wake up one day to realize that the cloud is being used at your company even if you didn’t approve its use. Become the conductor on the train, who helps people get to their destination… don’t let the train run you over.
As to the question about which vendor to select, take stock of your assets. You will need a solution with staying power -- ones that takes the best of what you have today, and can grow with where technology is going. Does it feel like a big leap of faith?
Well, exhale because you are not alone. In a recent IDC Cloud Survey, 60%* of customers polled said that the cloud solution provider (CSP) they work with needs to be somebody they have a trusted relationship with in order to make them their vendor of choice. In addition, ~65% also said that the CSP should be able to offer to move their cloud solution back on-premises if needed.
Let’s think about that for a minute. How many vendors have a trusted relationship with your company that spans decades of computing, is delivering for you today and is innovating for tomorrow? How many vendors have solutions that give you choice and allow you the flexibility to run in your datacenter AND in the public cloud or both? Who can provide the ability to move workloads between datacenters, securely and reliably? Finally, who builds products with security as a core development principle, has massive global reach and is a trusted partner who has been with you through many technology evolutions? I don’t mean the latest trend, this is tried and true durability and reliability of products, many products that power your business ahead of your competition.
At the end of all these questions, I suspect you have a very short list to work from. At Microsoft, we have designed Windows Azure to be truly enterprise class.
It is the only platform that is fully cloud enabled, supporting both platform services (PaaS) to eliminate complexity and infrastructure services (IaaS) for flexibility. Use PaaS where you can, and IaaS where you need to. With Windows Azure, you can use both together and independently – you can’t do that with other vendors.
Windows Azure integrates with what you have, including Windows Server, System Center, Linux and others. It supports heterogeneous languages including .NET, Java, Node.js, Python, and data services for No SQL, SQL and Hadoop. Whether your developers want to use Team Foundation Servers or GitHub, Windows Azure can be used with these developer tools. Windows Azure is secure and highly available by design, with enterprise grade SLAs and Support options that include deep technical staff ready to work directly with you. You’ll always know the status of Azure services as we aim for transparency via our Service Dashboard.
Azure provides a number of ways to take your business to the next level.Need a secure place to store your valuable data? Windows Azure Storage+ StorSimple, Windows Azure Online Backup or SQL Availability Groups allows you to store, backup and recover your data in the cloud at a cost that is lower than using SAN technology, with scale and global reach that is unparalleled to any other cloud storage solution.
Going mobile? Windows Azure Mobile Services lets you streamline common development tasks like structuring storage, integrating push notifications and configuring user authentication, while fully supporting Windows Store, Windows Phone 8, iOS, Android and HTML5 development.
Need to develop and test at the speed of business? Windows Azure platform services can be used to create applications that can be managed by Microsoft to reduce your complexity… or, if you need to be more hands on, IaaS can be up and running in minutes using a pre-built Virtual Machine images.
Need to tap into the power of big data? Simply pair Azure Websites with HDInsight to mine any size data and compelling business analytics, to make adjustments to get the best possible business results.
Azure also lets you respond to business needs much more quickly. For example, say that your marketing team wants to rapidly develop, run and shut down their advertising/promotional campaigns. It has to get done fast, nobody knows how fast it will grow, but it has to scale quickly – well, Azure has you covered.
Whether it’s a .NET app development or using an open framework like WordPressor Joomla, your developers get an out-of-the box experience that can start up quickly and grow as big as needed with no headaches for IT.
So the great news is that you’re not alone in facing these challenges. Microsoft is with you on the journey just as we have been for decades – and we have enterprise-class solutions available today.
It’s time to transform your datacenter, foster innovation for your developers, unlock the key insights from any data you collect and evolve IT. Get started with an Azure free trial today. Business everywhere are innovating on Windows Azure; to see how, check out our case studies. And in the meantime, don’t forget to exhale.
Bill Hilf
General Manager
Windows Azure
<Return to section navigation list>
Windows Azure Platform Appliance (WAPA), Hyper-V and Private/Hybrid Clouds
Yung Chou (@yungchow) announced TechNet Radio: (Part 3) Building a Private Cloud with System Center 2012 Service Pack 1 – Deploying & Upgrading to System Center 2012 SP1 Virtual Machine Manager on 3/27/2013:
Back for Part 3 of their Building a Private Cloud with System Center 2012 SP1, Keith Mayer and I continued the conversation and discussed about how to deploy and upgrade to System Center 2012 SP1 Virtual Machine Manager which is essential for building a private cloud.
[1:15] Recap: Episode 1 & 2
- [8:28] What is System Center 2012 SP1 Virtual Machine Manager? Why is it important?
- [23:27] DEMO: Deploying System Center 2012 SP Virtual Machine Manager
- [39:39] DEMO: How to upgrade from System Center 2012 RTM VMM to SP1

Build your test lab with Boot-to-VHD. Here are the steps.
Deploy a VM to cloud and build your lab in Windows Azure with 90-day free trial. Here's how.
Preping for Microsoft certifications? Join our Windows Server 2012 "Early Experts" Study Group.
Websites & Blogs:
Virtual Labs:
Become an "Early Expert"
The Windows Server 2012 "Early Experts" Challenge provides a FREE online study group with certification exam preparation materials for quickly learning about the latest version of Windows Server! Keep practicing your labs and join Online Study Hall Friday 11 AM to 1 PM at http://aka.ms/VirtualStudyHall.

<Return to section navigation list>
Cloud Security, Compliance and Governance
 No significant articles today
<Return to section navigation list>
Cloud Computing Events
Rick Garibay (@rickggaribay) announced Global Windows Azure BootCamp – Phoenix 4/27 on 3/20/2013 (missed when publishded):
The rumors are true. The Global Windows Azure Bootcamp is coming to Phoenix on April 27th, 2013. Registration is now open: https://phxglobalazurebootcamp.eventday.com/
This is a truly global event in which the Phoenix community will come together to share and learn what you can do on Windows Azure.
This one day deep dive class will get you up to speed on developing for and deploying to Windows Azure. The class will be led by myself and fellow MVPs including the one and only Joe Guadagno, Dan Wahlin and you’re friendly neighborhood Microsoft Regional Director Scott Cate. You’re guaranteed to learn a ton and in addition to the talks, you’ll work on some great hands on labs so you can apply what you learn on the same day and take the labs with you! Best of all, if you get stuck, we’ll be there to make you do push ups, I mean get unblocked.
AGENDA
We will start at 9:00 with welcome and introductions and get right into an end-to-end overview of Windows Azure. From there, we’ll participate in a massive, coordinated, global deployment to Windows Azure, teaming with over 60 other worldwide locations to see the workload in action (details are super secret, so you have to show up to get your security clearance- this a a boot camp after all)!
After we’ve done our best to take down a datacenter, we’ll take a break and take a lap around storage and database options on Windows Azure while we enjoy a catered lunch kindly sponsored by Microsoft. We’ll also have fresh primo coffee, sodas, waters and snacks to help you power through the labs which will give you real-world exposure to what its like to actually apply what you’ve learned and take the working applications home with you.
From there we’ll take another break and wrap up the day with a look at how Windows Azure Service Bus changes how you think about messaging and integration when working at cloud scale. We’ll have a Service Bus lab and from there likely plan some nefarious after event activities at one of downtown Chandler’s fine watering holes.
Here are the details:
HOW MUCH DOES BOOTCAMP COST?
This event is FREE to the attendees. Gratis! Gratuite! Libero! We’ll certainly take any good karma you want to send our way, but your attendance and full engagement is all we ask. Be sure to check out the prerequisites to ensure you are ready to rock.
DO I NEED TO BRING ANYTHING?
This is a BYOL event. To get the most of the event, you will want to come to boot camp with your own laptop pre-loaded with Visual Studio, the Azure SDK and all prerequisites. Please see http://globalwindowsazure.azurewebsites.net/?page_id=171 to download and install everything you’ll need to make this a great event.
BUT, I’M COMPELTELY NEW TO THIS AZURE CLOUD THING
This event is for you! We’ll have a mix of content both for experienced developers and those brand spanking new to Windows Azure. Our trainers will be here to answer all of your questions and help you with the labs, so remember, there are no stupid questions.
BUT, I ALREADY KNOW THIS STUFF
Awesome! We’d love to have you as you’ll probably teach us a thing or two and we guarantee you’ll walk away learning a few things too!
LOCATION, LOCATION, LOCATION
Boot camp will be held at Gangplank in Chandler, located at 260 South Arizona Avenue | CHANDLER, AZ 85225
WHAT’S NEXT?
Seating is limited for this event so please register now at https://phxglobalazurebootcamp.eventday.com/ to guarantee your seat and help us plan for coffee, drinks, snacks and lunch.


<Return to section navigation list>
Other Cloud Computing Platforms and Services
Jeff Barr (@jeffbarr, pictured below) reported Amazon Linux AMI 2013.03 Now Available on 3/27/2013:
Max Spevack runs the team that produces the Amazon Linux AMI. Today he's here to tell you about the newest version of this popular AMI.
-- Jeff;
Following our usual six month release cycle, the Amazon Linux AMI 2013.03 is now available.
As always, our goal with the Amazon Linux AMI is to ensure that EC2 customers have a stable, secure, and simple Linux-based AMI that integrates well with other AWS offerings.
Here are some of the highlights of this release of the Amazon Linux AMI:
- Kernel 3.4.37: We have upgraded the kernel to version 3.4.37 which is part of the long-term stable release 3.4 kernel series. This is a change from the previous releases of the Amazon Linux AMI, which were on the 3.2 kernel series.
- OpenSSH 6: In response to customer requests, we have moved to OpenSSH 6 for this release of the Amazon Linux AMI. This enables the configuration option of AuthenticationMethods for requiring multi-factor authentication.
- OpenSSL 1.0.1: Also based on customer requests, we have added OpenSSL 1.0.1 to this release while retaining compatibility with OpenSSL 1.0.0.
- New AWS command line tools: We are excited to include the Developer Preview of the new AWS Command Line Interface. The aws-cli tool is written in Python, and provides a one-stop-shop for controlling multiple AWS services through the command line.
- New and updated packages: We have included a number of new packages based on customer requests as well as updates to existing packages. Please see our Amazon Linux AMI 2013.03 release notes for more information.
The Amazon Linux AMI 2013.03 is available for launch in all regions. Users of 2012.09, 2012.03, and 2011.09 versions of the Amazon Linux AMI can easily upgrade using yum.
The Amazon Linux AMI is a rolling release, configured to deliver a continuous flow of updates that allow you to roll from one version of the Amazon Linux AMI to the next. In other words, Amazon Linux AMIs are treated as snapshots in time, with a repository and update structure that gives you the latest packages that we have built and pushed into the repository. If you prefer to lock your Amazon Linux AMI instances to a particular version, please see the Amazon Linux AMI FAQ for instructions.
As always, if you need any help with the Amazon Linux AMI, don’t hesitate to post on the EC2 forum, and someone from the team will be happy to assist you.


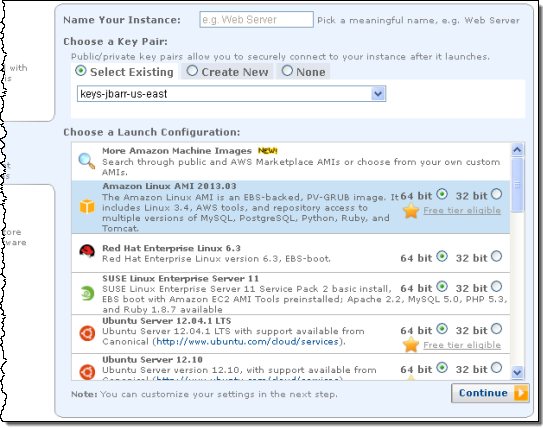
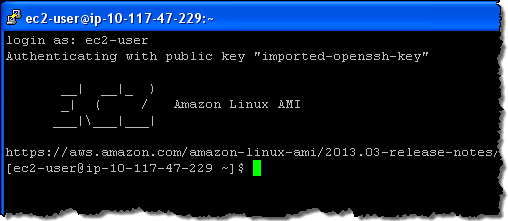
Jeff Barr (@jeffbarr) posted AWS CloudHSM - Secure Key Storage and Cryptographic Operations on 3/26/2013:
Back in the early days of AWS, I would often receive questions that boiled down to "This sounds really interesting, but what about security?"
We created the AWS Security & Compliance Center to publish information about the various reports, certifications, and independent attestations that we've earned and to provide you with additional information about the security features that we've built in to AWS including Identity and Access Management, Multi-Factor Authentication, Key Rotation, support for server-side and client-side encryption in Amazon S3, and SSL support in the Elastic Load Balancer. The Security & Compliance Center is also home to the AWS Risk and Compliance White Paper and the AWS Overview of Security Processes.
Today we are adding another powerful security option, the AWS CloudHSM service. While the items listed above are more than adequate in most situations, some of our customers are in situations where contractual or regulatory needs mandate additional protection for their keys. The CloudHSM service helps these customers to meet strict requirements for key management without sacrificing application performance.
What is an HSM and What Does it Do?
HSM is short for Hardware Security Module. It is a piece of hardware -- a dedicated appliance that provides secure key storage and a set of cryptographic operations within a tamper-resistant enclosure. You can store your keys within an HSM and use them to encrypt and decrypt data while keeping them safe and sound and under your full control. You are the only one with access to the keys stored in an HSM.The AWS CloudHSM Service
The AWS CloudHSM service brings the benefits of HSMs to the cloud. You retain full control of the keys and the cryptographic operations performed by the HSM(s) you create, including exclusive, single-tenant access to each one. Your cryptographic keys are protected by a tamper-resistant HSM that is designed to meet a number of international and US Government standards including NIST FIPS 140-2 and Common Criteria EAL4+.Each of your CloudHSMs has an IP address within your Amazon Virtual Private Cloud (VPC). You'll receive administrator credentials for the appliance, allowing you to create and manage cryptographic keys, create user accounts, and perform cryptographic operations using those accounts. We do not have access to your keys; they remain under your control at all times. In Luna SA terminology, we have Admin credentials and you have both HSM Admin and HSM Partition Owner credentials.
AWS CloudHSM is now available in multiple Availability Zones in the US East (Northern Virginia) and EU West (Ireland) Regions. We'll be making them available in other Regions throughout 2013 based on customer demand.
Inside the AWS CloudHSM
We are currently providing the Luna SA HSM appliance from SafeNet, Inc. The appliances run version 5 of the Luna SA software.Once your AWS CloudHSM is provisioned, you can access it through a number of standard APIs including PCKS #11 (Cryptographic Token Interface Standard), the Microsoft Cryptography API (CAPI), and the Java JCA/JCE (Java Cryptography Architecture / Java Cryptography Extensions). The Luna SA client provides these APIs to your applications and implements each call by connecting to your CloudHSM using a mutually authenticated SSL connection. If you have existing applications that run on top of these APIs, you can use them with CloudHSM in short order.
Getting Started
The CloudHSM service is available today in the US-East and EU-West regions. You'll pay an one-time upfront fee (currently $5,000 per HSM), an hourly rate (currently $1.88 per hour or $1,373 per month on average for CloudHSM service in the US-East region). Consult the CloudHSM pricing page for more info.To get started with CloudHSM or to learn more, contact us. You can also schedule a short trial period using the same link.
In most cases we can satisfy requests for one or two CloudHSMs per customer within a few business days. Requests for more than two may take several weeks.
Learn More
To learn more about CloudHSM, read the CloudHSM FAQ, the CloudHSM Getting Started Guide, and the CloudHSM Home Page.


<Return to section navigation list>


