Windows Azure and Cloud Computing Posts for 7/1/2013+
Top news this week:
- Ruslan Yakushev (@ruslany) reported the availability of a free Cloud Cellar: Azure Web Sites Backup Service on 6/27/2013 in the Windows Azure Virtual Machines, Virtual Networks, Web Sites, RDP and CDN section.
- Brian Benz (@bbenz) reported The Windows Azure Toolkit for Eclipse, July 2013 Preview is ready! on 7/3/2013 in the Windows Azure Cloud Services, Caching, APIs, Tools and Test Harnesses section.
- Mingfei Yan described Windows Azure Media Services in Build 2013 – DASH preview through Dynamic Packaging, Win 8 client update, Live Streaming and more on 6/27/2013 in the Windows Azure Blob, Drive, Table, Queue, HDInsight and Media Services section.
| A compendium of Windows Azure, Service Bus, BizTalk Services, Access Control, Data Storage, SQL Azure Database, and other cloud-computing articles. |
•• Updated 7/6/2013 with new articles marked ••.
‡ Updated 7/5/2013 with new articles marked ‡.
• Updated 7/4/2013 with new articles marked •.
Note: This post is updated weekly or more frequently, depending on the availability of new articles in the following sections:
- Windows Azure Blob, Drive, Table, Queue, HDInsight and Media Services
- Windows Azure SQL Database, Federations and Reporting, Mobile Services
- Windows Azure Marketplace DataMarket, Cloud Numerics, Big Data and OData
- Windows Azure Service Bus, BizTalk Services and Workflow
- Windows Azure Access Control, Active Directory, and Identity
- Windows Azure Virtual Machines, Virtual Networks, Web Sites, RDP and CDN
- Windows Azure Cloud Services, Caching, APIs, Tools and Test Harnesses
- Windows Azure Infrastructure and DevOps
- Windows Azure Pack, Hosting, Hyper-V and Private/Hybrid Clouds
- Visual Studio LightSwitch and Entity Framework v4+
- Cloud Security, Compliance and Governance
- Cloud Computing Events
- Other Cloud Computing Platforms and Services
Windows Azure Blob, Drive, Table, Queue, HDInsight and Media Services
Jim O’Neil (@jimoneil) produced Practical Azure #23: Windows Azure Media Services on 7/1/2013:
Ok, I admit it, of all the episodes in this series, Windows Azure Media Services is one I dreaded the most. It’s just not a feature I’d ever really touched nor one that I’d presented on. Of all the services in Azure it’s probably the most niche one, but it’s actually quite cool and gave me some appreciation for what it takes to pull all of the video assets together for the myriad Channel 9 episodes, like this one.
I won’t admit to completely understanding the differences or benefits of say H.264 Broadband 720p over VC1 Broadband SD 16x9, but if that’s the language you speak, I invite you to take 15 minutes or so to learn a bit more, then give Windows Azure Media Services a spin for encoding, encrypting, and packaging media assets. And if you’re more on the consumption side of things, I also learned there’s a complete Player Framework so you can build immersive applications in Windows 8 and Windows Phone that consume assets you might have stored in Windows Azure and generated via Media Services.
Download: MP3 MP4
(iPod, Zune HD)High Quality MP4
(iPad, PC)Mid Quality MP4
(WP7, HTML5)High Quality WMV
(PC, Xbox, MCE)
Mingfei Yan described Windows Azure Media Services in Build 2013 – DASH preview through Dynamic Packaging, Win 8 client update, Live Streaming and more in a 6/27/2013 post:
It has been over 8 months since the last Build was held in Seattle. I am preparing my Build presentation and started to realize how much progress our services made. Here is some major new features I want to share with you. As I promised, all code demo are available here for download: http://sdrv.ms/17lzuUL.
Dynamic Packaging with MPEG-DASH live profile streaming support
- What is Dynamic packaging?
This is a feature we shipped since Feb this year, which enables you to reuse your encoded video (Mp4 or Smooth streaming) to delivery multiple adaptive streaming formats such as Http-live-streaming or Smooth Streaming, by simply changing the streaming URL. Therefore, you no longer need to go through an intermediate step which packages video asset into various streaming format. And you save costs for storing them – you just need to store the encoded video once. Below it’s a diagram that demonstrates the concepts I described above. And I have a separate blog on dynamic packaging feature.
MPEG-DASH streaming format is what we just added as one of the output streaming format for dynamic packaging feature.
- What is MPEG-DASH and why it is significant?
MPEG-DASH is the first adaptive bit-rate HTTP-based streaming solution that is an international standard (ISO/IEC 23009-1). Before DASH, there are three major vendor-centric streaming formats: Microsoft’s smooth streaming(SS), Apple’s Http-Live-Streaming(HLS) and Adobe’s Http Dynamic Streaming (HDS). And these streaming formats are usually preferred on certain platform, for e.g Apple supports HLS playback in Safari and iOS devices. However, this formats fragmentation increases cost for content providers since they have to encode videos into multiple formats in order to deliver them into multiple platforms.
Therefore, DASH as a standard becomes significant for video streaming industry. All streaming sever or cloud providers could start to delivery content in DASH format. And for client side, W3C also introduced two important extension APIs for HTML5: Media Source Extension (MSE) APIs (to enable DASH playback) and Encrypted Media Extension (EME) APIs (to enable DRM License Acquisition). Moreover, there is a JavaScript library called DASH.JS implemented these interface which enables DASH playback in HTML5. Therefore, DASH is very likely to become a cross-platform, cross-browser video streaming solution in the future, if everyone starts to converge to standard.
Therefore, we are thrilled to announce
that wethe implementation of MPEG DASH comes to Windows Azure via Dynamic Packaging feature. This is available now for you to take for a test drive. While the DASH feature is technically only at “preview” quality, you can access it from your on-demand streaming Origin server in Media Services. Our PM John Deutscher wrote a step-by-step blog to produce DASH content, please check out if you want to give it a try.Windows 8 player framework and Client SDK adding support for MPEG-DASH
Our Windows 8 client is also adding support for MPEG-DASH. By using Microsoft Player Framework, you will be able to build a native store application in either HTML5 or XAML to enable DASH playback with DRM support. This is a sample application our lead developer Tim Greenfield has built as a demo of DASH playback. You could download it here: http://playerframework.codeplex.com/.
Live Streaming features and a sneak peek
I talked about Live streaming features and workflow in this presentation, BUT THE FEATURE IS NOT IN PREVIEW YET. So you won’t be able to get APIs and service to play with it yet. However, the feature is truly just around the corner. We will take Smooth Streaming as Ingest input and enable live streaming over public cloud. We will deploy live streaming all over the globe and you can scale up, scale down as time as you want. Please refer to the presentation video if you want to know more about live streaming features. Below is a snapshot of my live streaming demo remote with Redmond and you can catch that at 38:00 of my presentation video. Enjoy!
- This is the presentation slide:Windows Azure Media Services June 2013 update from Mingfei Yan
- And you can catch the presentation video here: https://channel9.msdn.com/Events/Build/2013/3-549


<Return to section navigation list>
Windows Azure SQL Database, Federations and Reporting, Mobile Services
‡ Mike Taulty (@mtaulty) posted Azure Mobile Services Update–Custom APIs on 7/5/2013:
Three weeks ago, Scott Guthrie posted about updates to Azure Mobile Services – I’ve written a little about Mobile Services here in the past and which I’ve also demo’d at various conferences, user groups and so on around the UK (and beyond). Then just last week at Build, the second day keynote announced that Mobile Services had come out of its preview phase and was now a fully “released” product ready to go.
I thought it was about time that I tried to catch up with Scott’s post. Of course, you’ll get the definitive view from reading what Scott wrote or from going on over to the Windows Azure site and looking at the quick-starts, samples or reference documentation.
There are a lot of changes to Mobile Services detailed in Scott’s post but the main thing that interested me was the new support for custom APIs. In talking about Mobile Services (and in writing about it) I’ve encountered many people who are enthused by what the service provides but who questioned whether the previous capabilities of;
- Create a table.
- Associate scripts for read/insert/update/delete.
(along with creating scripts that could be run on a schedule or on demand) were enough for their needs. The questions I’d get were generally along the lines of how Mobile Services would support scenarios where you wanted to provide services that aren’t directly associated with a single table and before these recent updates you’d either not be able to do these things or you’d perhaps struggle to try and shoe-horn this functionality into a script associated with a table where it didn’t perhaps fit.
With that in mind, I thought I’d experiment a little with custom APIs. One of the things about “going custom” is that it exposes me to more of node.js which I don’t really know very much about at all but I did notice a key line in Scott’s post;
“We will also be adding support for custom APIs written using .NET in the future as well.”
Which is something else I’ve heard from UK developers around Azure Mobile Services so it’s cool to know that .NET is on its way.
I figured that I’d try a simplified customer/address kind of scenario and see how I got on in exposing a join across those tables from a service and so I wandered up to the azure management portal, created a new service called mtJoinTest and got hit with one of the changes that Scott talked about – a free 20MB SQL database. Nice to see;
I created a quick Customer table and an Address table in the mobile service and then went to SQL Management Studio and gave those tables a small, simple schema and added (via Management Studio, not via Mobile Services) a CustomerAddresses table;
That means that mobile services is happy to provide automatically generated (and scriptable) RESTful services to do CRUD for my Customer table and my Address table and they show up in the UI on the portal;
and I can get data from the table using (in this case) Fiddler to cruft up a quick HTTP GET to my Customer table’s JSON endpoint;
but I can’t get to CustomerAddresses because there’s no table for that surfaced into Mobile Services – I never told Mobile Services about that table and;
- I don’t actually want direct access to that table.
- I may not want to make that table fit with the requirements that Mobile Services has for a table (e.g. a primary key column of type bigint named id).
Attempting to hit the table with Fiddler reassures me that it’s not quietly been made available;
That’s excellent because I want to write my own custom service to join those two tables here and I can wander into the new “API” section of the Mobile Services management portal to do just that;
which raises this dialog;
which I found interesting from the point of view of offering both “PUT” and “PATCH”. I’ve said many times before that I’d never encountered “PATCH” until I started sniffing traffic from Mobile Services and saw that it was being used for updates rather than “PUT” so it’s interesting to see them both side by side and I’ll admit that I’m not so sure whether I’d ever have different handling for those 2 verbs.
As an aside, I believe PUT is intended to replace a whole entity whereas PATCH is intended to update bits of it but I’m not going to worry about that here.
I can then go and set about trying to edit the script behind those verbs;
and “GET” seemed like the place to start and so I had a bit of a stab at joining my tables together and allowing for the possibility that the user of the service may want to query for all customer/address combinations or they might want to find out which customers live at a particular address or which addresses are associated with a particular customer. Here’s my first attempt;
exports.get = function(request, response)
{
    if (request.query.customerId && request.query.addressId)
    {
        response.send(statusCodes.BAD_REQUEST);
    }
    else
    {
        var sql =
            'select c.Id cId, c.firstName, c.lastName, c.email, ' +
            'a.Id aId, a.houseNameNumber, a.streetName, a.postCode ' +
            'from mtJoinTest.Customer c ' +
            'inner join mtJoinTest.CustomerAddresses ca ' +
            'on c.id = ca.customerId ' +
            'inner join mtJoinTest.address a ' +
            'on a.id = ca.addressId';

        var params = [];

        if (request.query.customerId)
        {
            sql += ' where c.id = ?';
            params.push(request.query.customerId);
        }
        if (request.query.addressId)
        {
            sql += ' where a.id= ?';
            params.push(request.query.addressId);
        }

        request.service.mssql.query(sql, params,
            {
                success: function(results)
                {
                    response.json(statusCodes.OK, results);
                },
                error : function()
                {
                    response.send(statusCodes.INTERNAL_SERVER_ERROR);
                }
            }
        );
    }
}
and that seems to work ‘reasonably well’ in my not-so-extensive testing from Fiddler, making a few requests and having a look at a few responses;
A Quick Word on URIs
In the example above I’ve ended up using URIs like /customeraddress?addressId=1 where the query string is being used to pass the identifier of the (optional) address or customer ID qualifier. I might have wanted to use a scheme like /customeraddress/address/1 or perhaps /customeraddress/customer/1 or something along those lines but as far as I can tell at the time of writing that’s not something that I can do via a custom API – that is, I think if I define an API called foo then I’m not sure that I can have any URI with additional path segments beyond /foo handled by my service.
I’ll update the post if I find out that I can.
If I wanted to flesh this out a little with a delete and an insert operation then I can do that. I’m not sure whether it makes sense to offer an “update” operation because if customer C is living at address A and they then move to address B then it possibly makes sense to delete the original customer address record and insert a new one especially given that it’s possible that the customer might reside at both address A and address B for a little while. So…I didn’t write update but I made an attempt to write delete;
exports['delete'] = function(request, response)
{
    if ((!request.query.id) || (Object.keys(request.query).length > 1))
    {
        response.send(statusCodes.BAD_REQUEST);
    }
    else
    {
        var sql = 'delete mtJoinTest.CustomerAddresses where id=?';

        request.service.mssql.query(sql, [request.query.id],
            {
                success: function()
                {
                    // think a 204 is the right response.
                    response.send(204);
                },
                error: function()
                {
                    // bit of an assumption.
                    response.send(statusCodes.NOT_FOUND);
                }
            }
        );
    }
}
and I attempted to allow post;
exports.post = function(request, response)
{
    var sql =
     'insert mtJoinTest.CustomerAddresses(customerId,addressId) values(?,?);' +
     'select @@identity as id';

    // It took me longer than I would expect to get this call to mssql.query to work because
    // I failed to understand that it calls your success handler for each resultset
    // from the DB (I have two).
    var firstTime = true;

    request.service.mssql.query(sql, [request.body.customerId, request.body.addressId],
        {
            success: function(results)
            {
                if (!firstTime)
                {
                    // this is not very nice, I need a better way to deal with URIs
                    // to be more like a RESTful service.
                    response.location('?id=' + results[0].id);
                    response.send(201);
                }
                firstTime = !firstTime;
            }
        }
    );
}
I must admit that I spent over an hour trying to write that post method and the simple reason for that was that I’m new to using mssql and I didn’t understand that the success handler that I passed to it is called multiple times – once for each resultset that SQL is sending back so in my case my SQL statements cause it to be called twice which I hadn’t expected and I spent a long time before I asked somebody and, thankfully, Josh told me how it worked
With those two additional verbs in place I can invoke my service (from Fiddler in this case) in order to delete an entry in my customeraddresses table;
or to insert an entry and tie up a customer to an address;
although I’d admit that I changed the code slightly from what I pasted above to try and do a bit of a better job on the location header that I’m sending back.
Consuming Custom APIs on the Client
Of course, the client for these kinds of services isn’t always going to be Fiddler, so I thought I’d take a look at what the Mobile Services guys had done with their client stack to make it “easy” to consume these custom APIs.
I spun up a new Windows 8 blank project (in .NET), added in the Mobile Services bits from NuGet and it seemed pretty discoverable to me that the MobileServiceClient (as doc’d here) has grown a new couple of methods called InvokeApiAsync.
If you’ve looked at the client-side APIs in .NET before then you’d know that they follow a pattern of offering a strongly typed variant which relies on data-contract serialization and a JSON variant where you pass in/out JSON objects.
These APIs seem to follow a similar model. For instance, I can invoke my GET API with something like;
view plaincopy to clipboardprint?
- IMobileServiceClient client = new MobileServiceClient(
- "http://mtJoinTest.azure-mobile.net/");
- JToken token = await client.InvokeApiAsync("customeraddress", HttpMethod.Get,
- new Dictionary<string, string>()
- {
- { "customerId", "1" }
- }
- );
      IMobileServiceClient client = new MobileServiceClient(
        "http://mtJoinTest.azure-mobile.net/");

      JToken token = await client.InvokeApiAsync("customeraddress", HttpMethod.Get,
        new Dictionary<string, string>()
        {
          { "customerId", "1" }
        }
      );
and then work with the JSON object that I get back ( the framework makes use of JSON.NET as it did in previous versions ) or I can do some “strong typing” as in;
view plaincopy to clipboardprint?
- IMobileServiceClient client = new MobileServiceClient(
- "http://mtJoinTest.azure-mobile.net/");
- var addresses = await client.InvokeApiAsync<IEnumerable<CustomerAddress>>(
- "customeraddress",
- HttpMethod.Get,
- new Dictionary<string, string>()
- {
- { "customerId", "1" }
- }
- );
      IMobileServiceClient client = new MobileServiceClient(
        "http://mtJoinTest.azure-mobile.net/");

      var addresses = await client.InvokeApiAsync<IEnumerable<CustomerAddress>>(
        "customeraddress",
        HttpMethod.Get,
        new Dictionary<string, string>()
        {
          { "customerId", "1" }
        }
      );
and, of course, that needs a CustomerAddress class to work with which I defined as;
view plaincopy to clipboardprint?
- [DataContract(Name = "customeraddress")]
- public class CustomerAddress
- {
- [DataMember(Name = "cId")]
- public int CustomerId { get; set; }
- [DataMember(Name = "firstName")]
- public string FirstName { get; set; }
- [DataMember(Name = "lastName")]
- public string LastName { get; set; }
- [DataMember(Name = "email")]
- public string Email { get; set; }
- [DataMember(Name = "aId")]
- public int AddressId { get; set; }
- [DataMember(Name = "houseNameNumber")]
- public string HouseNameNumber { get; set; }
- [DataMember(Name = "streetName")]
- public string StreetName { get; set; }
- [DataMember(Name = "postCode")]
- public string PostCode { get; set; }
- }
  [DataContract(Name = "customeraddress")]
  public class CustomerAddress
  {
    [DataMember(Name = "cId")]
    public int CustomerId { get; set; }
    [DataMember(Name = "firstName")]
    public string FirstName { get; set; }
    [DataMember(Name = "lastName")]
    public string LastName { get; set; }
    [DataMember(Name = "email")]
    public string Email { get; set; }
    [DataMember(Name = "aId")]
    public int AddressId { get; set; }
    [DataMember(Name = "houseNameNumber")]
    public string HouseNameNumber { get; set; }
    [DataMember(Name = "streetName")]
    public string StreetName { get; set; }
    [DataMember(Name = "postCode")]
    public string PostCode { get; set; }
  }
What surprised me a little was that I could magically use IEnumerable<CustomerAddress> as the generic parameter type to that call to InvokeApiAsync and something in the framework figured out how to do the right thing and give me back a List<T> from the results of de-serialization. I was impressed by that.
That all seems fairly simple and understandable and, over-all, it opens up Mobile Services to be more broadly applicable for server-side scenarios that need more than just CRUD operations against a table – very nice to see this custom API feature come to fruition.


• Sign up to download a complimentary Forrester Research Report: The Future of Mobile Application Development research report, originally offered for US$499 in January 2013:
This report, which is the vision report of the mobile app development playbook for Application Development and Delivery (AD&D) professionals, focuses on the changes application developers need to understand if they want to build modern applications that deliver contextual customer experiences.
With more than 1 billion smartphones worldwide, and tablets numbering in the hundreds of millions, the scope of the mobile revolution rivals that of the move from monolithic systems to client/server computing in the 1990s. As in that period, we're now seeing massive changes to application architecture as companies modernize the way they build applications. Modern applications require multichannel clients, elastic infrastructure, and elastic licensing; they're composed of multiple service endpoints that are provisioned by developers with direct customer feedback on their convenience. The report also looks at how modern applications will evolve over the next few years and what development teams should prepare for now.
Offered Free by: Salesforce.com
Table Of Contents
- The Mobile App Revolution Transcends Mobile Devices
- Technology Innovations Will Accelerate Contextual Computing
- Ready Your Team To Build Modern Applications, Not Mobile Apps
- The Biggest Change In Development In A Generation Is Here
- The Potential Of Contextual Data In Modern Applications Will Evolve Over Time


Via the Java Researcher’s Blog.

<Return to section navigation list>
Windows Azure Marketplace DataMarket, Cloud Numerics, Big Data and OData
![]() • Oasis has published OData Version 4.0 Part 1: Protocol Specification Public Review Draft as a PDF document. From the frontispiece:
• Oasis has published OData Version 4.0 Part 1: Protocol Specification Public Review Draft as a PDF document. From the frontispiece:

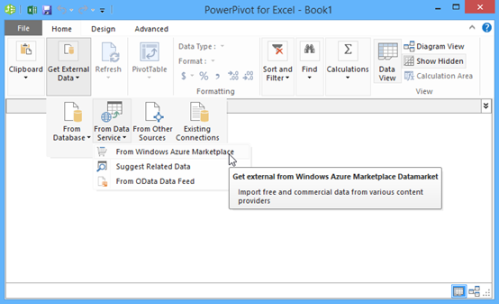
Kevin Kell posted Windows Azure Marketplace DataMarket to the Learning Tree blog on 7/3/2013:
As I prepare to teach Learning Tree’s Power Excel course in Rockville next week I have been taking a closer look at PowerPivot. Since the course now uses Excel 2013 we have expanded the coverage of PowerPivot which is now included with Excel. In 2010 it had been a separate add-in.
So what, you may ask, does that have to do with cloud computing? Well, as it turns out PowerPivot is really well suited to consume data that has been made available in the Windows Azure DataMarket.
The DataMarket is perhaps one of the less well known services offered as part of Windows Azure. In my opinion it has some growing to do before it reaches a critical mass. It has, however, made some impressive advancements since its inception in 2010. The DataMarket contains both free and paid-for data subscriptions that can be accessed using a variety of tools. Here I give a brief example of consuming a free subscription using PowerPivot.
The DataMarket does not appear anywhere on the Azure portal. To access it you need to create a separate subscription. You do that at https://datamarket.azure.com/ . Once you have established an account you can subscribe to any of the various data that have been published. You can also subscribe and use the data from your browser but I found it very easy and intuitive to subscribe to the data right from within PowerPivot.
Figure 1. Consuming Azure DataMarket data using PowerPivot
I then chose to limit my selection to just the Free subscription. In an actual application, of course, I would be able to search for data that was relevant to the analysis I was doing. For fun I decided to look at the USA 2011 Car crash data published by BigML. When I finish clicking through the wizard the data is imported into my PowerPivot Data Model and is available for my use. Here can correlate it with other data I have to build up my analysis dataset.
Once the data is in PowerPivot I can quickly do analyses using familiar Excel tools. I can also use the reporting capabilities of Data View in Excel 2013 to create compelling presentations of the data.
Figure 2. Analysis of Car Crash data in Excel Power View
The easy integration between PowerPivot and the Azure DataMarket gives Excel users a powerful tool to augment their data analysis. In future posts I will explore some of the other services that Microsoft is offering through Azure to further enhance and simplify analysis of very large datasets.


<Return to section navigation list>
Windows Azure Service Bus, BizTalk Services and Workflow
• Juval Löwy will present Introducing the Azure Service Bus to the San Francisco Bay Area Azure Developers group on 7/9/2013 at 6:30 PM PDT. See the Cloud Computing Events section below for details.
Clemens Vasters (@clemensv) described TechEd Europe 2013: Service Bus Sessions in a 7/2/2013 post:
Messaging with Windows Azure Service Bus
Windows Azure Service Bus offers a rich set of messaging capabilities in the cloud as well as on-premises. This session discusses some of the advanced messaging capabilities in Service Bus. Join us to learn about publish-subscribe patterns, Using the Service Bus sessions, interoperability with AMQP, scaling with Service Bus, and messaging strategies for server to cloud federation. >> Channel 9
Connected Clients and Continuous Services with Windows Azure Service Bus
Most applications today involve “connected clients”—smart phones, tablets and special-purpose devices—that extend the applications’ reach out to users or assets that can be located anywhere. In this session, we will explore the common messaging challenges associated with building such apps—including mobile user engagement, location transparency/addressability, integrating with a diverse set of client platforms, and providing a common model for client auth. Taking these challenges one-by-one, we will delve into the rich options provided by the Azure Service Bus for building “connected clients" >> Channel 9


No significant articles today

<Return to section navigation list>
Windows Azure Access Control, Active Directory, Identity and Workflow
Mike McKeown (@nwoekcm) posted Organizational Identity/Microsoft Accounts and Azure Active Directory – Part 2 to the Aditi Technologies blog on 7/1/2013:
In Part 1 of this blog, we defined some key terms to help us now move into a deeper discussion of how to best integrate Azure Active Directory (AAD), Organizational Identities (OrgIDs), and Microsoft IDs. We defined Azure subscriptions and AAD tenants, then discussed the different types of administrative access for each entity.
The goal of integrating all of these entities is to manage your Azure subscription(s) using only organizational accounts (as opposed to Microsoft accounts).
Within Part 2 of this blog, we focus on specific use cases to accomplish this integration. We will look at different use cases related to existing Azure and AAD subscriptions to accomplish this. Each use case describes how to leverage the use of organizational accounts.
To bring your Azure subscription under management of ONLY OrgIDs (no Microsoft accounts), follow the tasks outlined in the Use Cases section and then perform the following:
- Ensure that an organizational account identity which has co-administrator privileges within Azure can log in to the Azure Portal to manage the organization’s users in the environment.
- Remove the Microsoft accounts users from the being co-administrators. This may require a support call to move the Azure Service Subscription to a different co-administrator if the Azure Service administrator is a Microsoft account. In some cases, you can also do this from your subscription management UI.
Scope of use cases
The goal of these use cases is to bring your Azure subscription under management of only organizational accounts (and not Microsoft accounts). Items such as synchronization of on-premise Active Directory to Azure Active Directory or the use of Active Directory Federation Services (ADFS) for single sign-on (SSO) between your on-premise environment and your Azure Portal is outside the scope of this document.
Use Cases
• Case 1 – No existing AAD or Azure subscriptions
• Case 2 – Existing AAD tenant/no Azure subscription
• Case 3 – Existing Azure subscription/no AAD tenant
• Case 4 – Existing Azure subscription and existing AAD tenantCase 1 – No Azure or AAD Subscriptions
In this situation, there are no existing AAD or Azure subscriptions so we will begin with signing up for both subscriptions. Here are two options to get started:
(Once you accomplish either or one of these you can go to one of the other three use cases.)• Option A (recommended): Use this link https://account.windowsazure.com/organization to sign up for Azure as an organization and get an AAD tenant in the process.
• Option B: Use this link http://www.windowsazure.com/en-us/pricing/free-trial/ to sign up for Azure with a personal account and get an AAD tenant later if you like.
Case 2 – Existing AAD Tenant / No Azure subscription
Your organization has an AAD tenant (that may be associated with an Office 365 subscription) but no Azure subscription. You would like to sign-up for an Azure subscription and allow a select group of users in the AAD tenant to log on to the Azure Portal using their organizational accounts. Once subscribed to Azure your existing AAD tenant will automatically be accessible in the Azure Portal to a specified set of administrators.
An organization can use its OrgID credentials to login to Azure today and sign-up for their Azure trial subscription.
1. Subscribe to Azure by going to http://manage.windowsazure.com/:
2. Log on using OrgID credentials by selecting the link circled in the above image and then entering your OrgID user id and password.
3. Select the link that is circled below to sign up for Windows Azure:
4. Proceed through the sign-up process for your trial Azure subscription.
Key Point – Your AAD tenant will now be accessible automatically within the Azure Portal.5. Additionally, you can add the OrgIDs (and Microsoft accounts) of the users you want to be co-administrators of your Azure subscription(s).
6. You may want to use the Azure Portal to register applications and/or add organizational accounts to the AAD tenant. The account(s) used to perform these tasks must have Global Administrator privileges for the AAD tenant.
Note: Co-administrators of the Azure Portal are not by themselves Global Administrators of the AAD tenant. To administer the AAD tenant, the user must be assigned the Global Administrator organizational role.
Case 3 – Existing Azure Subscription/ No AAD tenant
Consider a scenario where your organization used a Microsoft account to set up its Azure subscription and does not have an AAD tenant. To manage the identities better, you can administer the Azure subscription(s) through the Azure Portal by instantiating an AAD tenant. Since your organization started its Azure subscription(s) using Microsoft accounts, you can log into Azure Portal using the Microsoft account and get an AAD tenant.
Azure allows one AAD tenant per subscription. So when you create an AAD here you must enter all the OrgIDs you want to be a part of that AAD. Once an OrgID is part of an AAD, you can then make it a co-administrator in the Azure portal. You can then use that OrgID (instead of the Microsoft account used to originally create the Azure subscription) to log in to Azure and manage the AAD. If you want to delete the Microsoft account totally you can change this either by calling Azure support or doing it in the account settings.
1. Log into Azure portal with Microsoft ID and click Active Directory.
2. Add new users to the new AAD tenant.
Use the OrgIDs of those users you would like to co-administrators on your Azure subscription(s) and who are maintained in this new AAD tenant.
Note: You could also add Microsoft accounts to administer the AAD tenant. But the goal of this blog post is to get away from Microsoft account and use solely OrgIDs in the AAD tenant and login process.
3. When adding an Azure co-administrator assure that the correct subscription box is selected and the correct email address is entered.
If you would like to integrate this Azure subscription with an AAD tenant created using an organizational account (perhaps in conjunction with Office 365) see the next case (Case 4).
Case 4 – Existing Azure Subscription / Existing AAD tenant
Your organization has an existing AAD tenant that was perhaps obtained through subscription to Office 365, Intune, CRM, etc. Your organization also has an existing Azure subscription, but it was created using a Microsoft account.
You would like a select group of users to use their OrgIDs to access the Azure Portal of the Azure subscription created using a Microsoft account. You also want the users to use their organizational accounts for registering applications and services in AAD.
1. Add the Azure account administrator’s Microsoft account to your AAD tenant.
Key Point – By adding an Azure account administrator to your AAD tenant this enables the Azure subscription to query the AAD tenant.It is assumed that the Azure account administrator is the same person as the Service Administrator. To check if this is the case: Use the Microsoft account in question and log in here with that account. https://account.windowsazure.com/Subscriptions. If you see the target Azure subscriptions listed you have the proper Microsoft account. If you do not see the target subscription or if you see the image below you do not have the proper account.
2. Log into the Azure portal at http://manage.windowsazure.com using an OrgID from your AAD tenant that has Global Administrator rights.
3. Log in using OrgID credentials, select the link circled in the above image and then enter your OrgID user ID and password.
If the AAD Global administrator does not have an Azure subscription, sign up for a free trial Azure subscription.
Note: This step is required so that the AAD Global Administrator can access the AAD management interface. This step will be eliminated in the future.
4. Add the Azure account administrator’s Microsoft account (Live ID) to the AAD tenant. Make sure the user name field matches their Microsoft account.
5. If the Azure account administrator and the Azure Service Administrator are not the same then add the Azure Service administrator’s Microsoft Account to the AAD tenant as well.
6. Once the Azure account/Service administrator of the Azure subscription is in the AAD tenant, that account can be used within Azure to add an organizational account from the AAD tenant to be a co-administrator on the Azure subscription.
In Part 2 of this blog, we looked at four different combinations of how to use OrgIDs within both AAD and Azure subscriptions. You may have various combinations of existing Azure and AAD subscriptions that need to be handled slightly differently.
The key to all this is the Account Administrator (AA) for your Azure subscription. That is the user that needs to be added to the AAD tenant so that tenant can be queried and is visible in the Azure AAD portal. Once the Account Administrator is part of the AAD tenant the Service Administrator (SA) can add other OrgIDs as Co-Administrators (CAs) to the Azure portal. The SA and CAs can then add OrgIDs to the AAD tenant in the Azure portal.
Best practices would be that the eventual owner of an Azure subscription be the entity who is assigned or owns the Azure Account/Service Administrator role.
For example, if an Azure development or test subscription is created for an organization it is highly recommended that the Azure Service Administrator role be assigned to an organizational account and not a Microsoft account. This will make the management of Co-Administrators within the subscription much easier during the life-cycle of the Azure subscription. You can also allow administrators from your AAD tenant to administer and manage your organizations users within Azure.Here are some key links you can use to help you manage all this.
• To manage Azure subscriptions: https://account.windowsazure.com/Subscriptions
• To manage Azure, AAD, and organizational account: http://manage.windowsazure.com/
• To manage Microsoft account: https://account.live.com/The preferred flow of this process is to obtain an Azure subscription, an AAD tenant, and an organizational account at https://account.windowsazure.com/organization. The end result of all this is that you can now use the OrgIDs of your organization’s AAD to log in and manage your Azure subscription and no longer need to use Microsoft IDs.


Windows Azure Virtual Machines, Virtual Networks, Web Sites, RDP and CDN
•• Ruslan Yakushev (@ruslany) reported the availability of a free Cloud Cellar: Azure Web Sites Backup Service in a 6/27/2013 post (missed when published):
My site (RuslanY.net) is powered by WordPress and is hosted on Windows Azure Web Sites. I’ve migrated it from a private hosting to Windows Azure last year and since then I am pretty happy about the level or reliability and performance that I got on Windows Azure. The one thing that I’ve been missing though was the regular backups that I used to have when I self-hosted my site. I backed up the site content and the database regularly and those backups have saved me several times. Often when I upgraded some WordPress plugins, the newer plugin version got some bug or change in behavior that I did not like. On those occasions I just restored the site from the most recent backup that I took. I really wanted to have this capability even when hosting my site in Windows Azure.
That’s what prompted me and my friends (Bilal Aslam, Robert Lucero and Michael Dorian Bach) to develop a backup service for Windows Azure web sites. The service is called Cloud Cellar and is now live in beta at
https://www.getcloudcellar.com/
With this service you can schedule regular backups of web sites hosted in Windows Azure along with SQL Azure or MySQL databases. The following walkthrough demonstrates the main capabilities of the service.
Sign up experience is pretty simple and once logged on you will see the main dashboard that shows the status of all the backups that you have scheduled. You can see how much storage all your backup copies take and how many backup jobs you can setup
Creating a new backup job is easy
- First upload a publishing profile for the site
- Next choose where to save the backup copies. You can use Cloud Cellar storage or specify connection to your own Windows Azure Storage
- Select backup schedule. Currently available options are “Weekly” and “Monthly”. “Daily”, “Hourly” and “On-Demand” are coming soon.
- Customize the backup. For example you can choose to backup only the site content or only the databases. Also you can specify the size limit for a backup. When a successful backup copy is taken the Cloud Cellar will check the total size used by the backup job and if it exceeds specified limit then the oldest backup copies will be deleted.
As soon as backup job is created a first copy will be taken. It may take some time, depending on the size of your site and databases. After it has been created you can see the backup copy details, including the number of backed up files and database tables.
From this page you can download the backup copy, which is a zipped up content of your site and database.
You can also schedule a restore job which will do a full synchronization of the site content with what was in the backup copy.
The Cloud Cellar Service is completely free and very easy to use. We hope it will be useful for people who need this kind of backup capability in Windows Azure. Please try it out and let us know if you have any feedback or feature suggestions.


I plan to give the Cloud Cell Service a try with my Android MiniPCs and TVBoxes Windows Azure WordPress Web site. Stay tuned for my results.
•• Ruslan Yakushev (@ruslany) described How to setup IP SSL on Windows Azure Web Sites in a 7/1/2013 post:
Azure Web Sites started to support custom domains SSL functionality recently. There are two SSL modes supported:
- SNI based SSL. This is an extension to SSL and Transport Layer Security (TLS) that allows multiple domains to share the same IP address, with separate security certificates for each domain. Most modern browsers (including Internet Explorer, Chrome, Firefox and Opera) support SNI, however older browsers may not support SNI.
- IP based SSL. This mode associates a certificate with a domain name by mapping the dedicated public IP address of the server to the domain name. This requires each domain name (contoso.com, fabricam.com, etc.) associated with your service to have a dedicated IP address. This is the traditional method of associating SSL certificates with a web server.
The SNI SSL setup is pretty simple and is documented in “How to enable SSL web site“. The IP SSL setup is more tricky, and unfortunately an important step is missing from that article. Without performing that step the domain name configured for IP SSL will continue to work as SNI SSL. The Windows Azure team is looking into fixing the documentation and UI workflow to prevent this confusion going forward. Meanwhile this blog post explains how to make sure IP SSL is configured correctly.
How to check if IP SSL is working
After enabling IP SSL for your custom domain the simplest way to test it is working is to use IE with TLS 1.0 option DISABLED. Open IE then go to Internet Options –> Advanced and uncheck the “Use TLS 1.0″ checkbox.
This basically emulates the behavior of web browsers that do not support SNI. Browse to your site using the custom domain name. Check which certificate is used. If IP SSL was not configured correctly then you will see the certificate error as below. If you do not see this error then IP SSL is working correctly.
How to fix IP SSL configuration
IP SSL requires a dedicated public IP address to be associated with a domain name. So when you enable an IP SSL binding for a custom domain name in Windows Azure Portal:
a dedicated IP address is assigned to your site. You can find this IP address on the site’s dashboard page in Windows Azure Portal (look for “VIRTUAL IP ADDRESS:“).
This dedicated IP address is different from the default Azure Web Sites IP address that was used when you’ve configured custom domain A record or CNAME. Any HTTP traffic that arrives on this new IP address will be using your custom SSL certificate. Any HTTP traffic that still arrives on the default Windows Azure IP address will continue to use SNI SSL (or default Azure Web Sites SSL certificate if HTTP client does not support SNI).
So to have IP SSL working properly you’ll need to update an A record for your domain name so that it points to the dedicated IP address assigned to your site instead of the default Azure Web Sites IP address. To do that logon to your DNS registrar’s web site, go to the page for managing DNS and configure the domain and IP address as follows:
Note that if your custom domain had a CNAME record pointing to yoursite.azurewebsites.net then you need to remove that CNAME record.


‡ Sivamurugan P described HOW TO: Deploy to a Windows Azure Website from Bitbucket in a 7/4/2013 post to the Aditi Technologies blog:
Bitbucket is a web-based hosting service for projects that use either the Mercurial or Git revision control systems. Bitbucket offers commercial plans and free accounts. In this post, I will explain how to use the Mercurial revision control system for hosting an application.
Pre-requisites:
Before you proceed with integrating your source code with Bitbucket for Windows version ensure that you have Tortoise HG and Visual HG. Note that Tortoise HG is a Mercurial revision control client that runs on both Microsoft Windows and Linux. Visual HG is a Mercurial Source Control Plugin for MS Visual Studio.
Steps to deploy a Windows Azure website from Bitbucket:
1. Create an account with Bitbucket.
2. Create a new repository. I have created one and named it firstmvc.
3. Create a sample website. I have created an MVC2 application on VS2010 as Visual HG supports 2005/2008 and 2010 RC.
4. Commit and Push to the repository (Bitbucket)
5. Login to the Bitbucket portal
6. Create a website. I have created mercurial.azurewebsite.net
7. Integrate the source control.
8. Click Set up deployment from source control.
9. In the Set Up Deployment window, click Bitbucket
Wait for authorization
10. Login with your Bitbucket account credentials.
11. Choose a repository
12. Link the project to Bitbucket
13. Deploy your website
14. Check the deployment history
Your MVC website as seen on the browser.
After the code is changed and committed to Bitbucket
Deployment History after the code is changed and committed to Bitbucket
Your website after new code changes
Your website after integration with Bitbucket
Simple enough? Try it and let me know how it goes in the comments.


‡ Richard Seroter (@rseroter) wrote How to Publish Node.js Application to Windows Azure Cloud for Newvem on 4/28/2013 (missed when published):
Windows Azure Web Sites offer a really nice and easy way to host applications written in a variety of languages. It also supports a variety of ways to push code, including Git, GitHub, Team Foundation Service, Codeplex, and Dropbox. For simplicity sake (and because I hadn’t tried it yet), I chose to deploy via Dropbox.
[However, first I had to create my Windows Azure Web Site. I made sure to use the same name that I had specified in my ADFS relying party. Learn how to Use Active Directory Federation Services to Authenticate / Authorize Node.js Apps in Windows Azure]
Once the Web Site is set up (which takes only a few seconds), I could connect it to a source control repository.
After a couple moments, a new folder hierarchy appeared in my Dropbox.
I copied all the Node.js application source files into this folder. I then returned to the Windows Azure Management Portal and chose to Sync my Dropbox folder with my Windows Azure Web Site.
Right away it starts synchronizing the application files. Windows Azure does a nice job of tracking my deployments and showing the progress.
In about a minute, my application was uploaded and ready to test.
Visualize your Azure resources and usage patterns
- Associate business activities with cloud usage
- Leverage Azure crowd sourced knowledge and best practices


Maarten Balliauw (@maartenballiauw) described Autoscaling Windows Azure Cloud Services (and web sites) in a 6/27/2013 post:
At the Build conference, Microsoft today announced that Windows Azure Cloud Services now support autoscaling. And they do! From the Windows Azure Management Portal, we can use the newly introduced SCALE tab to configure autoscaling. That’s right: some configuration and we can select the range of instances we want to have. Windows Azure does the rest. And this is true for both Cloud Services and Standard Web Sites (formerly known as Reserved instances).
We can add various rules in the autoscaler:
- The trigger for scaling: do we want to base scaling decisions on CPU usage or on the length of a given queue?
The scale up and scale down rules: do we scale by one instance or add / remove 5 at a time?
- The interval: how long do we want to not touch the number of instances running after the previous scale operation?
- The range: what’s the minimum and maximum required instances we want to have running?
A long awaited feature is there! I'll enable this for some services and see how it goes...


<Return to section navigation list>
Windows Azure Cloud Services, Caching, APIs, Tools and Test Harnesses
My (@rogerjenn) Uptime Report for my Live OakLeaf Systems Azure Table Services Sample Project: June 2013 = 100.00% of 7/5/2013 begins:
My (@rogerjenn) live OakLeaf Systems Azure Table Services Sample Project demo project runs two small Windows Azure Web role compute instances from Microsoft’s South Central US (San Antonio, TX) data center. This report now contains more than two full years of uptime data.
Here’s the detailed graphic report from Pingdom for June 2013:


‡ Shaun Xu explained how to Plan to Minimize VIP Changes in Windows Azure in a 7/5/2013 post:
In Windows Azure, when we published a cloud service, or a virtual machine, it will provide a public virtual IP (VIP) address and a DNS name to us. For example, when I created a new cloud service I need to provide the name, which is the public URL prefixing of it. Worldwide azure will provide [name].cloudapp.net while China azure will provide [name].chinaclouapp.cn. This URL will never been changed until we delete the cloud service regardless if anything we deployed in it or not. So it’s very stable that we can use to visit and bind with other external service, such as our DNS server through CNAME and some web services. But the public IP address we got was not as stable as this URL. If we need to use this VIP in our application we need to be very carefully since it might be changed out of our expectation.
I knew that the VIP might be changed in some cases, but I just dig into it once I got a requirement from a customer who need to bind their SMS service with the VIP of their cloud service. The communication between the SMS service and integrated application was socket, which means it only allow IP binding. And since they have a very strict firewall rule and change policy it would be very hard and time consuming to change the binding IP once it had been configured. So our target is to work out a plan to minimize the VIP changes.
VIP Grant, Keep and Release Policy
In the MSDN page (here) it said
The VIP of a cloud service is allocated when you first deploy it to Windows Azure in a particular environment, such as the Production environment. The VIP doesn’t change unless you delete the deployment explicitly or it is implicitly deleted by the deployment update process.
Well this is a little bit general and I would like to explain more about when the VIP would be granted, kept and released. I will use cloud service as the example, and the virtual machine would be very similar.
When we created a new cloud service, we specified the region, name and then Windows Azure provided a public URL to us. But at this moment since there is no deployment in the cloud service, there is no VIP assigned to it.
Once we deployed a package, regardless if it’s web role or worker role, regardless if you specified a public endpoint or not, Windows Azure will assign an internal IP address and a public IP address. They will be linked in the cloud service load balancer. The public address is the Virtual IP (VIP) we are talking right now.
For example, once we deployed a role with one instance, there will be an internal IP assigned to that virtual machine. In this case it’s 192.168.10.2. Then the load balancer will received a VIP assigned, in this case it’s 137.116.164.23, and linked with the virtual machine.
If we increase the instance count of this role, windows azure will create another virtual machine and host our role, assigned a new internal IP. And it will be linked to the load balancer with the existing VIP. So that in this case, the incoming request will arrive at the VIP, then be routed to one of the instances.
Also, if you update the package (application) you deployed in the cloud service, it will NOT cause the VIP changed as you still make the deployment exists on the instances.
The VIP will NOT be changed if any of the instance was crashed, reallocated or hard failure. Windows Azure will create another instance in cases above, deploy the application and link the new instance to the load balancer. So user can still visit it through the VIP. Furthermore, VIP will NOT be changed even though all instances are crashed at the same time.
This will only be happened if you specifically assign all instances in one fault domain.
But, if you removed the deployment from the cloud service, Windows Azure will release all instances you have, then release the VIP the load balancer has. This is the only way you get your VIP lost.
How to Keep My VIP
Based on the description above, if we keep the deployment exists in our cloud service, we will never loss our VIP. This should be very easy if the application is running on Windows Azure. Just make sure not delete the deployment, the VIP will be stable.
But if we wanted to update our application, which means deploy a new version in the cloud service, what we should do to ensure the VIP will not be changed? So let’s have a look on how to do it through Visual Studio.
Firstly I created a cloud service and deployed a web role. Then we can see the VIP was assigned from the portal.
Then in Visual Studio we trigger another deployment. Just make sure that in the publish wizard we have the “Deployment update” checked and “Delete deployment on failure” unchecked. This means
1, Deployment the package by updating on the existing deployments, instead of deleting the exist deployment and redeploy the new one.
2, Do not delete the deployment if this new one was failed.
Also, clicked the “Settings” link next to the “Deployment update” box and make sure the “If deployment can’t be updated, do a full deployment” is unchecked. This ensures that, never do a full deployment (delete and redeploy) even though failed or not possible.
After confirmed these configuration, we can start the deployment and the VIP was not changed as you see below.
In Visual Studio Windows Azure Activities Log window, we can see that the package was been uploaded but there’s not step for virtual machine creation. This our deployment was safe and the VIP was not changed.
If we unchecked the “Deployment update” setting and trigger an new one, the log window will be like this. And we will find that the steps for virtual machine creation, starting, etc..
This means Visual Studio deleted our existing deployment and the VIP was lost.
And the good news was, the VIP will never been changed even though
- The instance count was changed (increased or decreased).
- The VM size was changed.
- The role was changed (added, removed).
- The guest OS was changed.
- The endpoint was changed (public or internal, added or removed).
More Stable VIP Solution
Even though we knew that the VIP will not be changed unless the deployment was deleted, we still might need some architecture consideration to make the VIP more stable.
For example, the case I mentioned at the beginning of this post, if we need to bind our application with some external service with IP and it’s very difficult to change the binding, we need to do more to ensure the VIP will not be changed even though we deleted the deployment.
The solution is, we need to firstly identify the minimum component related with the external service, and separated it into a dedicate cloud service.
With this architecture, we can bind the VIP of the “stable” cloud service to the external service, and the main logic of our application will be in another “dynamic” cloud service. In this way the deployment of the “stable” cloud service almost never been changed since it only contains the minimum logic to communicate with the external service. For example in my case, it only contains the logic to send SMS.
Then we can update our application, change the code, redeploy and even delete the deployment in the “dynamic” cloud service. The VIP of this cloud service might be changed, but it will not affect the “stable” one.
Summary
In this post I described the policy Windows Azure grand, keep and release the Virtual VIP of a cloud service. And I also explained how to make sure the VIP will not change when publishing through Visual Studio. And finally I introduced an architecture solution to make the sensitive VIP more stable even though the main application cloud service VIP was changed.
(Originally posted on: http://geekswithblogs.net/shaunxu/archive/2013/07/05/plan-to-minimize-vip-changes-in-windows-azure.aspx)


• Shahrokh Mortazavi reported the availability of Python Tools v2.0 Beta for Visual Studio is available from CodePlex as of 6/25/2013 (missed when posted):

PTVS paired with “VS Shell” give you a complete and perpetually FREE Python IDE
(click to enlarge)PTVS is a free/OSS plugin that turns Visual Studio into a Python IDE. PTVS supports CPython, IronPython, editing, browsing, Intellisense, mixed Python/C++ debugging, profiling, HPC clusters, multiple REPL’s, IPython, Django, and cloud computing with client libraries for Windows, Linux and MacOS. This is an officially supported product from Microsoft's Developer Division.
Click to watch a quick overview of all PTVS 2.0 features (1-2 minutes per feature)
New features for 2.0 Beta in detail

New features for PTVS 2.0 Alpha:

Core IDE: PTVS supports all the core features of Visual Studio plus many Python specific ones:

Azure: PTVS now supports VMs, Cloud Service, Web Sites, Client Libraries and Browser based computing on Azure:

Complete list of Azure related features at: https://www.windowsazure.com/en-us/develop/python/
Installation
- PTVS itself is Free. It can be installed into a paid or free version of Visual Studio.
- Here are the detailed PTVS Installation Instructions.
PTVS News
- Latest PTVS info is available on our Codeplex PTVS News page, on twitter: @pt4vs, and facebook.com/pt4vs.
Getting Involved
- PTVS is built by a small team – we would love for you to get involved! Please see details here.
Building PTVS yourself
- If you’d like to build the code yourself, please see the instructions here: Building PTVS from source.
Related projects
- Sho, Solver, IronPython, IPython
- Dedicated to Kyril Faenov
• Brian Benz (@bbenz) reported The Windows Azure Toolkit for Eclipse, July 2013 Preview is ready! in a 7/3/2013 post:
Microsoft Open Technologies, Inc., has released a new update to the Windows Azure Toolkit for Eclipse. The July 2013 Preview includes a number of enhancements that make it easier for Eclipse developers to work with Windows Azure.
July 2013 Enhancements
For the July release, we’ve added an auto option for the Windows Azure Storage account selection in the JDK and server deployment configurations. This enables you to postpone the selection of a specific Windows Azure Storage account until you publish the deployment using the Publish to Windows Azure dialog. The Windows Azure Storage account you select in the Publish Wizard is used when you’re ready to publish. This is an enhancement to the automatic upload of a chosen JDK and App Server to Windows Azure storage that was enabled in the May 2013 release. See the updated Creating a Hello World Application for Windows Azure in Eclipse tutorial for more details.
Starting with this release, it’s also possible to deploy a complete cloud application to a new Windows Azure storage account within Eclipse. A key part of this capability is the addition of the New button in the Add Storage Account dialog, which creates a new Windows Azure Storage account without having to leave the Eclipse UI. More information here.
We’ve also added new features for larger deployments. One often requested feature is the ability to specify a local storage resource as the deployment destination for your JDK and application server, in case your deployment may be too large to be contained in the default approot folder, as is sometimes the case with larger JBoss and JDK v1.7 deployments. More information on large deployments can be found here. Another handy new feature for large deployments is our support for the new high-memory A6 and A7 Windows Azure Virtual Machines
We also added new options for Service Endpoints. With the users of Windows Azure by 21Vianet, China in mind in particular, there is also now a way to select the service endpoints of the Windows Azure cloud you target. Service endpoint options for this release are the global Windows Azure platform, the Windows Azure by 21Vianet, China, or a private Windows Azure platform. For more information, see Windows Azure Service Endpoints. Here’s how the Endpoint selection looks in the new release:
There is also an update to the Windows Azure Libraries for Java Package, based on version 0.4.4 of the Microsoft Windows Azure Client API. This package contains the latest SDK distribution and their open-source dependencies as an Eclipse library. Add this library to the build path of your project (not the Windows Azure project) and all relevant Windows Azure API libraries will be automatically referenced and included in your WAR file.
Getting the Plugin
Here are the complete instructions to download and install the Windows Azure Plugin for Eclipse with Java, as well as updated documentation.
As always, let us know how the latest release works for you and how you like the new features! To send feedback or questions, just use MSDN Forums or Stack Overflow.


M. Sheik Uduman Ali (@udooz) described Adopting Event Sourcing in SaaS using Windows Azure in a 7/3/2013 post to the Aditi Technologies blog:
People in the enterprise application development world and those with a strong attachment to the relational world feel ill-chosen while suggesting to use and adopt event sourcing. There are some reasons for that. This blog post specifies the candidate places in SaaS development using Windows Azure where event sourcing will be useful. Before that let us understand what event sourcing is.
Event Sourcing
Let us take an order management SaaS system as depicted in the figure below:
Assuming that the Order is the main entity (in the DDD world, this is further specialized as “AggregateRoot” or simply “Aggregate”). Whenever a request to make an order in this system through a service layer is made, a lifecycle of an Order instance will be started. It is started with OrderQuoted and ends with OrderShipped/OrderReturned.
In the typical relational world, we will persist the order instance as:


If the order OD30513080515 is delivered, then we will simply update the record # 1 as:
The Event Sourcing approach enforces to persist domain object using an immutable schema. In this case, the data store will look like:

You are now under the impression that event sourcing is nothing but an audit log and if this approach is taken in the main stream database, we will be end up with an underperforming query and unnecessary database size. Let us understand the benefits of event sourcing before discussing these concerns:
- Businesses sometimes need to track changes with relevant information that has happened in the entity during its lifecycle. For example, before shipping the order, if the system allows the customer to add or remove items in the order, “OrderItemChanged” this will play important role to recalculate pricing by tracking back to the previous “OrderItemChanged” events.
- With the immutable persistent model, this would be a fault tolerance mechanism so that at any point in time we can reconstruct the whole system or to a particular point by rewinding the events happened on a particular entity.
- Data analytics
The above two points keep specifying the term “event”. A business system is nothing but performing commands (technically Create, Update, and Delete operations) on business entities. Events will be raised as a yield of these operations. For example, making an order in the above SaaS system will create an event OrderBooked with following facts:
{
“name” : “orderBooked”,
“entity” : “Order”,
“occrredOn” : “2013-06-16 12:35PM”,
“orderDetail” : {
“orderId” : “OD30513080515″,
“orderItems” : [{ "productId" : "PR1234", "quantity" : 1}]
}
}
In the distributed domain driven design approach, the above domain event will be published by Order aggregate and the service layer receives the event and publish itself to the direct event handler or via event publisher. One of the main subscribers could be a event store subscriber that persists the event into the event store. The event can also be published to an enterprise service bus so that it can be subscribed and handled by wide variety of other subscribers. Most likely the schema for an event store looks like depicted below:
The various implementations of event sourcing use different terminologies and slightly different schema. For example, main stream event sourcing implementation will have the whole aggregate object itself on every change.
Hence, event sourcing has following characteristics:
- The data should be “immutable”
- Every event should be “identifiable”
In the SaaS World
By now, you have understood that event sourcing is not “one size fits all,” particularly, in the enterprise world. Based on the SaaS system and the organization ecosystem, you can suggest these different methodologies:
- Use Event Store as the main stream data store and use query friendly view data stores such as document or column friendly databases. This will handle all queries from client systems. This is likely to be the CQRS approach.
- For enterprises where you feel relational is the right candidate for main stream database, use event store as a replacement for audit log, if the system and regulations permit. This will help you to address the use cases where past event tracking is the business requirement.
Right Storage Mechanism in Windows Azure
When you are building applications on Windows Azure, you have three official storage options as of now. Let us see this as a whole:


Event sourcing is more than just an audit log that can be well adopted into the SaaS system. You should take the right approach on how to use this in your system. Windows Azure blob storage is one of the nicest option as of now since there is no native document or column oriented database support in Windows Azure.
Here are a few event sourcing frameworks in .NET:

Return to section navigation list>
Windows Azure Infrastructure and DevOps
• Philip Fu posted [Sample Of Jul 3rd] How to transfer IIS logs to storage account in a custom format in Windows Azure on 7/3/2013:
Sample Download : http://code.msdn.microsoft.com/How-to-transfer-IIS-logs-6f39b589
Because any log file transfer to Azure storage are billable, custom log file before transfer will help you save money. This sample will show you how to custom IIS logs in your Azure web role. This is a frequently asked question in forum, so we provide this sample code to show how to achieve this in .NET.
You can find more code samples that demonstrate the most typical programming scenarios by using Microsoft All-In-One Code Framework Sample Browser or Sample Browser Visual Studio extension. They give you the flexibility to search samples, download samples on demand, manage the downloaded samples in a centralized place, and automatically be notified about sample updates. If it is the first time that you hear about Microsoft All-In-One Code Framework, please watch the introduction video on Microsoft Showcase, or read the introduction on our homepage http://1code.codeplex.com/.

Grigori Melnik (@gmelnik) reported Windows Azure autoscaling now built-in on 7/2/2013:
One of the key benefits that the Windows Azure platform delivers is the ability to rapidly scale your application in the cloud in response to fluctuations in demand. Up to now, you had to write custom scripts or use other tools like Wasabi or MetricsHub in order to enable that. Last week during //Build, Scott Guthrie announced that autoscaling capabilities are available natively on the platform (also summarized in this post). This means that in most common scenarios you are no longer required to host Wasabi yourself. It’s now much easier to scale your apps by configuring the rules right within the Windows Azure portal. Just go to the Scale tab for your cloud services or VMs. The sample below shows the knobs for configuring autoscaling based on CPU utilization.
It’s still in preview and only supports basic metrics (CPU utilization and the Azure queue length). Nevertheless, Windows Azure autoscaling addresses the needs of the majority of Azure customers. It is quite simple and elegant. In fact, it’s so simple and intuitive you don’t need a tutorial for it. We recommend you consider it first before looking at any other options or tools.
If your scenarios require more advanced features (such as other perf counters, time-based constraints, composite rules, growth rates, custom metrics or actions), Wasabi may still be a good choice in the meantime. Many of its features are on the backlog of the Windows Azure autoscaling team and they will be added to the future releases of the platform in due course. As far as Wasabi goes, there’re no plans for future releases. This is aligned with p&p’s deprecation philosophy, on which you can read more on here.
To help you understand the differences between the current version of the built-in autoscaling feature and Wasabi, see the table below:


* Wasabi has 2 knobs: one to enable the cool-down periods after any scaling action and another one to optimize the costs around the hourly billing boundaries. With Windows Azure now supporting more granular billing, it’s recommended not to use Wasabi’s optimizing stabilizer.
During the keynote Scott Guthrie gave an example of Skype, one of the largest Internet services in the world. Like most apps Skype sees fluctuations in loads which result in unused capacity during non-peak times. By moving to Windows Azure and with the use of autoscaling, Skype will realize >40% of cost savings (vs running their own data centers or with no autoscaling).
Other autoscaling case studies can be found here.
Regardless whether you choose to use the new autoscaling feature (which you should!) or Wasabi, your application still needs to be designed for elasticity (for guidance, review most of the concepts in Wasabi docs, the Developing Multi-tenant Application for the Cloud guide (3rd edition) and the CQRS Journey guide).
<Return to section navigation list>
Windows Azure Pack, Hosting, Hyper-V and Private/Hybrid Clouds
‡ Tim Moyers (@TimothyMoyers) explained Microsoft Dynamics GP on Azure – how it stacks up in a 7/1/2013 post to the Reviora blog:
Now that Microsoft Dynamics GP is available on Windows Azure, the deployment scene has changed. Now, when a customer of GP 2013 is looking to provision the software, there are four choices to choose from.
Which one is best? You’ll have to decide on your own, but here’s a quick guide:
Option 1: Purchase license, Install on-premise.
As always, the option is available with Dynamics GP 2013 to purchase the Business Ready License (BRL) license on day one from your preferred Microsoft certified Dynamics value added reseller (VAR). Other than a nominal annual software assurance and maintenance fee that is required by Microsoft, you will outright own the software license.
From a deployment perspective you can install that license anywhere, so with the necessary server hardware requirements and network setup, the software will be up and running.
Option 2: Purchase license, install in a private cloud
With the Business Ready License you can install it anywhere, including a private cloud. In a private cloud, your Dynamics GP install will be running from a infrastructure where only your organization has access to the servers, licensing, and databases for your company, but the cloud “floats” around on high-end servers that you neither have to purchase nor maintain. There are a variety of remote hosting environments available. These range from hands-off to multi-tenant environments. Companies like Reviora, specialize in Microsoft Dynamics GP and will ensure it runs as best it can from an enterprise class datacenter that will virtually and physically be the most secure environment you can obtain. Since you own the license still, the monthly infrastructure cloud fee is lower than it would be with licensing included, and you have complete ownership of your data and license so you can migrate it anytime you wish (with a little help from your Dynamics partner).
Option 3: Rent license, deploy on Azure
With Microsoft’s new offering in Azure, subscribers can pay a monthly fee to not only license, but also host the infrastructure that it takes to create the environment. With Azure, you can leverage the Microsoft brand name and core infrastructure, but you do have to be responsible for, or pay for additional services to operate the environment. These include but are not limited to; authentication, backups, server maintenance, and layer on additional technology such as domains, IP addresses, and handle security concerns.
Paul White, Senior Director, Microsoft Dynamics ERP posted online recently: “It’s important to note that there’s no change in our partner model here, meaning that Microsoft Dynamics GP [..] continue[s] to be available only through our partners, and not direct from Microsoft. This is because we remain deeply committed to the industry and regional expertise our partners bring to every customer engagement, and to giving our customers the broadest possible range of choices in terms of partner selection, pricing and licensing, deployment options, hosting providers and more.”
Option 4: Rent license, deploy in a private cloud
The final option that is available, is a hosted Dynamics offering where you subscribe to the license for Microsoft Dynamics GP 2010 or 2013 and pay monthly for the private cloud infrastructure to run the software. The monthly fee will be more than an unlicensed option (option 2), however, the upfront cost to deploy will plummet and it will take years before this option would be more expensive than buying the license and deploying it on your own.
The finale:
And that’s how Microsoft Dynamics on Azure stacks up against your options. Contact your preferred Dynamics reseller or, if you don’t have one, give us a call so we can recommend one for you.


Randy Bias (@randybias) posted Missing the Point on Private, Public, and Hybrid Cloud APIs on 7/1/2013 to his CloudScaling blog:
At the recent Structure event in San Francisco, I watched Werner Vogels’ presentation, along with about 500 others in a packed auditorium. Werner is the CTO of Amazon Web Services and one of the industry’s more prophetic voices. (I was honored to share the keynote stage with him at Cloud Connect a couple of years ago.)
During Werner’s conversation with Jo Maitland, he talked about the Workday deal, the CIA contract win, and his forecast for the cloud market.
But it was a little more than eight minutes in when Werner’s comments really struck a chord with me. He talked about the importance of designing applications to fully leverage the scale-out architecture of AWS. His point was that business rules should drive automation decisions, not technical rules, but his comments underscored an unspoken assumption.
That assumption is that app architects and enterprise IT teams intuitively understand the intimate relationship between APIs and the infrastructure on which the app runs.
APIs usually reflect the underlying architectural assumptions of a given system. In the case of infrastructure clouds this means:
The capabilities of an API are only as good as that infrastructure’s ability to deliver on what the API promises. And elastic clouds like AWS deliver different services than enterprise architectures like VCE’s VBlock.
When an API is native, the implicit contract between the API and the infrastructure is well understood. However, when an API has been ported or copied – like the AWS and GCE APIs – this contract is at risk. How “true” your cloud is to a ported API depends on how well your new cloud’s architecture mimics, emulates, or recreates the native architecture that the API was attached to originally.
A real world example of this is the recent tussle between Oracle and Google. Google had re-written, from scratch, the Java VM into a new VM called Dalvik that was faithfully API-compatible with Java and the Java VM. Dalvik is not the *same* architecture as the JVM. However, it’s very similar, which allowed unmodified Java code to run on Dalvik. If, for example, you put the Java APIs on top of BEAM (the Erlang VM) most Java bytecode would fail to run because the architectures are so fundamentally different.
This might seem intuitive and obvious, but what I’m hearing from the marketing departments of cloud software vendors and from enterprises we talk to suggests that there’s critical (purposeful?) confusion at work.
That got me thinking about the nature of our conversation in the industry about private and hybrid cloud API compatibility with public clouds like AWS and Google Compute Engine (GCE). If you swallow the marketing hype whole, you’ll believe that all you need to move workloads from AWS or GCE to your private cloud and back is access to the APIs.
Nothing could be further from the truth.
So, I spent a few minutes talking to Rich Miller, Editor of Data Center Knowledge (and a GigaOm analyst) about what AWS compatibility really means.
Highlights from my conversation with Rich:
Customers are looking at how to deploy on the public cloud now, or future-proof app development for migration to public clouds like AWS and GCE later.
Accomplishing this means thinking about how applications will behave when API calls are made.
The key is *architectural* compatibility, not just API compatibility.
Cloudscaling’s product (Open Cloud System, or OCS) is a production-grade private cloud solution that’s compatible with AWS and GCE architecturally, not just at an API level.
Hardware management is an important part of architectural consistency with major public clouds. OCS’s Cloud Blocks architecture reproduces the way web-scale players think about hardware, including features like availability zones and virtual private cloud (available later this summer).
In short, it’s about ecosystem choice and flexibility. Enterprise IT buyers want the choice to run workloads on private cloud or public cloud depending on what makes the most sense given business circumstances (regulatory, agility, economics). Those circumstances change over time.
Choice is possible only when there’s architectural consistency between public and private cloud infrastructure. Those who focus only on API compatibility are either confused or intentionally misleading people. There is NO API COMPATIBILITY without architectural compatibility.
So, let’s talk about *architectural* consistency between private and public cloud, because hybrid cloud solutions are simply not possible without this.
APIs alone will never be enough.

![]() No significant articles today
No significant articles today
<Return to section navigation list>
Visual Studio LightSwitch and Entity Framework 4.1+
Jewel Lambert (@DotNetLore) explained jQuery Mobile Collapsible Content Control with LightSwitch in a 7/1/2013 post to her Dot Net Lore blog:
LightSwitch makes it easy to include custom controls in your HTML screen designs using the render method. In this method, the developer has complete control, but has to manually compose the necessary html.
This isn’t a problem for simple value controls – for instance a color picker or date picker. But it can be a bit cumbersome and tedious for group or collection controls. As a concrete example, let’s consider the jQuery Mobile collapsible content or accordion control.
Let’s create a screen and add some properties as children of a Rows Layout control. Now, if we were to change that Rows Layout control to a Custom Control, we’d be responsible for rendering not only the custom control, but all the child controls as well. It would be better if we could get LightSwitch to take care of the child controls while we simply modify the Rows Layout control to do what we want.
However with normal (non-custom) controls in LightSwitch, we only have access to the postRender method, not the render method. The render method fires before jQuery mobile has expanded the html based on data attributes. The postRender method fires after.
So if you want to change the Rows Layout from a simple <div> to a Collapsible Content Control, you can’t use the postRender method – it fires too late! Right?
Well… not quite. You can make dynamic changes to a page’s html, including adding new elements or changing data attributes of existing elements, and then tell jQuery Mobile to work its magic on these new elements. The key is trigger(‘create’).
This is a powerful technique. LightSwitch takes care of rendering all the child controls using the built-in control types… no need for custom controls. And we’ve essentially repurposed the Rows Layout control to act as our jQM Collapsible Content control, with just a few lines of code.
Here’s what our postRender method looks like, along with a helper method (which you’d normally place in a reusable library, but for simplicity in this example, I’ll leave in the screen’s .js file):
function collapsibleContent(element, contentItem, options) {
    // provide some defaults for the optional "options" parameter
    var defaults = { theme: 'a', collapsed: false };
    options = $.extend({}, defaults, options);

    // create a header based on the displayName of the bound content
    var h1 = $('<h1>').text(contentItem.displayName);
    $(element).prepend(h1);

    // build the <div> for the jQM collapsible content control
    var d = $('<div data-role="collapsible" data-content-theme="' +
        options.theme + '" data-theme="' +
        options.theme + '" data-collapsed="' +
        options.collapsed + '"/>');

    // wrap the existing children with this div
    $(element).children().wrapAll(d);

    // tell jQM to render the new <div>
    d.trigger("create");
}

myapp.AddEditPerson.Address_postRender = function (element, contentItem) {
    collapsibleContent(element, contentItem, { collapsed: true });
};
If we run this, we’ll see it works fine, except there’s a bit of a styling glitch.
There are several ways to correct this. I’m going to do it by adding an override in Content/user-customization.css:
.ui-collapsible-inset .ui-collapsible-heading {
    margin-right: 0px;
    margin-left: 0px;
}
Now the header aligns cleanly with the left and right border lines.


Andy Kung and Kris Langohr described Solution Explorer Enhancements in a 7/1/2013 post:
Last week we announced the availability of Visual Studio 2013 Preview and highlighted some improvements in this release of LightSwitch. One of which is the significant improvement of working with LightSwitch projects in the Solution Explorer. We will go over some of the enhancements in this article.
One view in Solution Explorer
If you have built a LightSwitch project before, you probably know the concept of a Logical View and File View. Logical View was originally designed in the early release to simplify what you see in the Solution Explorer. It only shows the core LightSwitch assets (screens/tables/queries) that you interact with the most. For more advanced scenarios, it requires you to switch to File View to see the underlying files and projects.
As LightSwitch introduces more features and allows you to customize more aspects of your application, it becomes apparent that the existing Logical/File View model does not scale. Specifically,
- With the introduction of the HTML Client in Visual Studio 2012 Update 2, users must switch back and forth between Logical View and File View to manage the contents of your HTML Client and achieve common scenarios.
- New features such as SharePoint support and intrinsic database management increase the number of projects associated with your LightSwitch application that require direct interaction.
With Visual Studio 2013 Preview, all your project content is available under one view in Solution Explorer! So in addition to managing screens, tables, and queries, you can add a NuGet package, update CSS and images, and manage project references while writing code all under one view.
Familiar development experience
Everything that you used to be able to do in the Logical View is still available to you in the consolidated view and the functionality is in the same places you used to go.
To highlight some of the enhancements, let’s walk through some designer gestures to create a simple appointment list application. We will skip the implementation details and focus on the navigation experience around the Solution Explorer.
Create a LightSwitch Application
First, create a LightSwitch HTML Application project. After the project is created, you will notice 3 projects in your solution: LightSwitch root project, client project, and server project.
The LigthSwitch root project is where you can find the application level properties such as authentication mode, extensions, and SharePoint. You can also add a 2nd client or publish your app via the context menu.
Add a table
We will start by adding an appointment table. Right click on the Data Sources node and add a table via the context menu. Name it Appointment. The appointment table will appear under the Data Sources node. Notice we preserve the logical grouping of the data sources and tables you would find in the Logical View in Visual Studio 2012.
Add some fields in the table such as StartDate and EndDate.
Add a query
We want to eventually display a list of upcoming appointments. We need a query to return appointments sorted by date. Right click on the Appointment table node and add a query via the context menu. Name it UpcomingAppointments. The query will show up under the appointment table. Sort the appointment by StartDate using the query designer.
Create a screen
We’re ready to create the appointment screen. Right click on the Screens node and add a screen via the context menu.
We will create a Browse Data Screen showing the UpcomingAppointments. The newly created screen will appear under the Screens node.
Manage NuGet
We’d like to format the appointment list item by leveraging libraries from the community. Right click on the HTMLClient project node and select Mange NuGet packages via the context menu. Search for moment.js and install the package. The JavaScript file is downloaded to the Scripts folder for you.
Update default.htm
To use the library, we also need to reference it in the default.htm of the HTML client. Open default.htm and add in the reference.
Write screen code
Now we’re ready to consume the library. Open the appointments screen by double clicking on the screen node. On the screen designer, change the list item to Custom Control and click Edit Render Code in the Properties window.
Notice the screen code file is nested under the screen.
Many developers who may have used WinForms or WPF applications in the past are likely familiar with the concept of nesting an items code underneath the item in Solution Explorer. We now use that same type of functionality to give you a hierarchical view of your items including their source code. This allows you to expand and collapse your view to see the level of detail that you are interested in.
Customize theme
You can also customize the theme by directly manipulating the CSS and images under the Content folder.
Notice the development experience is very similar to building a LightSwitch application in Visual Studio 2012. However, we eliminated the need to switch back and forth between the Logical View and File View! We consolidated everything under one view to speed up the development of these common scenarios.
What else?
In addition, we’ve made LightSwitch projects work more seamlessly with the Visual Studio IDE. Now that we don’t have a custom LightSwitch Logical View but rather integrate directly into the Solution Explorer, you can leverage the already built-in features like scoped views and search.
Scoped Views
Right click on a node and select Scope to This via the context menu. This allows you to reduce what you see in the Solution Explorer to just a selected node and its children. For example, you could scope to the Data Sources node and focus on defining the data.
New Solution Explorer View is similar in function but rather than replacing the existing Solution Explorer it creates a new tool window containing the selected node and its children. This allows you to create as many scoped instances as you like to track as much information as you want. The other great thing about the windows is that you can drag them wherever you want, even outside of Visual Studio.
Search
Another huge benefit of consolidating the Logical View and File View is that you can leverage the powerful search feature in Solution Explorer. For example, I could use search in Solution Explorer to find everything (screen, table, query, method, etc) that has something to do with appointments, all under one view.
Conclusion
Visual Studio 2013 improves the usability of working with LightSwitch projects in the Solution Explorer and speeds up the common tasks.
Please let us know what you think and thank you for trying Visual Studio 2013 Preview!


 No significant Entity Framework articles today
<Return to section navigation list>
Cloud Security, Compliance and Governance
•• David Linthicum (@DavidLinthicum) asserted “Cloud computing is the perfect match for the strictures around patient data HIPAA puts in place” in a deck for his HIPAA and Cloud Computing is a Great Match article of 7/2/2013 for Gathering Clouds:
Those charged with HIPAA security and compliance within healthcare organizations are quick to say “No” to cloud computing. Why? Clouds are not under their direct control, clouds are not typically up-to-date on existing and emerging healthcare regulations, and, most importantly, clouds are new and unproven. However, healthcare could be missing a huge opportunity.
There is a clear need to rethink the role of cloud computing by those charged with HIPAA security and policy. The trick is to understand the existing requirements, and then understand how the emerging use of cloud computing could provide compliant and secure HIPAA solutions. In many cases, leveraging cloud computing will improve upon the best practices and technology that exist today.
One of the things that those looking at cloud computing and HIPAA find most frustrating is dealing with myths versus reality when it comes to HIPAA Security and cloud adoption. The “addressable” requirements of the security rules tend to be the most difficult to meet. Thus, these addressable requirements have a tendency to fall off of the radar, and therefore could create issues with compliance.
HIPAA Security has three overall sections: Administrative, physical, and technical. Each section outlines things that should be done to remain compliant through the “implementation specification.” An example is the “technical safeguard” section that defines the standard for “transmission security,” and outlines how data should be protected through encryption.
So, what about cloud computing and HIPAA? First you need to realize that the cloud provider is an active participant, and thus must also adhere to security requirements, such as employee screening and physical access requirements. Our host, LogicWorks, is a good example of a cloud-based active participant, but you could have many.
Thus, you need a cloud computing provider that understands HIPAA, but most importantly, understands how to be compliant. This means they should become a trusted agent and owner of your data, and meet all of the security requirements, including encryption, integrity controls, transmission protections, monitoring, management, and physical security. They will need to pass the same audits, and should meet or exceed your expectations and requirements.
Keep in mind that cloud computing is not for all who have to deal with HIPAA security. In some instances, it’s not cost effective when considering the internal processing risks, cost of migration, or ongoing operational costs. You have to do your homework before making the jump.
However, in the vast majority of cases, cloud computing and HIPAA security are a good mix, assuming you partner with a cloud computing provider that knows what they are doing around HIPAA Security. To get comfortable with a provider, you need to ask the right questions and review their existing documentation.
In reality, this is the right move for most who have to deal with HIPAA compliance. You outsource the process of dealing with HIPAA security to those who are best equipped and funded to deal with it. Through economies of scale, a cloud computing provider that specializes in HIPAA compliance should both save you money as well as make your life easier.


Paul S. Patterson (@paulspatterson) described Creating a Governance Model for Public Cloud Security on 6/21/2013 (missed when published):
cTheir are obvious opportunities that the public cloud offers, and while the rewards far outweigh the risks, there are still risks. Applying governance to your cloud strategy will set you in a better position to realize value, within the levels of risk that you are willing to accept.
The flexibility of today’s cloud services, especially public cloud services, provides for very convenient and easy ways of “spinning up” services on demand. Just like the way grocery store candy and magazine stands serve customer impulse buying tendencies, so do the offerings of some public cloud services. It is very easy to provision a new service in the public cloud. With Windows Azure for example, I can fire up a full blown 8 server infrastructure, complete with networking and integrated services, in a matter of twenty minutes. That simple convenience makes it easy to cater to impulse tendencies.
Policies and procedures are meant to ensure that activities are executed in way that are in the best interest of the organization. Additional governance processes specifically for cloud services ensures that those services are used in a controlled way, so that the interests of the organization are maintained. Creating and deploying a cloud based server farm that includes virtual networking connected to your on-premise infrastructure, for example, presents risks. With a set of governed practices, that cloud based deployment will meet the expectations of the organization, and thus make your CIO sleep better at night.
Is governance for cloud services needed? Well, let’s try and answer the questions that help determine if your use of cloud services should be governed in some what or another.
What returns do you expect to receive from public cloud services? What opportunities will be lost if you don’t adopt a cloud strategy?
Again, the risk of using public cloud services are likely insignificant compared to the opportunities that will be lost. Operational efficiencies. Improved customer service and satisfaction. Sales and revenue. There are plenty of opportunities in adopting a public cloud strategy. Planning and executing on a sound cloud strategy can enabled an organization to realize a return from new opportunities.
Policies and practices will typically guide how public cloud services will provide value. Governed cloud services are expected meet organizational expectations, with goal being that the services used will return value and realize new opportunities.
If you used a cloud service today, is there clear direction and does that direction align with strategic objectives?
Cloud services are not the means to an end. Cloud services are simply another mechanism for enabling and delivering business value. Your current internal data center, or your “private cloud”, was created for a reason; to deliver value to the organization. Decisions on IT spending are ultimately measured against strategic objectives. The decisions made to use cloud services should be traced back to clearly defined, accepted, and measured organizational priorities.
Do you have a cloud strategy for your organization? If so, does that strategy include plans to meet enterprise goals and objectives?
Are you ready for the cloud? How do you feel when someone starts talking to you about public cloud services?
Some organizations are not ready for the public cloud, or cloud computing in general for that matter. There is a lot of publicized hype and marketing about cloud services. The cloud computing landscape can be confusing and intimidating at best. Being ready for the public cloud means being comfortable about what the public cloud offers, and what risks are, and are not.
An organizations’ readiness for public cloud services can be gauged by the following:
- The amount of public cloud knowledge in the enterprise.
- Organizational attitude towards the public cloud, and does the organizations’ culture support public cloud opportunities.
- Existing strategies conflict with using public cloud services.
- What does your gut say?
Determining an organizations readiness for adopting a Public Cloud strategy is critical in identifying adoption pressure points. Rather than brute force the implementation of a strategy, due diligence will hash out and prioritize the opportunities that will bring the organization to a state of Public Cloud readiness. Risks should be identified with existing organizational culture, knowledge, and policies and practices. A readiness assessment can then created and vetted.
What else?
Some resource that I have found of interest (so far)…
- Information Systems Audit and Control Association
- Cloud Security Alliance
- Understanding IT Governance in the Cloud For Dummies - You have to start somewhere
Hey, this is just one of many topics I am discovering in my never ending public cloud security journey. I likely just touched the surface on this particular topic and if you have any insight, opinions, or whatever, please let me know. The more discussion the better.

Paul S. Patterson posted Becoming a Public Cloud Security Expert on 6/19/2013 (missed when published):
I read an interesting Forbes.com article regarding the results of a cloud computing survey. Among the interesting findings and great infographics was a point about the most common inhibitors to cloud computing adoption. According the findings from the survey, security concerns is the most common inhibitor.
Risk Averse, or just Naive
I’m not much of a security concerns kind of guy. In fact, I put a lot of faith in the folks at Microsoft, Amazon, and the like. I believe that the work they have done with (and the billions of dollars they have sunk into) security in their cloud services is more than enough to make be feel safe. Notwithstanding I am not, however, naive enough to simply throw caution to the wind and rely on someone else’s say-so.
So, to ensure I live up to my own self-proclamation as that of a public cloud expert, I need to be accountable to what I say and do, and make sure I truly do know a little more about cloud security than, say, the next guy. Thank being said, I am going to dedicate these next couple of months to becoming more “enlightened” in all things public cloud security.
Where to Start
My objective in all this is to be able to handle any objection to adopting cloud services – objectively. The key word here being “objectively”. I may be a fan of Microsoft’s Windows Azure, but to really be considered an expert at public cloud security, I need to understand the entire playing field.
Here is where I am going to start; by first creating a list of what I consider today’s most common concerns when it comes to security in the public cloud.
- Governance
- Compliance and Auditing
- Data Protection
- Identity and Access Management
- Whatever else I happen to think of and discover…
So, here I go (I was already scanning the web for interesting articles).


<Return to section navigation list>
Cloud Computing Events
• Juval Löwy will present Introducing the Azure Service Bus to the San Francisco Bay Area Azure Developers group on 7/9/2013 at 6:30 PM PDT:
Microsoft San Francisco (in Westfield Mall where Powell meets Market Street)
835 Market Street
Golden Gate Rooms - 7th Floor
San Francisco, CA (map) We are in the same building as Westfield Mall, 7th Floor
The services bus is arguably the most accessible, ready to use, powerful, and needed piece of cloud computing. The service bus allows clients to connect to services with great ease, across any boundary as if they were part of the same local network, and doing all that without compromising the programming model or security. The service bus acts as an equalizer between large and small companies, and is the gateway for future cloud migrations. Not only that, but the service bus offers significant advantages with security, scalability, extensibility, availability and events distribution.
This session presents the service bus model, why it is such a fundamental breakthrough, suggests ways the technology can evolve and where it is heading, and what does the service bus mean for decision makers, system architects, and how it affects the very business model of the next generation applications.
About Juval Lowy
Juval Löwy is the founder of IDesign and a master software architect specializing in system and project design. Juval has mentored hundreds of architects across the globe, sharing his insights, techniques, and breakthroughs, in architecture, project design, development process, and technology. Juval is Microsoft’s Regional Director for the Silicon Valley and had participated in the Microsoft internal strategic design reviews for C#, WCF and related technologies. Juval is a frequent speaker at the major international software development conferences. Juval published several bestsellers, and his latest book is the third edition of Programming WCF Services (O'Reilly 2010). Juval published numerous articles, regarding almost every aspect of modern software development and architecture. Microsoft recognized Juval as a Software Legend as one of the world's top experts and industry leaders.


<Return to section navigation list>
Other Cloud Computing Platforms and Services
David Linthicum (@DavidLinthicum) asserted “Oracle's late scramble to the cloud is a cautionary tale for all traditional enterprise software providers” in a deck for his Oracle's aversion to cloud computing takes its toll post of 7/2/2013 to InfoWorld’s Cloud Computing blog:
Everyone loves to bash Oracle. Why? Because it is big, its stuff is expensive, and most enterprises are wholly dependent on its technology.
I always understood why Oracle was the brunt of jokes, but each quarter it was able to post substantial numbers. Then came cloud computing.
Although enterprise software companies miss their financial numbers for many reasons, not just new technology, the recent announcement that Oracle missed its Q2 projection has many analysts worrying and wondering about the impact of cloud computing on Oracle. Many also question if Oracle can take advantage of the growing cloud computing space.
In a response to the lagging numbers, Oracle signed three significant alliance agreements with Salesforce.com, Microsoft, and NetSuite, focused on providing database technology and software integration. The idea is simple: If you can't build the cloud computing technology fast enough, push it into companies that do, and let everyone know about it.
Oracle has a cloud strategy. However, it's been focused on selling more enterprise software and not on-demand computing. Indeed, the new model for consuming technology on demand flies in the face of how Oracle currently sells its products. The model also doesn't support Oracle's historically high margins and, thus, its profitability.
Oracle is the first of many enterprise software companies that will find cloud computing is, at best, a distraction that lower sales or, at worst, a technology usage shift that leaves them without market demand. The reaction should be to go with the flow and create cloud offerings that nail the market. However, most enterprise software providers are busy writing press releases rather than actually building cloud technology.
The result will be sheer panic in a few years as enterprise software providers finally realize they can't spin or purchase their way out of trouble. We've seen this pattern before, such as when Microsoft focused on the PC in its early days while the established companies ignored PCs and stuck to their mainframes and minicomputers. Those companies are not around today.

Jeff Barr (@jeffbarr) reported MySQL 5.6 Support for Amazon RDS on 7/1/2013:
I am happy to announce that the Amazon Relational Database Service (RDS) now supports version 5.6 of MySQL.
If you are an existing RDS customer, you know that Amazon RDS for MySQL delivers several important benefits to MySQL customers including ease of deployment, high availability with automatic failure detection and failover, read replicas, push button scalability, automated back-ups, point-in-time restore and automated software upgrades and patching.
New Features in MySQL 5.6
You now have access to a number of powerful new MySQL 5.6 features. Here's a sampling:
- Crash Safe Read Replicas - MySQL 5.6 improves the reliability of RDS Read Replicas by making the binlog and table data transactionally consistent on the primary database instance. This allows Read Replicas to resume replication automatically after a primary database instance crashes or fails over (in the case of Multi-AZ instances).
- InnoDB Integration with Memcached - You can use the Memcached API to bypass the SQL layer and treat InnoDB data as a “key-value” store. You can enable Memcached on your Amazon RDS for MySQL instance using a DB Option Group.
- Binary Log Access - You can download and stream binary logs through the native mysqlbinlog tool. This can be useful for a variety of purposes such as syncing data with an on-premises deployment, audit logging, analytics, and debugging of replication errors. You must enable backup retention for the RDS database instance in order to take advantage of this feature.
- Online Schema Changes - You can now initiate multiple, concurrent ALTER TABLE operations on InnoDB tables to add columns or indexes while simultaneously running queries.
- Full Text Indexes - You can build full text indexes (for InnoDB tables) on columns with text based content to speed up searches for words/phrases.
Launch Now
You can get started with MySQL 5.6 today by launching RDS Database Instances from the AWS Management Console:
Upgrading From MySQL 5.5
Upgrading an existing database instance from MySQL 5.5 to MySQL 5.6 is not currently supported. However, we intend to provide this functionality in the near future.In the meantime, if you would like to port your existing MySQL 5.5 database to MySQL 5.6, you can use mysqldump to export your database from your existing MySQL 5.5 database instance and import it into a new MySQL 5.6 database instance.
For more information, visit the MySQL section of the Amazon RDS User Guide.


Jeff Barr (@jeffbarr) announced a Transaction Library for DynamoDB on 7/2/2013:
Today we are introducing a new client library that will reduce the development effort needed for you to perform atomic transactions that can encompass multiple DynamoDB items in one or more tables. This allows you to develop those applications more easily on DynamoDB that until now either required relational databases (with their attendant scalability issues) or required you to do a lot of work in your application tier to implement atomicity.
Let's review the concepts of atomicity and transactions before digging in...
In many cases, several related database storage operations must be treated as a transaction. Within the scope of a transaction, all of the storage operations must succeed or fail as a unit. This is referred to at Atomicity. When all goes well, a transaction proceeds as follows:
- Begin transaction.
- Put item #1.
- ...
- Put item #N.
- Commit transaction.
If an error is detected before step 5 completes, or if the program terminates unexpectedly, then the transaction fails and the Put operations (Steps 2 through 4) are undone, leaving the database items in the state that they existed in prior to step 1. If you are writing code that transfers money from one bank account to the next, you'd definitely encapsulate the operations in a transaction, otherwise you could lose money (and prevent the accounts from balancing) if an interruption or fault occurred at an inopportune time.
The DynamoDB Transaction Library
The new library has been implemented as an extension to the existing DynamoDB in the AWS SDK for Java. This library tracks the status of ongoing transactions using a pair of DynamoDB tables. The first table stores the transactions and the second one stores pre-transaction snapshots of items modified within a transaction. You must call the verifyOrCreateTransactionTable and verifyOrCreateTransactionImagesTable functions from the TableManager class to create the tables before you initiate any transactions.. Be sure to provision sufficient read and write capacity to avoid undue delays.Here's a code sample that creates the necessary tables:
AmazonDynamoDB client = new AmazonDynamoDBClient(); // pass in your AWS Credentials, and configure which DynamoDB endpoint / region you're talking to
TransactionManager.verifyOrCreateTransactionTable(client, "Transactions" /*tableName*/,
10 /*readCapacityUnits*/, 10 /*writeCapacityUnits*/, 10 * 60 /*waitTimeSeconds*/);
TransactionManager.verifyOrCreateTransactionImagesTable(client, "TransactionImages" /*tableName*/,
10 /*readCapacityUnits*/, 10 /*writeCapacityUnits*/, 10 * 60 /*waitTimeSeconds*/);Here's some code that performs a transaction on the Thread and Reply tables, as described in the Amazon DynamoDB Developer Guide. In the example Forums application, there is a Thread table, which stores one item for each question that has been asked on the forum, and a Reply table, which stores one item for each response to each question. The Thread table also contains a count of the number of total replies for each question and whether or not the question is answered. The following transaction both adds a new Reply, and increments the “Replies” counter in the associated Thread item:
// Create a new transaction manager (do this once, potentially at the same time as making a new client object)
TransactionManager txManager = new TransactionManager(client, "Transactions", "TransactionImages");
...
// Create a new transaction from the transaction manager
Transaction t1 = txManager.newTransaction();
// Make a PutItem request to add a new Reply to a Thread asking about DynamoDB Transactions
Map<String, AttributeValue> reply = new HashMap<String, AttributeValue>();
reply.put("Id", new AttributeValue("Amazon DynamoDB#Transactions?"));
reply.put("ReplyDateTime", new AttributeValue("(the current date and time)"));
reply.put("PostedBy", new AttributeValue("DavidY@AWS"));
reply.put("Message", new AttributeValue("Transactions are now available!"));
t1.putItem(new PutItemRequest()
.withTableName("Reply")
.withItem(reply));
// At this point the new Reply item is in the table, but is not yet committed
// Add second request for a different item to the transaction object
Map<String, AttributeValue> thread = new HashMap<String, AttributeValue>();
thread.put("ForumName", new AttributeValue("Amazon DynamoDB"));
thread.put("Subject", new AttributeValue("Transactions?"));
Map<String, AttributeValueUpdate> threadUpdates = new HashMap<String, AttributeValueUpdate>();
threadUpdates.put("Replies", new AttributeValueUpdate(new AttributeValue().withN("1"), "ADD"));
t1.updateItem(new UpdateItemRequest()
.withTableName("Thread")
.withKey(thread)
.withAttributeUpdates(threadUpdates));
// At this point the new Thread item is in the table, but is not yet committed
// Commit the transaction
t1.commit();
// Committed transaction. The Thread and Reply writes are now both committed
// Delete the transaction item
t1.delete();In addition to atomic writes, the transaction library offers 3 levels of read isolation: fully isolated, committed, and uncommitted. Fully isolated reads are performed through obtaining locks during a transaction, just like writes. Committed reads provide a consistency guarantee similar to eventually consistent reads, and are performed by reading the old copy of the item if a lock is detected. Uncommitted reads (also known as “dirty reads”) are the cheapest, but are the most dangerous, since they may return data that will later be rolled back. Here’s some code that performs a read operation at the “committed” isolation level:
// reusing the txManager variable from earlier
Map<String, AttributeValue> key = new HashMap<String, AttributeValue>();
key.put("ForumName", new AttributeValue("Amazon DynamoDB"));
key.put("Subject", new AttributeValue("Transactions?"));
// Uncommitted reads happen on the transaction manager, not on a transaction.
Map<String, AttributeValue> item = txManager.getItem(new GetItemRequest()
.withKey(key)
.withTableName("Thread"),
IsolationLevel.COMMITTED).getItem();More code examples are available in the README file distributed with the transactions library.
A single transaction can span one or more DynamoDB tables. Transactional puts are more expensive (in terms of read and write capacity units). A put that does not contend with any other simultaneous puts can be expected to perform 7N + 4 writes as the original operation, where N is the number of requests in the transaction.
Getting Started
To get started, download the AWS SDK for Java, pull the DynamoDB Transactions library off of the AWS Labs GitHub repository, read the documentation, and start coding!


<Return to section navigation list>


0 comments:
Post a Comment