Windows Azure and Cloud Computing Posts for 5/6/2013+
• Tutorial of the Week:  Sandrino Di Mattia’s Reference implementation: Creating a hybrid cloud with Windows Azure Virtual Networks software based Site-to-Site VPN of 5/6/2013 in the Windows Azure Virtual Machines, Virtual Networks, Web Sites, Connect, RDP and CDN section below.
| A compendium of Windows Azure, Service Bus, EAI & EDI, Access Control, Connect, SQL Azure Database, and other cloud-computing articles. |
• Updated 5/9/2013 with new articles marked •.
Note: This post is updated weekly or more frequently, depending on the availability of new articles in the following sections:
- Windows Azure Blob, Drive, Table, Queue, HDInsight and Media Services
- Windows Azure SQL Database, Federations and Reporting, Mobile Services
- Marketplace DataMarket, Cloud Numerics, Big Data and OData
- Windows Azure Service Bus, Caching, Access Control, Active Directory, Identity and Workflow
- Windows Azure Virtual Machines, Virtual Networks, Web Sites, Connect, RDP and CDN
- Windows Azure Cloud Services, Apps, APIs, Tools and Test Harnesses
- Visual Studio LightSwitch and Entity Framework v4+
- Windows Azure Infrastructure and DevOps
- Windows Azure Platform Appliance (WAPA), Hyper-V and Private/Hybrid Clouds
- Cloud Security, Compliance and Governance
- Cloud Computing Events
- Other Cloud Computing Platforms and Services
Azure Blob, Drive, Table, Queue, HDInsight and Media Services
Denny Lee (@dennylee) suggested that Hadoop users and developers Add Built-In Hive UDFs on HDInsight Azure in a 5/6/2013 post:
In the last few weeks, I have had a number of customers ping me about how to
utilize various Hive UDFs. The first ask was how to use some of the UDFs that are already built into Hive. For example, if you wanted a generated row sequence number (i.e. an IDENTITY column), you can use the Hive UDF UDFRowSequence.
This UDF is already built and included in the hive-contrib-0.9.0.jar that is not already loaded in the distributed cache (run list jars from the Hive CLI to verify). Below is a quick code snippet that allows you to run the generated row sequence by accessing the UDFRowSequence Hive UDF.
– Compression codecs (not necessary for Hive UDFs, just habit)
set mapred.compress.map.output=true;
set mapred.map.output.compression.codec=org.apache.hadoop.io.compress.GzipCodec;
set hive.exec.compress.intermediate=true;– Drop the table
DROP TABLE hivesampletable_rowseq;– Add the built-in Hive jar that contains the Hive UDF UDFRowSequence
ADD JAR /apps/dist/hive-0.9.0/lib/hive-contrib-0.9.0.jar;– Create a function that references UDFRowSequence that can be used within the Hive statement directly
CREATE TEMPORARY FUNCTION rowSequence AS ‘org.apache.hadoop.hive.contrib.udf.UDFRowSequence’;– Running the Hive statement with rowSequence() call
CREATE TABLE hivesampletable_rowseq
AS
SELECT
rowSequence() as lid,
clientid,
querytime
FROM hivesampletable;Note that running the ADD JAR statement still uses Unix paths (even though we’re on Windows) which references the local file path (vs. HDFS or ASV).


<Return to section navigation list>
Windows Azure SQL Database, Federations and Reporting, Mobile Services
Kevin Kell described Data Analytics in the Cloud – Microsoft Azure SQL Reporting in a 4/30/2013 post to the Learning Tree blog (missed when published):
•
First, let me say I have been looking forward to using this service for some time. As a long time user of SQL Server Reporting Services (SSRS) I was eager to use this technology in some of my cloud computing projects. I was disappointed a few months ago, however, when I started down the path but then discovered that the minimum cost I could achieve would be in the order of around $600 per month. I could not in good conscience recommend that to my client. At the current cost of $0.16 per hour I think it is still a little expensive but may be preferable to building an on-premises solution. In this post I will take a quick look at using Azure SQL Reporting as a cloud-based business intelligence tool.
We can start from the Azure portal. Select the SQL REPORTING tab. A wizard walks you through the process of creating a Reporting Services service. Once the wizard completes you will have provisioned a Reporting Server on Azure. We can then go ahead and create reports and publish them to this server in exactly the same way we would publish to any SSRS server.
To create reports I usually use the Business Intelligence Template for Visual Studio 2012 (aka BIDS). I have also used Report Builder 3.0 but I find that I am more comfortable in Visual Studio and it offers more flexibility. For my report data source I created a database on Azure SQL DATABASE. In this way my whole solution is in the cloud. When you are finished creating the report to your specification all you then have to do is just deploy it to your Azure SQL Reporting service using the Web Service URL shown on the dashboard.
The only issue I found here is that when you create the data source in BIDS you need to specify that the connection type is Microsoft SQL Azure. If you don’t do this you will get an error when you deploy the report.
Figure 1. Data Source Properties
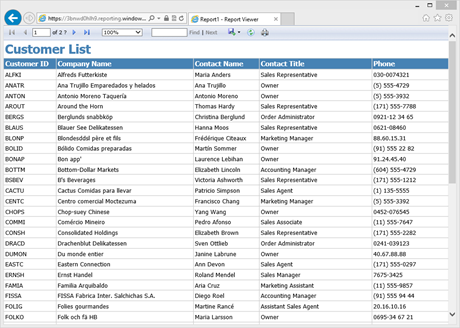
Once it is deployed you can view the report in a browser:
Figure 2. Report hosted on Azure SQL Reporting service
So, all in all, the process is pretty straightforward and painless. In this way you can easily deploy SSRS reports without the administrative requirement of having to install and configure a Report Server on-premises. I think that it is likely, however, that there may be some incompatibilities that I haven’t discovered yet. I will continue to look for these in the days to come.


![]() No significant articles today
No significant articles today

<Return to section navigation list>
Marketplace DataMarket, Cloud Numerics, Big Data and OData
Mike Pizzo (@michael_pizzo) reported OData Version 4.0 enters 30-Day Public Review in a 5/3/2013 post to the OData.org blog:
Last Friday the OASIS OData Technical Committee voted unanimously to progress the OData Version 4.0 spec to public review.
The official announcement was sent out yesterday, kicking off the 30 day review. The announcement includes links to the public review documents for the Core Protocol, Atom, and JSON specifications, and instructions for submitting feedback through the mailing list. Note that all comments submitted to OASIS are subject to the OASIS Feedback License.
This is an exciting milestone for OData and we need your help! The public review is your opportunity to provide input into OData version 4.0, so please review the latest documents and send us feedback as soon as possible, but no later than the close of this public review period, June 2, 2013.
Thank you in advance for your feedback!

David Linthicum (@DavidLinthicum) asserted “Although cloud providers like Amazon are linking big data with the public cloud, enterprises rightfully don't see it that way” in a deck for his CIOs like big data, just not in the cloud post of 5/3/2013 to InfoWorld’s Cloud Computing blog:
Amazon.com CTO Werner Vogels recently made the case for big data computing in the cloud. But what else would you expect him to say?
The points made by Vogels are compelling, including a prediction that demand for big-data analysis is spurring interesting in real-time analytics. Enterprises thus need capacity; to Vogels, this means they need the public cloud -- Amazon's public cloud in particular. Vogels also said we can expect infrastructure like Hadoop to become invisible behind a cloud-provided analytics layer such as (of course) Amazon's Redshift.
Vogels is half right today, and he could be completely correct in five years.
The reality is that big data is, well, big. Most enterprise have some sort of big data project under way, and they see much the same benefits as Vogels does, such as the move to real-time analytics, including predictive analytics that CIOs believe will add a huge amount of value to what enterprise IT can do.
Public cloud computing platforms are indeed compelling. Consider the instant scalability from using auto- and self-provisioning services and from using built-in big data services such as Hadoop. However, in reality, most of what can be called big data today is still very much in the enterprise data center. It may remain there for some time.
The reasons are understandable: The use of local data storage systems means that integration with operational data stores won't be as much of an issue as it would over an Internet connection. In many instances, using public clouds as the place to store huge amounts of enterprise data seems like a good idea, until you have to ship off the USB drives to the cloud provider and hope they load correctly.
Also, while I think security and compliance are typically solvable problems in public cloud computing, they are easier to work with if the data is local. Moreover, performance is better with local data because you're not dealing with the latency of sending requests and returning data sets over the open Internet. Finally, hardware and software are cheap these days, and the ROI of putting these systems on public cloud providers versus internal servers is not as persuasive as you might imagine.
Should you discount public clouds as an option for building big data systems? No -- for the first generation of big data systems, most enterprises shouldn't choose the cloud. But that calculus will change over time.

Glenn Gailey (@ggailey777) described Extending the OData Async Extensions to DataServiceCollection<T> Methods in a 3/4/2013 post (missed when published):
Well, it’s now 2013, and I spent some time over the holidays messing around with using custom parameters in my mobile service…
Windows Azure Mobile Services makes it rather easy to both read data from and modify data in a mobile service by using HTTP requests to the CRUD operations: POST, GET, PATCH. and DELETE. GET requests use an OData-style query URI to select data, and POST is used to send a new JSON object to be inserted. Pretty simple stuff really, and the client libraries make it very easy to do in your apps.
Although it’s simple to get started, Mobile Services also provides a huge amount of flexibility to execute custom business logic in the backend that is triggered by these CRUD operations, by using server scripts. In particular, server scripts can inspect the incoming request and short-circuit, modify, or even cancel the requested operation. As Amit demonstrated previously in his post Custom Parameters in Azure Mobile Services, a request URI can include custom parameters that can be used by the client provide additional information to the mobile service to help it more correctly process the request.
The goal of this post is not to describe how custom parameters work (Amit has already done that) but to highlight the new client support in the Mobile Services SDK for Windows Store apps.
Handling custom parameters on the service-side
As I mentioned, Amit’s existing post already provides excellent information showing how to leverage custom parameters on the service-side, but just for the context of the examples in this post, here is the service script, registered to the insert function on the ubiquitous TodoItems table, that I am using to test:
function insert(item, user, request) {// Get the TodoItem table.var todoItemTable = tables.getTable('TodoItem');// Check the supplied custom parameter to see if// we should allow duplicate text items to be inserted.if (request.parameters.duplicateText === 'false') {// Find all existing items with the same text// and that are not marked 'complete'.todoItemTable.where({text: item.text,complete: false}).read({success: insertItemIfNotComplete});}function insertItemIfNotComplete(existingItems) {if (existingItems.length > 0) {// Because there is an existing item, which is not// marked complete, block the insert and raise a// 409 response to notify the client that// the insert was not processed.request.respond(statusCodes.CONFLICT,"Duplicate items are not allowed.");} else {// Insert the item as normal.request.execute();}}}Notice that that for this insert request to the TodoItem table, we block duplicate inserts when a) this behavior is requested by the client by specifying the duplicateText=false parameter and b) the existing item is not yet marked as complete. Now, let’s see the goodness in the client. We also raise an error to notify the client that the insert essentially failed, which I’ll discuss more later on.
Adding custom parameters in a Windows Store app
Appending custom parameters to a request URI is a fairly trivial operation when you are composing your own URIs, but in Amit’s post (using filters and custom wrappers) you can see how difficult it used to be to include custom parameters in your requests. Mobile Services now makes it super-easy to attach custom parameters to your requests from a Windows Store app. Of course, the APIs look different depending on whether you are coding in C# or JavaScript….
Note: Since support for custom parameters in a Windows Store app is a fairly recent addition, you need to download the most recent version of the Mobile Services SDK. If you already have the SDK installed, it will simply overwrite the libraries.
Windows Store app in C#
The CUD operations methods now have a new overload that takes an IDictionary<string, string> that contains your custom parameters. The following example is based on the InsertTodoItem method from the Mobile Services quickstart, which has been updated to have the mobile service reject duplicate text values, when the item isn’t marked complete:
// Define a custom query parameter to prevent duplicate text.Dictionary<string, string> myParam = new Dictionary<string, string>();myParam.Add("duplicateText", "false");// This code inserts a new TodoItem into the database. When the operation completes// and Mobile Services has assigned an Id, the item is added to the CollectionViewawait todoTable.InsertAsync(todoItem, myParam);items.Add(todoItem);This code also handles the MobileServiceInvalidOperationException that is returned when the item already exists. Note that support for parameters may not have yet made it into the WP8 client.
Windows Store app in JavaScript
In JavaScript, you also pass parameters into the CRUD methods, but as a JSON object, which is way easier than using a dictionary in .NET:
todoTable.insert(todoItem, { duplicateText: false }).done(function (item) {todoItems.push(item);});What about adding parameters to read (GET) requests?
I chose to focus on an insert (POST) operation rather than a read (GET) because (IMHO) the OData-based URI query syntax already gives you a great deal of flexibility in requesting data without having to resort to using custom parameters. Plus, Amit covered some existing read scenarios in his original post.
For queries, there is now a new WithParameters method on MobileServiceTableQuery<T> in the (C#) client, which lets you supply a dictionary of parameters to be added to the query request. This means that Amit’s original client query example now looks like this:
Dictionary<string, string> myParam = new Dictionary<string, string>();myParam.Add("allUsers", "true");List<User> allUsers = await App.MobileService.GetTable<User>().Skip(0).WithParameters(myParam).ToListAsync();Note that in the C# client, we have to use a query method to get back a MobileServiceTableQuery<T> instance; I used Skip(0) in this workaround. Ideally, there would be a WithParameters() method on IMobileServiceTable<T> for cases where we wanted to execute a “default” table query with parameters.
For JavaScript clients, it’s as simple as passing the JSON parameters object to the read function:
todoTable.where({ complete: false }).read({ allUsers: true }).done(function (results) {todoItems = new WinJS.Binding.List(results);listItems.winControl.itemDataSource = todoItems.dataSource;});And, yes, the MSDN docs have not yet caught up to the current version of the SDK…working in it.
Communicating a no-op to the client
The one design point in my insert script on the server that hung me up a little bit was deciding on what kind of response the insertItemIfNotComplete function should send when it prevented a duplicate insert. Because the client explicitly requested not to insert duplicates, I wanted to treat this as a “no-op” and return an HTTP 204 (NO_CONTENT). To me, this would indicate that an update was not made by the server and the client should not refresh its view (binding). However, the client treats any 200-level response as a success, and there is currently no way to inspect the result of an async CUD operation. Because of that, I went with returning an HTTP 409 (CONFLICT)—which seemed sort of to the point. That way, I could get hold of the response, make sure the error was really the expected 409, and then display a message box, as shown in the following code:
// Define a custom query parameter to prevent duplicate text.Dictionary<string, string> myParam = new Dictionary<string, string>();myParam.Add("duplicateText", "false");try{// This code inserts a new TodoItem into the database. When the operation completes// and Mobile Services has assigned an Id, the item is added to the CollectionViewawait todoTable.InsertAsync(todoItem, myParam);items.Add(todoItem);}catch (MobileServiceInvalidOperationException ex){if (ex.Response.StatusCode == 409){var dialog = new MessageDialog(ex.Message);dialog.Commands.Add(new UICommand("OK"));dialog.ShowAsync();}else throw ex;}I’m thinking of making a Mobile Services feature request to make the entire response accessible to the client from CUD operations. That way, I could inspect a success operation for specific success codes, like 204.

<Return to section navigation list>
Windows Azure Service Bus, Caching Access Control, Active Directory, Identity and Workflow
Claudio Caldato described A new way for iOS and Android users to access corporate resources: The Application Gateway in a 5/6/2013 post to the Interoperability @ Microsoft blog:
Every CIO today has mobile VPN access sitting very high on the priority list and knows how mobile connectivity to corporate resources is an important yet complicate matter. In a quest to solve the VPN issue in a simple way, Microsoft Open Technologies, Inc. created AppGateway, an application of VPN access for Android and iOS based on the preview of a Windows Azure Application Gateway service meant to help mobile users be more productive on the go. With this app, developed in collaboration with the Windows Azure Active Directory team, Android and iOS users can experience easy connectivity to web sites behind the corporate firewall, leveraging Windows Azure authentication services.
For obvious security reasons, connecting to resources that are behind a firewall usually requires a fairly complex infrastructure such as VPN (Virtual Private Network). The AppGateway demo app is designed to make the process simpler yet highly secured. The mobile app connects to a service on Windows Azure that acts as the proxy to an agent that is running inside the network behind the firewall. Using the Windows Azure Authentication service, the proxy can establish a trusted connection to the agent so that the application on the mobile device can browse web sites that would not be normally accessible outside the corporate network.
The demo app is available on the Apple App Store, GooglePlay and Amazon marketplaces at the following links:
For more information on the Windows Azure Application Gateway service preview, visit http://appgportal.cloudapp.net/.
In our best tradition, we also released the source code of the demo app. You can find the Android application code here.
For detailed instructions and a quick ‘get started; guide is available here.
We look forward for your feedback, comments and suggestions.


<Return to section navigation list>
Windows Azure Virtual Machines, Virtual Networks, Web Sites, Connect, RDP and CDN
• Sandrino Di Mattia (@sandrinodm) posted a Reference implementation: Creating a hybrid cloud with Windows Azure Virtual Networks software based Site-to-Site VPN on 5/6/2013:
After Microsoft announced software based Site-to-Site VPN support between Windows Azure Virtual Networks and Windows Server 2012 Routing And Remote Access I wrote a blog post on how easy it is to configure all of this: Setting up software based Site-to-Site VPN for Windows Azure with Windows Server 2012 Routing and Remote Access. I got lot of positive response on that post and a few people also asked me how they could get this to work in a real corporate network.
That’s why I decided to write this post… I’ll be covering step by step how Contoso moved from everything in their datacenter to a hybrid setup with their datacenter and Windows Azure Virtual Machines, connected with the Site-to-Site VPN available in Virtual Networks.
The original setup
This is how Contoso looked like before moving to Windows Azure. Besides the standard infrastructure like AD, DNS, … their network included the following:
- A firewall + router which was directly connected to the internet. Everything behind that firewall + router was using NAT.
- A developer (Contoso-DEV) connected to the wireless network. This wireless network was connected to the router.
- A webserver (Contoso-WEB001). Using port forwarding (port 80 and 443) this server was available from the internet. Developers from within the network were able to connect to the machine using Remote Desktop, but this was only possible if they were connected to the corporate network.
- A database server (Contoso-SQL001) which was not publicly available. Only the webserver and the developer workstations were able to access it.

Contoso decided to resell their application in a few additional countries so they needed some extra power. And instead of investing in additional hardware, licenses, … they decided to go for Windows Azure. The plan was to have multiple webservers running in Windows Azure depending on number of additional customers. If it would turn out that the application wasn’t selling good enough in these countries, they could just remove the Virtual Machines and that would be the end of it. They loss they would suffer would be minimal.
Preparing the hardware and the network
The first thing I did was install a new physical server with Windows Server 2012. Now take a look at the following picture:
The image in the lower left corner represents my new server. As you can see this server has a public IP since it’s connected to my modem, but it also comes with an internal IP since it’s connected to the firewall/router. The important thing to know here is that you machine needs direct access to the internet, meaning no NAT or blocked ports. If that’s not possible for you, I think it all ends here. Here in Belgium I think it’s almost impossible to get this on a residential line, so I had to buy a new modem + upgrade my internet subscription in order to get this.
Ok so let’s take a look at what we’ve done so far:
- Install a Windows Server 2012 (name: Contoso-RRAS)
- Connect this server to the internet using a direct connection without NAT (so no firewalls, routers, … between your server and the internet)!
- Connect this server to our corporate network. For this connection, NAT is OK
And this is how an ipconfig on the new server looks like:
Here you can clearly see the 2 network interfaces: Ethernet is the one connected to the internet and the Wireless one is the one connected to the corporate network. Note that for the connection to my corporate network I’ve set this to a fixed IP address and remove the gateway (explained here: http://blog.concurrency.com/featured-post/site-to-azure-vpn-using-windows-server-2012-rras/).
Creating the Local Network in Windows Azure
The first thing we’ll need to do in Windows Azure is define our local network. You can create a new local network under Networks > New > Add Local Network. Start by giving it a name and the IP address of the new Windows Server (in my case the public IP address of Contoso-RRAS, 93.221.80.21).
On the next page I’ll enter the internal IP range of the corporate network (this matches the second IP address you saw in the ipconfig screenshot):
And that’s it, your corporate network has been defined in Windows Azure. Next stop, creating a Virtual Network!
Creating the Virtual Network in Windows Azure
So I created a new Virtual Network which I called Contoso-AZURE:
On the next page I defined the DNS server which runs on-premises (in my case 10.0.0.9). This is really important if you want your Virtual Machine to resolve your local resources like a SQL Server (in my case that would be Contoso-SQL001). And on the third page I configured the Virtual Network with a subnet called Web-Frontends and a gateway subnet. The Web-Frontends subnet will hold the Virtual Machines running the webapplication.
After a few seconds the Virtual Network will be created. Now it’s time to set up the gateway as described in my previous post: Setting up software based Site-to-Site VPN for Windows Azure with Windows Server 2012 Routing and Remote Access.
- In the Virtual Network, create a gateway with static routing
- Download the VPN Device Script for Microsoft / RRAS
- Replace the weird characters in that file
- Replace the settings in that file
- Save the file as a *.ps1 file
- Run it on the new server (in my case Contoso-RRAS)
- Wait for the installation to complete
Here’s how I replaced the variables in that file, it might be a useful reference for when you’re comparing this with your own environment:
- SP_AzureGatewayIpAddress: 137.117.x.x (the IP address you’ll see in your Virtual Network after creating the gateway with static routing)
- SP_AzureNetworkCIDR: 10.1.0.0/16 (the address space of my Virtual Network, see previous screenshot)
- SP_AzureNetworkMetric: 10
- SP_PresharedKey: the key you’ll find when clicking Manage Key in your Virtual Network
After running the script on your new server you’ll see that the Routing and Remote Access Role has been configured. Open up RRAS and go to Network Interfaces. This is where you’ll see the gateway as a Demand-dial interface. Right click it and press Connect. The first time I had to do this a few times before it worked (Disconnect / Connect / Disconnect / Connect / …). After the first time everything kept working OK:
Creating the Virtual Machines
So the first part of the network configuration is done. Now we’re going to setup a new Virtual Machine which will allow the developers to deploy the application. And after that we will remove the web server which runs on-premises (in a real project this would keep running in parallel for a few days/weeks).
For the first Virtual Machine I had to create it as a stand-alone Virtual Machine. And it’s on this page that I decide to link the Virtual Machine to the Contoso-AZURE Virtual Network and in which subnet to place it (the Web-Frontends subnet). Finally on the next page I decided to create an availability set called WebFrontEnds in order to get the 99,95% SLA when I connect a second machine.
Immediately after creating the first machine I created the second machine, but for that one I connected it to the first virtual machine:
After a few minutes you’ll see the Virtual Machines popping up in your Virtual Network:
Did you notice that both machines received an IP address which matches the Web-Frontends subnet. This is how we’ll be able to address the Virtual Machines from our corporate network.
Time for some Routing
The networks have been connected, the web application has been migrated to Windows Azure Virtual Machines. This means we only have one task left: configure the routing to make sure that our developers can connect to the Virtual Machines from within our corporate network and to make sure that the Virtual Machines can access the SQL Server running on-premises.
You might be thinking that the developers already have access to the Virtual Machines (since they deployed the web application on the Virtual Machines). That’s true, but in order to do so they had to connect though the public endpoint for Remote Desktop. Now this might be a possible security risk, since anyone with an internet connection could be able to connect to your Virtual Machine (this leaves the door open for brute force attacks). Go ahead and remove these public endpoints and make sure you open ports which are really required for your application like HTTP or HTTPS:
The next step will depend on the type of firewall you have in your corporate network. Since I’m doing this at home I don’t have a fancy firewall, but I’m using a Netgear Genie WNDR4000 instead (which is my firewall + router). But this doesn’t really matter. The only thing you’ll need to do is setup routing in your firewall. In my case I created a static route to my Web-Frontends subnet:
Here is what this means:
- Name: I guess that’s obvious
- Destination: the subnet you want to connect to (the one you defined in the Virtual Network). In my case this is the 10.1.0.0 range.
- Gateway: the server that can “bring you there”. In my case this is the new server I deployed. This server is the only connected to Windows Azure using the Site-to-Site VPN and if you look back to the picture at the start of this post you’ll see that the IP address of the machine is: 10.0.0.2
Once that’s done I’m able to connect to the Virtual Machine from the developer workstation (or any other machine in the corporate network connected to the firewall):
But this also means we could use this for so many other scenarios like secure backup, secure Remote PowerShell, using Windows Shares, Web Deploy, integrating with System Center … And do you remember the DNS Server you assigned to your Virtual Network? Well, take a closer look: the Virtual Machine automatically uses this DNS Server. This means my Virtual Machine will be able to resolve the names of the machines in my corporate network.
Now the other way around just works thanks to RRAS, so from that Virtual Machine I’m able to ping any server in my corporate network like the SQL Server for example (10.0.0.4):
And we’re done! Our servers in the corporate network are able to connect with the Virtual Machines running in Windows Azure and those Virtual Machines can connect to our corporate network!
Improving security
Our RRAS server is connected to the internet without a firewall sitting in front of it. In order to improve security you could configure the firewall to only allow incoming connections from the internet coming from the gateway you created in the Virtual Network. For the VPN to work only these rules should be enabled for the public profile (besides the Core Networking rules):
The End
And there you go, this should be a good reference to get started with the Windows Azure Virtual Networks Site-to-Site VPN functionality for Routing and Remote Access. Here’s how the network looks like today:
Writing this article was very challenging for me (since I’m not an IT Pro) and it even cost me a few bucks (about 85€ for the line upgrade and the new modem), but I hope this can be a useful start for people who want to move their infrastructure to a hybrid cloud (with Windows Azure of course).


• Haishi Bai (@HaishiBai2010) posted a Walkthrough: File Sharing Between Your Local Machine And Your Virtual Machines on Windows Azure on 5/7/2013:
With Windows Azure Virtual Network Point-to-Site Connectivity, it’s amazingly easy for cloud developers to connect their development machines to their Windows Azure virtual machines running on Windows Azure Virtual Network. In this walkthrough I’ll walk you through the steps of setting up a file share between your development machine and a virtual machine running on Windows Azure.
Log on to Windows Azure Management Portal.
- On command bar, click on NEW button, then select NETWORKS->VIRTUAL NETWORK->CUSTOM CREATE menu.
- On Virtual Network Details page, enter network NAME as pointtosite, create or select a AFFINITY GROUP, then click next arrow.
- On DNS Servers and VPN Connectivity page, check Configure Point-to-Site VPN, then click next arrow:

- On Point-to-Site Connectivity page, click next arrow.
On Virtual Network Address Spaces page, click on add gateway subnet button, and then click on check icon to complete network creation.
- After the virtual network has been created, open its DASHBOARD page, and the click CREATE GATEWAY icon to create the dynamic routing gateway.
- Add a new Windows Server 2012 virtual machine to the virtual network. Note that when you specify user credential, make sure to use the same user id and password of your local account. This is because the virtual machine on Windows Azure is not under your domain controller, and we are using the same user credential on both local and virtual machines to allow file sharing.
- As the virtual machine is cooking, let’s create two self-signed certificates: one for root, and another for client identification. During the following steps we’ll need to upload the root certificate to Windows Azure so Windows Azure can validate the client machine using the certificate chain.
- Launch Developer Command Prompt for VS2012 as administrator. Change current folder to a folder where you want to keep the generated certificates. Here I’ll use folder c:\books.
- Use command
makecert -sky exchange -r -n "CN=MyFakeRoot" -pe -a sha1 -len 2048 -ss Myto create root certificate.- Use command
makecert -n "CN=MyLaptop" -pe -sky exchange -m 96 -ss My -in "MyFakeRoot" -is my -a sha1to create client certificate.- Launch certmgr. Export the root certificate as a MyFakeRoot.cer file (without private key).
- [Optional] if you are configuring VPN for another client, you’d need to install the client certificate on target machine.
- Go back to Windows Azure Management Portal. On DASHBOARD page of the virtual network, click on link Upload client certificate to upload the root certificate. Note at this point the gateway should have been created.

- After certificate has been uploaded, you can download and install VPN client from the DASHBOARD page (AMD64 Client link for 64-bit machines, x86 Client link for 32-bit machines).
- After VPN client has been installed, you can see the VPN connection on your Windows network connection list. Click on the network to connect. When prompted by the VPN client, click Connect button to continue.
- [Optional] Now you can use ipconfig/all to verify if VPN connection has been successfully established (look for PPP adapter).
- Log on to the virtual machine, create a new Share folder under c:\. Share the folder with the user you specified when you created the virtual machine.
- On Management Portal, record the virtual machines private IP on its DASHBOARD page. In my case the IP is 10.0.1.4.
- Now you can use Explorer on your local machine and access the shared folder by \\10.0.1.4\Share.


• Scott Guthrie (@scottgu) posted Announcing the Release of WebMatrix 3 on 5/1/2013 (delayed publication caused by length of the 4/29/2013 blog):
I’m excited to announce the release of WebMatrix 3. WebMatrix is a free, lightweight web development tool we first introduced in 2010, and which provides a great, focused web development experience for ASP.NET, PHP, and Node.js.
Today’s release includes a ton of great new features. You can easily get started by downloading it, and watching an introduction video:

Some of the highlights of today’s release include deep Windows Azure integration, source control tooling for Git and TFS, and a new remote editing experience.
Windows Azure Integration
With WebMatrix 3, we are making it really easy to move to the cloud.
The first time you launch WebMatrix 3, there’s an option to sign into Windows Azure. You can sign in using the same credentials you use with the Windows Azure Management Portal:
Once you are signed-in your Windows Azure account and subscriptions are integrated directly within WebMatrix. You have the option to create up to 10 free sites on Windows Azure:
You can use the My Sites”button to browse and edit the web sites you already have hosted on Windows Azure. You can also use the New button to directly create and host new web sites on Windows Azure – and create either a blank new site, or a site created from the Windows Azure Web App Gallery (which lets you start with templates like Umbraco, WordPress, Drupal, etc):
In this case we’ll create a new web site using the popular Umbraco CMS solution – one of the templates in the Windows Azure Web Site Gallery:
When you select this template, WebMatrix can help you create a new Web Site to host it on Windows Azure, and associate all of the publishing information you need to publish it and keep it in sync with your editing environment within WebMatrix:
Once created you get a tailored experience within WebMatrix that provides integrated Umbraco (or WordPress or Drupal, etc) editing functionality inside the tool:
And WebMatrix provides the ability to open/edit any appropriate files in it with editing/ and code intellisense support:
And when you are done you can one-click publish the site to Windows Azure using the Publish command in top left of the tool. WebMatrix will provide real-time feedback as it uploads and publishes the site:
The end result is a simple, fast and super effective way to edit your sites locally and host and manage them in Windows Azure.
Watch this great video as Eric build a site with WebMatrix 3 and deploys it to Windows Azure.
Source Control with Git and TFS
One of the most requested features in WebMatrix 2 was support for version control. WebMatrix 3 now supports both Git and TFS. The source control experience is extensible, and we’ve worked with several partners to include rich support for Team Foundation Service, CodePlex and GitHub:
The Git tooling works with your current source repositories, configuration, and existing tools. The experience includes support for commits, branching, multiple remotes, and works great for publishing Web Sites to Windows Azure:
The TFS experience is focused on making common source control tasks easy. It matches up well with Team Foundation Service, our hosted TFS solution that provides free private Git and TFS repositories.
Watch these great videos of Justin giving a tour of the Git and TFS integration in WebMatrix 3
Remote Editing
In WebMatrix 2, we added the ability to open your Web Site directly from the Windows Azure Management Portal. With WebMatrix 3, we’ve rounded out that experience by providing an amazing developer experience for live remote editing of your sites. The new My Sites gallery now allows you to open existing web sites on your local machine, or to remotely edit sites that are hosted in Windows Azure:
While working with the remote site, IntelliSense and the other tools work as though the site was on your local machine. But when you save changes it pushes them directly to the remote hosted site. This makes it ideal for when you want to make quick changes in a hurry.
If you want to work with the site locally, you can click the ‘download’ button to install and configure any runtime dependencies, and work with the site on your machine:
Watch this video of Thao showing you how to edit your live site on Windows Azure using WebMatrix 3
Summary
WebMatrix 3 includes a seamless experience for working with sites in Windows Azure, source control support for working with Git and TFS, and a vastly improved remote editing experience. These are just a few of the hundreds of improvements throughout the application, including an extension for PHP validation and Typescript support.
You can easily get started with WebMatrix by downloading it for free, and watching an introduction video about it:
We look forward to seeing what you build with the new release!


<Return to section navigation list>
Windows Azure Cloud Services, Apps, APIs, Tools and Test Harnesses
• Mark Souza (@mark_sqlcat) posted Designing Great Cloud Applications to the Windows Azure blog on 5/7/2013:
I get strange looks when I talk to developers about the difference between developing an application to a product versus developing an application to a service. The application you write on premise is written to a piece of software purchased, installed and configured on a piece of computer hardware that you privately own. The application you write in the cloud is written to a set of services that are available to you as well as the public to exploit. So let’s explore how they are different.
When you write your application for your on-premises server there are expectations that you have from this set of hardware and software. You can expect that you will connect successfully every time you logon. You control what applications run on this server so you expect the same level of performance every time. You know and control the security context of your data. You configured the software and hardware so you expect that if something goes wrong all you have to do is look at a logged event and you can most likely figure out what happened. For the most part you have a pretty good pulse on the behavior of your application for your privately owned, managed and maintained server. On the other hand, you also know that if you run out of compute on this server you now have to move to a different, more capable configured system. And if it turns out that your server has more compute capacity than your application needs, you have wasted compute and now need to migrate other workloads onto the same server to better utilize the compute you have. Lastly once it is all up and running you need to maintain the hardware and software. It is some of these reasons why you may be looking at the cloud in the first place where the hope is to lower your overall cost of computing.
Now you decide to either move your application or build your application in the cloud. In the cloud you have the same capabilities that you have on premise: authentication services, application services (Cache, messaging, etc.), database services, and availability services, to name a few. But you also have significant new opportunities such as ability to scale on demand and the cost benefits of pay-as-you-go on commodity hardware. If you desire you can develop your application to these services similarly to how you wrote your on-premise application and for the most part it will work.
However building a great cloud application requires a little more.
Maximizing the performance, scalability and manageability of cloud applications written for Windows Azure requires architecting and coding to exploit the unique features of the cloud platform. Examples include:
- Capturing application telemetry throughout your code so you can proactively react to the applications behavior in real-time.
- Exploiting scale-out of compute and storage nodes for great scale or utilizing multiple data centers for greater availability. Designing your application to grow through deploying new “scale units” (groupings of compute, storage, and database) allows provisioning for both planned and unplanned growth.
- Tolerating any single component failing while ensuring the app continues to run. The best cloud applications in the world support this but it does require you to write your application expecting a potential component failure and responding to that outage in real-time without notable impact to the end user.
- Leveraging cache for data retrieval whenever possible, and spreading database requests across a number of separate databases (shards) to support scalability and maximize performance.
To help jump start the learning process of writing a great cloud application this blog points to seven reusable cloud components with sample code and documentation that you can leverage for almost any PaaS application that you are developing on the Microsoft Windows Azure platform.
What we created: The AzureCAT (Microsoft’s Customer Advisory Team in engineering) has been part of the design, build and deployment of hundreds of Azure PaaS applications. We learned a lot from this and decided to write and share these seven reusable components below to help others see what we mean by writing to a service. We wrote them as a single end to end application to ensure the components work seamlessly. The application itself is a rather simple application that registers users, logs in and adds comments. It was built and tested at scale requiring telemetry and sharding code to be added to ensure great performance.
The sample code and documentation for the seven reusable components will benefit anyone who is writing a PaaS application. The components are:
- Configuration – configuration files are key to helping make management of your application seamless
- Logging – the logging of application, event and performance telemetry
- Data Access – this is actually two components: a) retry logic for database commands and connections and b) sharding using a custom hashing algorithm
- Caching – writing and reading user data into/from cache
- Scheduling - background worker role to collect telemetry data every minute and move it into a custom ops database in SQL Azure
- Reporting –reporting on the telemetry collected into the SQL Azure ops database
- Application Request Routing (ARR) – technology in IIS for routing users to multiple hosted services (application workload load balancing)
Below is a link to the material – The application code is posted on MSDN’s CodeGallery:
- Cloud Service Fundamentals in Windows Azure:
- http://code.msdn.microsoft.com/Cloud-Fundamentals-in-1a3ab1bd
Summary: This introductory blog will be followed by several others drilling into each of the components in much more detail. If you read this blog and take
away that great cloud applications require you to write code to exploit the cloud services to their fullest, then it has met its purpose. The code samples are real and they work (i.e., they function together.) They are derived from real-world implementations and have been tested at scale.

• Guarav Mantri (@gmantri) described Windows Azure Cloud Services, Extensions and Service Management API – Fun with Remote Desktop in a 5/6/2013 post:
I want you to try something: ... Fire up Visual Studio, create a simple Windows Azure Cloud Service and then without making any changes just publish that service. When you publish the service, DO NOT ENABLE REMOTE DESKTOP!
Once the service is deployed, head on to Windows Azure Portal (https://manage.windowsazure.com), navigate to the cloud service you just deployed and click on the “CONFIGURE” tab. Once there, just click on the “REMOTE” button below. You’ll be greeted with the following screen:
Now follow the instructions there and enable remote desktop. Once the process is complete, go to “INSTANCES” tab and click on “CONNECT” button below. What you’ll notice is that you’re able to RDP into your instances. If you’ve been using Windows Azure for some time, you know that in order to remote desktop into your instances you would have to enable this functionality when you’re publishing the service. If you forgot doing this at the time of deployment, you would need to go through an upgrade or new deployment process just to enable this functionality.
However what you saw just now is that you did not do anything of that sort. You published the service and then enabled this functionality on the fly! So, how did this happen? I’ve got one sentence for you:
Your Cloud Service just got Extensions!
In this blog post, we’ll talk about “Cloud Services Extensions”. We’ll talk about what they are, how you can work with them and finally we’ll see some code which will allow you to enable/disable this functionality on the fly.
So, let’s get started!
Extensions
Extensions are the newest functionality available through Windows Azure Service Management API. The way I understand it is that extensions allow you to dynamically add/remove some functionality in your cloud services without redeploying your code. At the time of writing this blog, there’re two things which you could do – Enable/Disable Remote Desktop (RDP) and Enable/Disable Windows Azure Diagnostics (WAD). Yes, you read it right!! Now you can enable/disable diagnostics for your cloud services on the fly without redeploying your service. No more messy code for diagnostics configuration and trying to remember things. I’ll cover diagnostics in a separate post. For now let’s focus on core extensions functionality.
The way it works today is that Windows Azure team has published some pre-defined extensions and you could enable/disable these extensions in your cloud service using Service Management API. Service Management API has added some functions to work with these extensions. The way the extensions functionality work is that you define settings associated with that extension; some of these settings will be public (i.e. you can fetch them later on e.g. RDP username) while some of the settings are private (i.e. you can’t fetch them after they’re set e.g. RDP password). You would define public settings in a public configuration file and private settings in a private configuration file. The configuration file are XML files. In order to determine the structure of these XML files, Service Management API exposes relevant schemas (public configuration schema and private configuration schema) using which you can construct XML files. Once the XML configuration files are defined, you can add an extension to your cloud service. However adding an extension does not do any magic. You would need to apply that extension to your cloud service which you can do through “Change Deployment Configuration” operation.
In this section we’ll focus on these functions and we’ll put them to practical use in next section. What I did was create a simple console application and defined some classes and methods to work with the extensions. …


Gaurav continues with code examples for “a simple class called ‘AzureExtension’.”
Martin Sawicki and Brian Benz asserted If you’re working with Java on Windows Azure, this update is for you! on 5/6/2013:
From: Martin Sawicki – Principal Program Manager – MS Open Tech and Brian Benz – Sr. Technical Evangelist – MS Open Tech
Incorporating developer feedback and keeping pace with Windows Azure’s ongoing evolution, Microsoft Open Technologies, Inc., has released a new update to the Windows Azure Toolkit for Eclipse. This latest version – the May 2013 Preview (or v2.0.0) – includes a number of new improvements we hope will further simplify your Java work in the Windows Azure cloud. This major update accompanies the release of the Windows Azure SDK v2.0.
Key Enhancements: Automatic upload of the JDK and Server to Windows Azure storage (and deployment from there)
This new option automatically uploads the selected JDK and Web Application Server, when needed, to a selected Windows Azure storage account and deploys these components from that account. This commonly requested feature can greatly enhance the ease and efficiency of deploying the JDK and server components, as well as help with team development scenarios, by avoiding the need to embed these components in the deployment package, or the hassle of manual uploads. Our “Hello World” tutorial walks you through these steps in detail. Here is a screenshot from the updated project creation wizard showing this feature in action:
Centralized storage account tracking
You may be wondering how Windows Azure knows which storage accounts to display in the drop-down list. The answer is another new feature – centralized storage account tracking. In order to reference storage accounts more easily across the various features that rely on storage, like caching and, in this case, the JDK or the Web Application server component deployment, you can register existing storage accounts names and endpoints in your current Eclipse workspace under Preferences > Windows Azure > Storage Accounts:
As usual, you can import the information from your subscription’s publish settings file to provide the storage account discovery magic.
Here’s an example of the centralized storage account tracking for caching as well. The drop down shows you where you would specify which storage account to store credentials for the cache configuration in a Windows Azure role. This way you no longer have to enter the access key manually.
Simplified Remote Access setup
For this release we’ve also streamlined the previous two-step remote access setup into one step. In the “Publish to Cloud” wizard, type in a user name and password to enable remote access, or leave it blank to keep remote access disabled.
By default, Eclipse will use the sample certificate for encrypting your remote access credentials in the Windows Azure configuration file. If you’d rather use your own certificate, choose the Advanced… link.
The “all-in-one” Eclipse library for easier Windows Azure API access now updated with the latest (v0.4.2)
The latest SDK distribution of the Windows Azure Libraries for Java are packaged along with their open-source dependencies as an Eclipse library and referred to as the Package for Windows Azure Libraries for Java (by MS Open Tech). If your Java code needs to take advantage of the Windows Azure API, just add this library to the build path of your Java project (not the Windows Azure project) and all the needed libraries will be automatically referenced and included in your WAR file.
Additional Enhancements
We’ve also fixed sticky sessions on Windows Server 2012 (previously limited to Windows 2008). And we’ve made some package publish performance improvements that can make the upload portion of the deployment process up to twice as fast as in previous releases, especially helpful if you’re not using the “deploy from download” options, but still embedding large components in the deployment package itself. We’ve also made a number of bug fixes, including some reported issues related to deploying Tomcat and Jetty on Windows 2012 from a cloud download.
Getting the Plugin
Here are the complete instructions to download and install the Windows Azure Plugin for Eclipse with Java, as well as updated documentation.
As always, let us know how the latest release works for you and how you like the new features! To send feedback or questions, just use MSDN Forums or Stack Overflow.


Corey Fowler (@SyntaxC4) reported Application Frameworks Now Part of the Windows Azure Web Sites Gallery on 4/30/2013 (missed when published):
A recent addition to the Windows Azure Web Sites Gallery has me very excited, support for installing Web Application Frameworks. Installing a Web Application Framework from the Windows Azure Web Sites Gallery provides the benefit of speed and simplicity during setup by means of implicit configuration for Windows Azure Web Sites.
Let’s take a look at how we can set up Django, a Web Framework for Python applications, using the Windows Azure Management Portal.
Setting up Django on Windows Azure Web Sites
This article makes the assumption that you already have a Windows Azure Subscription. If this is not the case sign up for the 90 day free trial of Windows Azure.
- Log into the Windows Azure Management Portal.
- Click on the + New button

- Select Compute > Web Site > From Gallery

- Select App Frameworks

- Click Next

- Click Complete

- Click Browse

- Start Building!
Did you know there are Python Tools for Visual Studio?
Why is this useful?
Having these packages installable from the Windows Azure Web Site Gallery ensures that you’re receiving a great experience when using the Application Framework of your choice. Once the site is configured, simply download the files using FTP to begin development, or upload your application specific files from your local installation of the same framework.


No significant articles today

<Return to section navigation list>
Visual Studio LightSwitch and Entity Framework 4.1+
• Heinrich Wendel, a Program Manager on the LightSwitch Team, posted Announcing Runtime Update 1 - Supporting jQueryMobile 1.3 on 5/7/2013:
When we took a bet on jQuery, jQueryMobile, and datajs for our HTML client, we recognized that we’d need to adapt to the rapid release cadence these frameworks employ. At the same time, we know that small issues in our application runtime can cause considerable strife. Our response is to start delivering a series of small, servicing releases for our HTML client runtime via NuGet that address known bugs and compatibility issues with emerging versions of jQuery, jQueryMobile, and datajs. Today we’ve released the first update onto the NuGet gallery—Microsoft.LightSwitch.Client.JavaScript.Runtime update 1!
This first update adds support for jQueryMobile 1.3 and jQuery 1.9. Especially jQueryMobile 1.3 brings a lot of improvements and bug fixes. Embracing the mobile-first, instead of mobile-only, approach was the main focus of this release. This was achieved by implementing a popular technique called responsive design. New widgets like tables and panels work efficiently on large screens as well as small phones, enabling data-richer scenarios. Also jQueryMobile and jQueryUI are working closer together with the goal of having even more shared code and conventions.
(picture taken from the jQueryMobile 1.3 announcement)
While we cannot add new design time features as part of a runtime update, you can still start using these new controls today by utilizing the power of our custom controls. A combination of our blog posts around custom controls and jQueryMobile’s excellent documentation will help you to get started. Michael dedicated a complete post to the integration of jQueryMobile controls as custom controls and our post about using a maps control to visualize list data explains the API of the LS collection which you need to implement your own table control.
How to update?
Thanks to NuGet the installation of a runtime update is a simple, two-step process. First, you update the “Microsoft.LightSwitch.Client.JavaScript.Runtime” package, which will automatically pull in the latest supported versions of our dependencies. Second, you bump the version numbers of the updated JavaScript and CSS files in the default.htm.
Start by switching to the file view of the solution explorer. The context menu of the HTML client project contains the entry “Manage NuGet Packages…”. Selecting the “Updates” section of the package manager will show the following screen:
Updating the LightSwitch runtime will automatically update jQuery and jQueryMobile for you. After a quick restart of Visual Studio and reopening the project you need to make a few changes in the default.htm:
- light-theme.css to light-theme-1.0.1.css
- lsls-light.css to msls-light-1.0.1.css
- jquery.mobile.structure-1.2.0.min.css to jquery.mobile.structure-1.3.0.min.css
- msls-1.0.0.min.css to msls-1.0.1.min.css
- jquery-1.8.2.min.js to jquery-1.9.1.min.js
- jquery.mobile-1.2.0.min.js to jquery.mobile-1.3.0.min.js
- msls-1.0.0.min.js to msls-1.0.1.min.js
F5 and you are done. Since NuGet packages are defined on a per project basis, you need to perform those steps for every project you have. Also keep in mind that jQuery and jQueryMobile remove functionality that was previously deprecated with every release. If you are heavily customizing your LightSwitch application using JavaScript code this might affect you. Make sure to carefully study their release notes in order to learn about new features and removed functionality:
If you have any problems with the upgrade or want to learn more about using some of the new features you can find us in the forums or the comments section below.


Jewel Lambert (@DotNetLore) explained Showing “In Progress” Animation While Waiting for Async Lightswitch HTML Client Operation in a 5/7/2013 post:
One visual element users have come to expect in modern web applications is an animated “please wait” or “in progress” indicator. You’ve probably noticed that the Lightswitch HTML Client provides this automatically for its long-running asynchronous data operations.
But what about your own code? Suppose you’ve added a button which asynchronously loads some data from the web, say via jQuery’s getJson() or ajax(). How do you get Lightswitch to display its progress animation until your async request is complete?
The Lightswitch HTML Client makes use of WinJS promise objects for its async operations. It surfaces a simple way for you to create your own promises – msls.promiseOperation(). It also provides a function call msls.showProgress() which takes a promise object as a parameter and shows the “in progress” animation until that promise completes.
You can find out more about WinJS promises here and here, but here’s some example code to get you started:
msls.showProgress(msls.promiseOperation(function (operation) {
    $.ajax({
        crossDomain: true,
        dataType: 'jsonP',
        data: {},
        url: 'http://picasaweb.google.com/data/feed/api/user/dotnetlore',
        success: function (data, textStatus, jqXHR) {
            var result = '';
            $(data).find('entry').each(function()
            {
                result = result + $(this).find('title').text() + '\n';
            });
            operation.complete(result);
        }
    });
}).then(function (result) {
    msls.showMessageBox(result);
}));


 No significant Entity Framework articles today
Return to section navigation list>
Windows Azure Infrastructure and DevOps
• Paul Stovell, the developer of the Octopus Deploy for automating ASP.NET Web applications and Azure Cloud Services deployments, requested suggestions from users in his Octopus Deploy 2.0 API changes - RFC post of 5/6/2013:
Octopus Deploy has had a RESTful HTTP API for some time, available at:
http://<your-octopus-server>/apiThe API was built primarily to power Octo.exe, a command line tool for creating and deploying releases. Most of the existing API is read-only, with the exception of machines, releases and deployments. When we introduced new features to the Octopus UI, they didn't always make it into the API; it's fair to say the API was really a second class citizen.
For Octopus Deploy 2.0, we're going to make some big changes to our UI, which I blogged about in UI design for eventual consistency. I want to make sure that Octopus feels fast and fluid even on very large installations. In addition, we often get feature requests to be able to do things in the API that we currently can only do via the UI.
So for the 2.0 release, we're going to make our API a first class citizen. The UI will leverage the API; this means that most of the interactions in the UI will make asynchronous requests via the API rather than posting directly to MVC controllers.
Since the API is getting so much attention, we're also going to document it properly as we rebuild it. To that end I've created a project on GitHub:
OctopusDeploy-API on GitHub
The project is fairly sparse currently, but you'll find a section on authentication and the way we use links to navigate the API.
If you're building on top of the Octopus API, or plan to, I'd suggest following this repository and providing feedback through issues/pull requests in the documentation.

Kenneth van Surksum (@kennethvs) described Paper: Infrastructure-as-a-Service Product Line Architecture Fabric Management Architecture Guide in a 5/6/2013 post:
Microsoft has released a paper titled: "Infrastructure-as-a-Service Product Line Architecture Fabric Management Architecture Guide". The paper which contains 69 pages provides guidance to develop solutions for a Microsoft private cloud infrastructure in accordance with the IaaS PLA patterns that are identified for use with the Windows Server 2012 and System Center 2012 Service Pack 1 (SP1). This paper also has an accompanying paper titled: ”Infrastructure-as-a-Service Product Line Architecture Fabric Architecture Guide” which covers the development of the associated fabric architecture.
The paper contains the following sections:
- Introduction
- IaaS Product Line Architecture Overview
- Private Cloud Architecture Principles
- Private Cloud Management Overivew
- Management Architecture
- Management Scenarios
- Detailed SQL Server Design Diagram
- System Center Connections


Kenneth van Surksum (@kennethvs) reported on 5/6/2013 the availability of a Paper: Infrastructure-as-a-Service Product Line Architecture Fabric Architecture Guide (related to the above):
Microsoft has released a paper titled:”Infrastructure-as-a-Service Product Line Architecture Fabric Architecture Guide“. The paper which contains 112 pages provides guidance to develop solutions for a Microsoft private cloud infrastructure in accordance with the Infrastructure as a Service (IaaS) product line architecture patterns that are identified for use with the Windows Server 2012 operating system. This paper also has an accompanying paper titled: ”Infrastructure-as-a-Service Fabric Management Architecture Guide” which covers the development of a fabric management architecture.
The goal of the Infrastructure-as-a-Service (IaaS) product line architecture (PLA) is to help organizations develop and implement private cloud infrastructures quickly while reducing complexity and risk. The IaaS PLA provides a reference architecture that combines Microsoft software, consolidated guidance, and validated configurations with partner technology such as compute, network, and storage architectures, in addition to value-added software components.
The paper covers the following topics:
- Introduction
- IaaS Product Line Architecture Overview
- Continuous Availability over SMB Storage Pattern Overview
- Non-Converged Infrastructure Pattern Overview
- Converged Infrastructure Pattern Overview
- Storage Architecture
- Network Architecture
- Compute Architecture
- Hyper-V Virtualization Architecture
- Fabric and Fabric Management
- Non-Converged Architecture Pattern
- Converged Architecture Pattern
- Continuous Availability over SMB Storage Architecture Pattern
- Multi-Tenant Designs


Barton George (@barton808) asked, so Dell Acquires Enstratius — So what do they do? in a 5/6/2013 post:
Last week at DevOps Days Austin, I did a couple of interviews with John Willis (aka @botchagalupe), VP Client Services and Enablement at Enstratius. The first video dealt with devops and the idea of culture as a secret weapon in the war of hiring. The second one was about Enstratius the company, which coincidentally today Dell announced it was acquiring.
I’m very excited about the move because, besides the great technology, with Enstratius we are getting some top talent like John, James Urquhart, George Reese, Bernard Golden, David Bagley and many more.
Take a listen as John explains what exactly it is that Enstratius does:
Some of the topics John covers:
- Enstratius’ common open API structure
- Governance: e.g. Role based access, a federated view of resources, encrypted key management storage yadda, yadda
- Direct integration with Chef and Puppet
- Integration points with APM companies like AppDynamics and New Relic
Extra-credit reading

![]() Enstratius supports Amazon Web Services and Windows Azure, in addition to other major cloud service providers’ offerings. Enstratius definitely has some top cloud movers and shakers in its ranks.
Enstratius supports Amazon Web Services and Windows Azure, in addition to other major cloud service providers’ offerings. Enstratius definitely has some top cloud movers and shakers in its ranks.
Brent Stineman (@BrentCodeMonkey) described Aggregate SLA’s & Windows Azure IaaS in a 5/3/2013 post:
I’d been pondering this a bit anyways, and yesterday actually had a customer ask. So I was forced to dig into this a bit further. And I need for forewarn you, this news may upset a few folks.
If you are using Windows Azure Virtual Machines (IaaS), you are taking two dependencies. Windows Azure Compute (to run the VM’s), and Windows Azure Storage (to persist the state of those VM’s). What this means is that you don’t have a single 99.95% sla, you actually have two SLA’s. And as such, they need to be aggregated since a failure in either, could render your service temporarily unavailable.
Calculating Aggregate SLA’s
Some background information before I get to far down this rabbit hole. When you have a solution that takes on multiple dependencies, the SLA you are providing is an aggregate of the underlying SLA’s. For example…
Two Instances of WA Compute = 99.95% uptime or approximately 263 minutes of downtime per year
Azure Storage = 99.9% uptime or 525 minutes of downtime per year.
This gives us a total possible downtime of 788 minutes or availability of approximately 99.85%.
Since we have multiple dependencies, we need to take the total amount of downtime we could experience when determining what our availability is.
But what about Windows Azure’s 99.95% SLA?
Now this is where things get a bit more… fuzzy. You actually need tor reference the details of the published Windows Azure SLA’s. When we look into the SLA for “Cloud Services, Virtual Machines, and Virtual Network”, we’re after three key terms that factor into the SLA.
“External Connectivity” is bi-directional network traffic over supported protocols such as UDP and TCP that can be sent and received from a public IP address.
“Maximum Connectivity Minutes” is the total accumulated minutes during a billing month for all Internet facing Virtual Machines that have two or more instances deployed in the same Availability Set. Maximum Connectivity Minutes is measured from when at least two Virtual Machines in the same Availability Set have both been started resultant from action initiated by Customer to the time Customer has initiated an action that would result in stopping or deleting the Virtual Machines.
“Connectivity Downtime” is the total accumulated minutes that are part of the Maximum Connectivity Minutes that have no External Connectivity.
So what these three items say is that IF you have two started virtual machines that are in an availability set, you will be able to connect to them 99.95% of the time or we owe you money back. Note I’ve highlighted the word ‘started’. Because if you take an external dependency that causes your virtual machine to stop/crash (aka the dependency on Azure Storage for the VM disks), when an instance of your VM stops, it’s no longer subject to the 99.95% SLA.
So where does this leave us
Ultimately, exactly where we’ve always been. In most cases, your solution is going to take multiple dependencies. And as a result, this simple example get compounded. It also doesn’t change our commitment to you as a customer of Windows Azure. This issue has always been here, even before cloud computing. And for the majority, that extra 0.1% isn’t going to make much of a difference.
Now, if you need really high uptime, you have the math above to help you really understand what level of risk your solution may be taking on. And hopefully can leverage that knowledge to help you design resilient solution architectures that are capable of adjusting to these outages and continuing (even if in a degraded state) to delivery functionality to the end users of those solutions.

<Return to section navigation list>
Windows Azure Platform Appliance (WAPA), Hyper-V and Private/Hybrid Clouds
![]() No significant articles today
No significant articles today
<Return to section navigation list>
Cloud Security, Compliance and Governance
David Linthicum (@DavidLinthicum) asserted “The recent addition of Amazon Web Services certification steals focus from the real need in cloud implementations” in a deck for this Cloud success goes beyond certification programs article of 5/7/2013 for InfoWorld’s Cloud Computing blog:
The new Amazon Web Services (AWS) Certification Program is a response to organizations screaming for some way to both validate and train employees on the use of AWS public cloud technology. Indeed, AWS Certifications help to recognize the skills, knowledge, and expertise in the AWS public cloud platform.
To earn an AWS Certification, individuals must demonstrate their proficiency in a particular area by passing an AWS Certification Exam -- akin to getting your driver's license but instead of road signs, you're tested on API error messages.
This is much like past certification exams from Microsoft, Novell, and Cisco. I'd go so far as to say that those with AWS Certifications are poised to earn decent money, considering the large number of AWS jobs chasing after a limited pool of candidates these days.
As this program becomes successful, count on emerging or existing certification programs from Microsoft, HP, Rackspace, Red Hat, and others to become more important to companies seeking cloud computing talent. However, this also indicates we're moving in the wrong direction.
These days, I find enterprises aren't really focused on creating a business case, core requirements, and a well-defined cloud architecture with an implementation road map. They are seeking wholesale cloud computing implementations, typically around a service or technology provider they've pre-selected, usually based on hype.
This often leads to picking the wrong set of cloud technologies. Thus, many first-generation cloud computing implementations fall on their faces, due to a lack of strategic guidance and planning. They toss technology at the issue and hope for the best. If that doesn't work, the money pit follows. If that doesn't work, they blame the technology.
My fear is that as we concentrate more on the enabling technology and its accompanying certification programs, the strategically challenged will find more excuses to ignore the larger issues. While certification programs have their place, they do not replace a larger understanding of the technology you're looking to implement or an honest assessment of your business issues.
I wish they had a certification program for that.

 No significant security articles today
<Return to section navigation list>
Cloud Computing Events
Yung Chou (@yungchou) announced on 5/6/2013 an Online Training Event - Wed. May 8th: Building Virtual Machines in the New Microsoft Cloud: From Deployment to Cost Analysis:
Windows Azure Infrastructure Services (IaaS) for IT Professionals Join us for a series of interactive weekly webcasts designed and in-person events to help you understand the ‘on-demand’ infrastructure scenarios and walk away with real-world proof of concepts that you can implement in your production environment.
Series 1: Building Virtual Machines in the New Microsoft Cloud: From Deployment to Cost Analysis
Delivered by Tommy Patterson
In Series 1, you will walk through building networked servers on the Windows Azure™ platform. No physical servers or licenses are required, just a PC with a web browser. Through this online hands-on series we will create a “Pay-As-You-Go” account, three virtual machines, and the networking required to link the two machines together. We will network a web server with a file server, authenticate through an AD controller, and configure the three servers in a working scenario. We will discuss each area of the portal, clarify pricing, and learn many of the new ways that you can utilize Windows Azure to become more productive. You will walk away with a clear understanding on the costs and ROI of the various scenarios and live, ‘production’ proof of concepts.
Part 1: Creating the Virtual Machines and Active Directory o Wed, May 8th, 11:00 am – 1:00 pm Eastern Time - Webcast Link: https://www.livemeeting.com/cc/microsoft/join?id=JC92SP&role=attend&pw=C%29%7E%7E_m%2C%3C6
Prerequisites: You must have a subscription to Windows Azure before arriving to the event. Get one here: http://aka.ms/azurebootcamp Please NOTE: Windows Azure service fees will be charged to your account during your proof of concept experience. This gives you the advantage of quickly analyzing the real costs associated with the scenarios, and enables you take with you the live proof of concepts. We estimate the fees incurred to be within $50-$75 dollars
Recommended: It is recommended that a participant has 2 monitors available, one for viewing the live walk-through, and the other for following through the lab exercises.
- See more at: http://blogs.technet.com/b/yungchou/archive/2013/05/06/online-training-event-wed-may-8th-building-virtual-machines-in-the-new-microsoft-cloud-from-deployment-to-cost-analysis.aspx#sthash.zFWvOR85.dpuf


Bruno Terkaly (@brunoterkaly) reported FalafelCon 2013 on June 10th and 11th at Microsoft in a 5/1/2013 post (missed when published):
FalafelCon 2013: June 10th - 11th at Microsoft's Silicon Valley Campus
Keynote Speakers: An impressive array of seasoned professionals.

Targeting seasoned developers
- Just some of the topics covered:
- Future of ASP.NET
- Sitefinity
- Windows Phone
- Lightswitch
- AJAX, JavaScript
Windows Azure (Cloud Computing)
- Windows 8 App Development
- And more
Additional Information
Registration Link http://www.falafel.com/store/falafelcon-2013 Web Site http://www.falafel.com/falafel-con-2013 Sessions http://www.falafel.com/falafel-con-2013/sessions
<Return to section navigation list>
Other Cloud Computing Platforms and Services
• Tom Rizzo (@TheRealTomRizzo) announced availability of the AWS Management Pack for Microsoft System Center on 5/8/2013:
With our continuing investment in making AWS the best place to run Windows and Windows workloads, we are making an announcement today that makes running and managing Windows even easier in the AWS environment: The AWS Management Pack for Microsoft System Center.
By using the AWS Management Pack with Microsoft System Center Operations Manager, you can view and monitor your on-premises and AWS resources together in a single console. The management pack lets you monitor EC2 instances (Windows and Linux), Elastic Block Store (EBS) volumes, Elastic Load Balancing, CloudFormation stacks, Auto Scaling groups, and Elastic Beanstalk applications. With the built-in CloudWatch integration, you can watch performance counters and get alerts when your AWS resources exceed alarm thresholds. In addition, you can view and monitor applications running inside your EC2 Windows instances such as Microsoft SQL Server, Microsoft SharePoint Server, or Microsoft Exchange Server. Because the management pack surfaces EC2 tags, you can filter and search across AWS regions for your AWS resources. Finally, your resources are mapped to your AWS Availability Zones so you know which resources are in which zones to make understanding your high availability and disaster recovery easier.
Use the management pack as your single pane of glass to view and monitor your resources – whether on-premises or in the AWS cloud.
To help you get started, we have put together a quick introduction video:
Download the AWS Management Pack and get started today. Here's a sample of what you'll be able to see:
-- Tom Rizzo, General Manager, Amazon EC2 Windows Team.


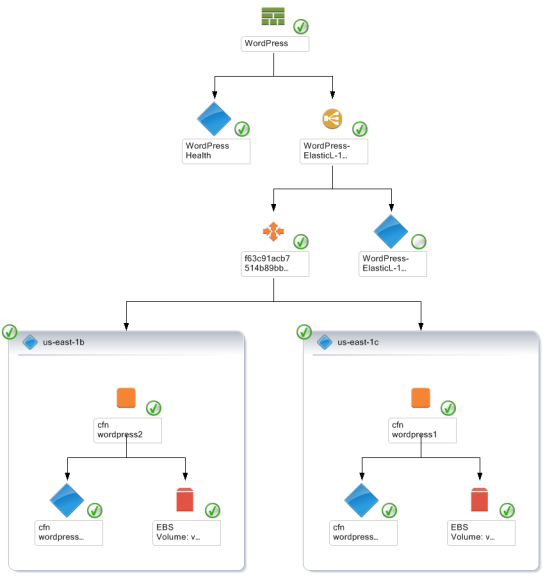
Tom spent many years in SQL Server and later Microsoft Exchange product management as a Senior Director. He was the technical editor for my Expert One-on-One Visual Basic 2005 Database Programming book for Wiley’s WROX imprint.
• Xath Cruz reported GE Invests $105 Million in Pivotal: Possible Game Changer for Big Data and Internet of Things in a 5/7/2013 post to the CloudTimes blog:
Pivotal, which recently become independent of its mother companies EMC and VMware, recently announced that they will be improving the speed of cloud-based industrial software applications, and they’re not doing it on their own, though, as General Electric will be backing them to the tune of a $105 million investment.
It was General Electric’s involvement that allowed Pivotal to venture off on their own last April 1, with a value of almost $1 billion, and about eight months away from having their own product.
One of the more noticeable changes in Pivotal is the fact that they are now referring to themselves as a Platform as a Service (PaaS), and they have admitted to drawing a lot from technology from their days with EMC and VMware’s stable of industry-level products and services. Pivotal is boasting integrated data fabrics, support for lecacy infrastructure, and programming frameworks, with their biggest target being the inclusion of real time telecommunications and future retail scenarios.
Pivotal’s success, if and when it happens, will be a milestone for the technology industry, which has a lousy record when it comes to making a successful company that starts out big. Pivotal is currently banking on a chance to revolutionize the way in which big businesses create software. Now that everything from cars, to turbines, to household appliances have sensor-enabled telemetry that can collect data about place and status, it has become possible to create industry-level applications in a matter of days or weeks, as opposed to months or years.
Pivotal is currently 1,250 employee-strong, with majority of the staff coming from earlier acquisitions by both EMC and VMware. They still have a strong library of software for cloud computing system building, data storage, management and analysis software, which came from its mother companies. Pivotal will be filling in gaps in the services offered by Amazon’s AWS, Google, and Microsoft – all of which offer similar cloud-based services but lack aspects of the business software creation capability. …

Read more.
• Jeff Barr (@jeffbarr) announced Provision Up to 4,000 IOPS per EBS Volume, New Marketplace Support on 5/7/2013:
I am happy to announce that EBS Provisioned IOPS volumes now support up to 4,000 IOPS. This represents a fourfold increase from the original Provisioned IOPS volume performance since last year's launch. You can now dial it up to 4,000 IOPS and up to 1 TB of storage per Provisioned IOPS volume. You no longer need to stripe (aka RAID 0) multiple volumes to reach the 4,000 IOPS performance level. However, if you do need even more performance, you can create multiple EBS volumes, each with Provisioned IOPS, and then stripe across them.
We are also introducing support for Provisioned IOPS in the AWS Marketplace with new products from 10Gen, NuoDB, and Omnibond. With this new support, you can now find, compare, and start the software that you need with 1-click, while specifying the desired level of performance. For more information, visit the new AWS Marketplace Provisioned IOPS page.
To recap, last year we introduced the Provisioned IOPS feature to give you the power to dial in the amount of performance (measured in I/O Operations Per Second or IOPS), with an initial maximum of 1,000 IOPS per volume. We raised the performance to 2,000 IOPS later in the year to give you more power and more flexibility. With 4,000 IOPS per volume, we have taken this to the next performance level.
Provisioned IOPS volumes are designed to deliver predictable, high performance for I/O intensive workloads such as databases, business applications and enterprise applications. You can set the level of performance you need and EBS will consistently deliver it over the lifetime of the volume.
To take full advantage of high performance Provisioned IOPS volumes, we recommend the use of EBS-Optimized EC2 instances. Available for our m1.large, m1.xlarge, m2.2xlarge, m2.4xlarge, m3.xlarge, m3.2xlarge, c1.xlarge and instance types, these instances feature dedicated throughput between EC2 and EBS.
Amazon EBS Provisioned IOPS volumes, EBS-optimized instances and AWS Marketplace products are now supported in all AWS regions except GovCloud.


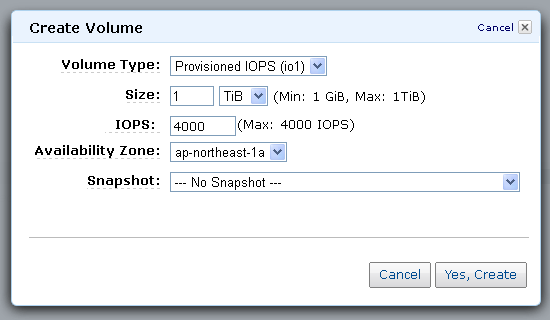
• Jeff Barr (@jeffbarr) asserted Amazon S3 - Enterprise Grade, Internet Scale, and Ready for Big Data on 5/7/2013:
I saw an interesting quote this past weekend from inventor and entrepreneur Dean Kamen. In response to a claim of instant success for one of his products, Dean responded that it wasn't in fact instant, but was actually the result of between 15 and 20 years of research and development.
Amazon S3 hasn't been around for nearly that long, but the service is growing very rapidly. This kind of rapid growth comes from a wide variety of customers with an equally wide variety of use cases. Our customers tell us that they use S3 in heavily regulated industries, for any application that needs access to data at Internet scale, and for solutions that address today's Big Data challenges. Let's look at how S3 is being put to use by our customer base in these ways.
S3 in Mature and Regulated Industries
Customers in heavily regulated industries such as finance, health care, and government are using S3 today. For example:NASDAQ OMX is the largest exchange company in the world, and uses S3 for their FinQloud and Market Replay offerings. FinQloud provides NASDAQ OMX’s clients with efficient storage and management of financial data to help address regulations such as the U.S. Securities and Exchange Commission (SEC) Rule 17 a-4 (Books and Records), which require storage of certain regulated financial data for specific periods of time. Among other use cases, FinQloud utilizes S3 for data storage to help broker-dealers meet record archival and retrieval requirements. The Market Replay offering helps customers quickly access historical stock price information. As noted in the case study, NASDAQ OMX “saw that Amazon S3 would enable them to deliver hundreds of thousands of small files per day to AWS, and then back to the customer - in seconds - an ideal solution at a low cost.”
Toshiba Medical Systems Corporation is a leading Japanese manufacturer of diagnostic imaging systems. They run a health care cloud service called “Healthcare@Cloud” which utilizes Amazon S3 for X-ray, CT and MRI image data recorded by health care institutions. S3 allows them to meet guidelines on safety management for medical information systems, as well as guidelines on employees who are entrusted with medical data (more information can be found in the case study).
The National Renewable Energy Laboratory’s Open Energy Information Initiative is an open source knowledge sharing platform created to facilitate access to data and tools that accelerate the transition to clean energy systems. OpenEI, which follows guidelines set by the White House’s Open Government Initiative, utilizes S3 for storage of datasets that users can upload and share. There are several hundred datasets today, including global energy and mining data from the World Bank as well as air emissions data from the EPA.
S3 at Internet Scale
Many of the largest Internet companies rely on S3 to store vast amounts of data. Here are a few examples:
Netflix, a leading online subscription service for watching movies and TV programs, runs their streaming video business on AWS. Netflix uses S3 to store petabytes of video content, which they then distribute to their customers’ devices via a CDN. When Netflix needs to create a video format for a new device, they then stream their S3 video content to thousands of EC2 instances for transcoding.
Instagram enables its users to quickly and easily share photos with their friends and family from their mobile devices. S3 provides the storage backend behind Instagram’s offering, which has now grown to over 100 million users per month.
Spotify is an online music service offering instant access to over 16 million licensed songs. As noted in the case study, using S3 gives them confidence in their “ability to expand storage quickly while also providing high data durability”, allowing them to add over 20,000 tracks a day to their catalog.
S3 for Big Data
Many of our customers store their application and web server logs in S3 for later analysis. These files can occupy a lot of space but S3 handles them with ease. Here are a few examples:
Yelp is best known for sharing in-depth reviews and insights on all types of local businesses. Yelp uses S3 to store daily logs and photos, and Amazon Elastic MapReduce to process these logs to power features like “People Who Viewed this Also Viewed” and “Review highlights”.
Pinterest is an online pinboard that lets their customers share things they love with their friends. Fortune Magazine recently reported that they’re one of the fastest growing social networks of all time. They use S3 for file and log storage, and process these logs on Elastic MapReduce to draw key insights into their business.
Etsy provides a website for individuals to sell handmade, vintage items, and craft supplies. They have over 25 million members and 18 million items listed today. They store their HTTP server logs in S3, and use Elastic MapReduce for web log analysis and recommendation algorithms.
S3 For You
If you find these examples interesting, you can get started at no charge using the AWS Free Usage Tier. You can also read the S3 documentation and build your own apps that use S3 storage using the AWS SDKs.


Jeff Barr (@jeffbarr) reported AWS SDK for Node.js - Now Generally Available in a 5/6/2013 post:
The General Availability (GA) release of the AWS SDK for Node.js is now available and can be installed through npm as aws-sdk. We have added a number of features since the preview release including bound parameters, streams, IAM roles for EC2 instances, version locking, and proxies.
Here are a couple of examples to help you to understand bound parameters and streams.
Bound Parameters
You can now pass parameters into the constructor of any service object. These parameters will be intelligently merged with request parameters for each call. This makes it easy to create a service object that is bound to a specific resource. In the following example we create an Amazon S3 service object and bind it to a bucket and key.
obj = new AWS.S3({ params: { Bucket: 'bucket-name', Key: 'object-key' })

obj.headObject(function (err, data) {
	// no request params required
});

obj.putObject({ body: 'data' }, function (err, data) {
	// merges body param with Bucket and Key
});
Streams
You can use the createReadStream() method on a request object to get a handle to a stream object which supports piping raw HTTP body data to a file. This is especially useful when streaming objects to streams like filesystem objects. The following example shows how you can stream an object from Amazon S3 directly to a file on disk:var s3 = new AWS.S3(); var params = {Bucket: 'myBucket', Key: 'myImageFile.jpg'}; var file = require('fs').createWriteStream('/path/to/file.jpg'); s3.getObject(params).createReadStream().pipe(file);Alternatively, you can register an 'httpData' event listener on the request object to access each chunk of data received across the wire (as Buffer objects):
var s3 = new AWS.S3();
var params = {Bucket: 'myBucket', Key: 'myImageFile.jpg'};
var file = require('fs').createWriteStream('/path/to/file.jpg');

s3.getObject(params).
    on('httpData', function(chunk) { file.write(chunk); }).
    on('httpDone', function() { file.end(); }).
    send();
For more examples, see the Getting Started Guide.
Resources
Here are some additional resources to get your started:


<Return to section navigation list>


0 comments:
Post a Comment