Creating a SQL Azure Federation in the Windows Azure Platform Portal
This tutorial assumes that you have obtained a free trial or pay-per-use subscription to the Windows Azure Platform.
![]() This sample federation requires a 1-GB root database and five 1-GB member databases created from the data source described in OakLeaf’s Generating Big Data for Use with SQL Azure Federations and Apache Hadoop on Windows Azure Clusters post of 1/8/2012.
This sample federation requires a 1-GB root database and five 1-GB member databases created from the data source described in OakLeaf’s Generating Big Data for Use with SQL Azure Federations and Apache Hadoop on Windows Azure Clusters post of 1/8/2012.
Note: Users of a Windows Azure Free Trial subscription are allotted only one 1-GB database at no charge. The additional five 1-GB databases will cost about $1.65 per day until you drop them. To drop the spending limit on your subscription, open the Subscriptions Profile page, click the yellow Would You Like to Upgrade Now? link to open the Fully Enable Windows Azure dialog, select the Yes, Upgrade My Subscription option and click the check button to convert to pay-as-you-go pricing for more than the allotted resources.
Warning: Removing the spending cap cannot be reversed.
1. Open the Windows Azure Platform Portal at https://windows.azure.com, click the Database button to display your subscription(s) and select the subscription you want to use for your federation:
2. Click the Server group’s Create button to open the first (Region) dialog in the Create a New Server process. Select the region that’s closest to your geographical location:
3. Click Next to open the Administrative Login dialog, type a login name, type a complex password that conforms to the rules in the red message:
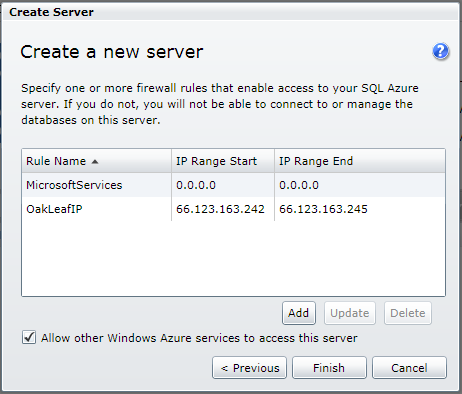
4. Confirm the password and click Next to open the Firewall Rules dialog and mark the Allow Other Windows Azure Services to Access This Server check box:
5. Click Add to open the Add Firewall Rule dialog to add a range of IP addresses that can access the server. To enable a computer at any IP address to access your server, which isn’t recommended, type 0.0.0.0 as the start address and 255.255.255.255 as the end address.
6. Click OK to add the rule to the Create a New Server dialog:
7. Click Finish to add the server to to the servers list and enable commands in the Server and Database groups:
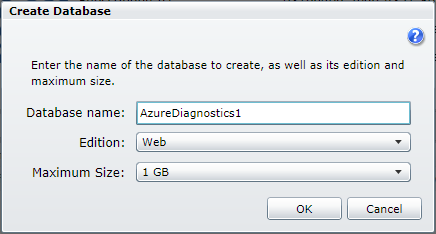
8. Create the Federation Root database by clicking the Database group’s Create button to open the Create Database dialog. Name it as shown here, if you intend to use the AzureDiagnostics data source:
9. Click OK to create the database and return to the Windows Azure Platform’s main page. Click the Server group’s Manage button to open a login dialog to the server you created in step 7. Type the Administrative Login Name and Password you created in step 3:
10. Click the Log On button to start the connection process. When connected, click the [Azure Diagnostics1] link in the navigation pane to open the Database Summary page and enable the New [Federation] button:
11. Click the New Federation button, type WADFederation as the Federation Name, type Id as the alias for CounterId (a column added to the WADPerfCounters table) as the Distribution Name, and select int as the Distribution Data Type. The current SQL Azure Federations version supports only the RANGE DistributionType:
12. Click Save to create the new federation and add a reference to it to the Database Summary page. Click to select the WADFederation(1) item:
Note: The empty Query Usage (CPU) chart doesn’t appear until a few hours after you create the database.
13. Click the arrow button at the right of the WADFederation (1) item to open the 1 Federation Member page, left-click the LOW box to display the WADFederation (LOW…HIGH) context menu, and select Query.
14. Click the Create Federated Table link to open a query window in the context of the selected federation member with a default
USE FEDERATION [WADFederation] ([Id] = -2147483648) WITH FILTERING = OFF, RESET
GO
statement at the top and an example query to create a table in the federation member:
Note: -2147483648 is the minimum value of the int data type and initially permits the table in the federation root to accommodate all CounterID values. This enables multiple split operations to create the five additional federation member databases and populate them with data.
15. Copy the following SQL statement to the clipboard, select all the content in the query pane, and paste to replace it with:
CREATE TABLE [WADPerfCounters](
[PartitionKey] [bigint] NOT NULL,
[RowKey] [varchar](100) NOT NULL,
[Timestamp] [datetime2](7) NOT NULL,
[EventTickCount] [bigint] NOT NULL,
[DeploymentId] [varchar](50) NOT NULL,
[Role] [varchar](20) NOT NULL,
[RoleInstance] [varchar](20) NOT NULL,
[CounterName] [varchar](100) NOT NULL,
[CounterValue] [decimal](16,8) NOT NULL,
[CounterId] [int] NOT NULL,
CONSTRAINT [PK_WADPerfCounters] PRIMARY KEY CLUSTERED
(
[PartitionKey] ASC,
[RowKey] ASC,
[CounterId] ASC
))
FEDERATED ON (Id = CounterID)
GO
Your query pane appears as below:
16. Click the Run button to execute the script and return a message similar to that shown here:
The process adds the table to a system-uuid database that’s generated when you execute the CREATE FEDERATION operation.
16. Click the Save As button and save the file as CreateWADPerfCountersFederated.sql.
17. Click the LOW button, and select Overview:
18. Click View Summary to open a summary view of the Federation Root database:
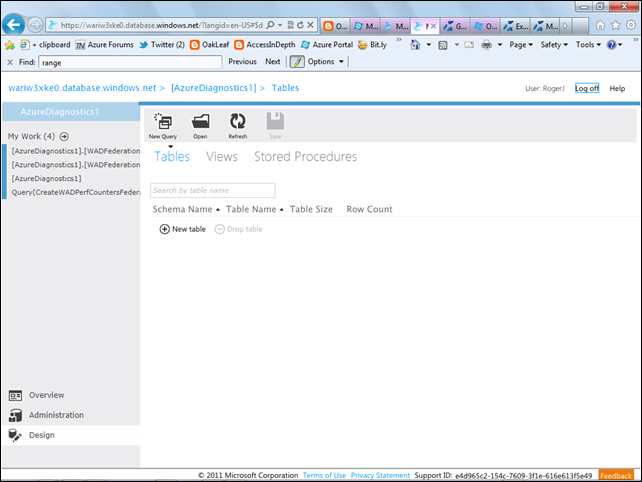
19. Clicking the Design button in the navigation pane opens a page with Tables selected. The expected federated WADPerfCounters table doesn’t appear in the list:
Notice that the bread crumbs at the top of the list don’t include :(Root)] > WADFederations > [LOW .. HIGH], which might account for the problem.
 Update 1/10/2012 2:20 PM PST: Cihan Biyikoglu (@SQLaaS) reported in an email:
We don’t support design view on federations yet in management portal. we only let you go to root in the design view. We’ll hopefully get this in future.
20. I’m presently testing SQL Azure Federation Migration Wizard with 1,000 rows and having a problem with truncated BCP data. See Adding Missing Rows to a SQL Azure Federation with the SQL Azure Federation Data Migration Wizard v1 updated 1/15/2011 for more details.


1 comments:
Sir, i want to discuss something with you - it is in reference to this blog post. Can you please ping me at contact [at] parasdoshi [dot] com so that i get your email id. Thank you.
- Paras
Post a Comment