Windows Azure and Cloud Computing Posts for 10/27/2011+
| A compendium of Windows Azure, SQL Azure Database, AppFabric, Windows Azure Platform Appliance and other cloud-computing articles. |

Note: This post is updated daily or more frequently, depending on the availability of new articles in the following sections:
- Azure Blob, Drive, Table, Queue and Hadoop Services
- SQL Azure Database and Reporting
- Marketplace DataMarket and OData
- Windows Azure AppFabric: Apps, Access Control, WIF and Service Bus
- Windows Azure VM Role, Virtual Network, Connect, RDP, Traffic Manager and CDN
- Live Windows Azure Apps, APIs, Tools and Test Harnesses
- Visual Studio LightSwitch and Entity Framework v4+
- Windows Azure Infrastructure and DevOps
- Windows Azure Platform Appliance (WAPA), Hyper-V and Private/Hybrid Clouds
- Cloud Security and Governance
- Cloud Computing Events
- Other Cloud Computing Platforms and Services
Azure Blob, Drive, Table, Queue and Hadoop Services
Steven Martin reported Microsoft Lowers Storage Cost for Blob and Table Storage in Windows Azure in a 10/27/2011 post to the Windows Azure Team blog:
Effective immediately, we are lowering the price of Windows Azure Storage (from $0.15 to $0.14 per GB per month.) We are also adding commitment volume discounts, which will give high-volume customers additional savings.
All Windows Azure Storage customers will automatically receive the reduced storage price effective October 26, 2011. High-volume customers with regular usage are eligible for additional savings through the Storage Core Offer. A breakdown of pricing discounts is listed below. Please note, the prices below are price tiers, not graduated prices. For example, if you store 400 TBs using the commitment offer your price will be $0.112 per GB per month for the full amount, not just the amount over 50TBs. For prices above 5 Petabytes per month, customers are asked to contact Microsoft for assistance. For additional details on this offer, please click here.
We are thrilled to extend these price discounts following last month’s addition of geo-replication to Windows Azure Storage, which together provide the best value in the industry for cloud storage.

<Return to section navigation list>
SQL Azure Database and Reporting
CodeFluent reported on 10/25/2011 that Starting with the build 579, CodeFluent Entities Ships with a SQL Azure Producer:
The SQL Azure producer translates your model into SQL Azure compliant T-SQL scripts to generate the equivalent SQL Azure database. Moreover the generated scripts can be run automatically on the SQL Azure database.
Note: Unlike the SQL Server Producer, this producer doesn't create the SQL Azure database. On SQL Azure, billing is based, in part, on your database edition and size. Therefore, we're letting developers create their database as desired, and the tool focuses on generating the database schema (schemas, tables, views, stored procedures, constraints, data, etc.).
Another key feature of the SQL Azure producer, is that you can work locally, by generating on a local SQL Server database. In this scenario, the SQL Azure producer will generate 100% compliant code on both platforms. Furthermore, when generating on a SQL Server instance, the producer detects it and will use a diff engine which will update the database through generations rather than dropping and creating it over.
This diff engine is in fact a key feature since it allows developers to generate continuously, without ever losing data. Once the application is ready to go live, the developer can configure the producer to run the scripts on the online SQL Azure database.
The Diff Engine currently uses SQL Distributed Management Objects (SQL-DMO), therefore, if using SQL Server 2008 or SQL Server 2008 R2 as your local server, you'll need to install them on your server to benefit from this feature.
You can download them here (only the “Microsoft SQL Server 2005 Backward Compatibility Components” is needed): http://www.microsoft.com/downloads/en/details.aspx?FamilyId=C6C3E9EF-BA29-4A43-8D69-A2BED18FE73C&displaylang=en.
The SQL-DMO dependency is planned to be removed towards 2011 - Q2. …
Blob Storage
Starting with the build 579, the CodeFluent Entities runtime supports the Windows Azure Blob Storage to store CodeFluent Entities binary large objects. See the Windows Azure Blob Storage section for more information on this subject.
Windows Azure is a completely different platform than SQL Azure. If you want to minimize the cost of storage and data access, it is probably better to store large files and blobs in the Blob Storage environment available with Windows Azure.
For a more thorough discussion on this subject, we suggest you to check out this MSDN article: SQL Azure and Windows Azure Table Storage
See Also
<Return to section navigation list>
MarketPlace DataMarket and OData
The Data Explorer Team posted “Data Explorer” Mashup 101 on 10/27/2011:
One of the most interesting scenarios that “Data Explorer” enables is the ability to work with data from different kinds of sources. “Data Explorer” provides the ability to enrich data by mashing up different sources of data that might be subsequently published to be consumed from various other “last-mile” tools. If you want to learn more about the metaphor for first-mile and last-mile tools, you can check out this post written by Tim Mallalieu, our Group Program Manager for Data Explorer.
In this post we focus on a concrete scenario (based on the famous Northwind sample database, which many of you might already be familiar with). We mash up data from different sources that contain information about products, product categories, suppliers and order details. In addition to the mash up capabilities, we cover how to enrich the data by doing some calculations on top of it (such as calculating the total sales per product) and adding custom columns to various resources.
We start from the mashup editor where we have already added a few resources:
1. Product Categories: Information about the different categories of products that Northwind sells. This information is contained in an Excel file that we have added to “Data Explorer”.
2. Northwind OData Service: This service is publicly accessible at http://services.odata.org/Northwind/Northwind.svc/. In this post we consume two different entity sets from this service: Products and Order_Details.
3. Suppliers: A text document that contains information about supplier contacts for each product. We need to apply some filtering tasks using “Data Explorer” in order to convert the text file contents into a table that we can use in subsequent steps.
This is how the mashup editor looks after we have imported these three data sources and selected the two different entity sets from the Northwind OData Service.
The ProductCategoriesAndOrders resource is ready to be used as it doesn’t require any additional filtering, cleanup or calculations.
The Products table, however, has too many columns that we don’t need; we are only interested in the ProductID, ProductName, SupplierID and CategoryID (we use the latter two columns to combine this table with Categories and Suppliers).
We use “Data Explorer” to keep only the columns that we are interested in. For that purpose, we have two complementary tasks in the ribbon, named Show Columns and Hide Columns. In this case, as we only want to keep four columns, we use the Show Columns task, which lets us select the columns that we want to keep in our resource.
Once we select the columns that we are interested in, we want to add a new lookup column to this table in order to also display the Category Name for each product.
The CategoryID can be used as the column to match since it exists in both Products and ProductsCategoriesAndOrders resources. We can name this new column CategoryName and specify it as the column to lookup in the ProductCategoriesAndOrders table. Once we specify these settings, the preview is automatically updated to display the Products table with the newly added CategoryName column.
We can now hide the CategoryID column in the Products table since it is no longer needed…
Once we are done with the Products table, we can focus on shaping the Suppliers resource as needed. This resource has been imported from a text document. We can see a preview of it using “Data Explorer”, as displayed below.
Our goal is to convert this text document into a table. In order to do that we can use the task named To Table, under the Convert group in the ribbon. This task lets us configure a few settings as part of the conversion:
- Delimiter: When dealing with text files there are many different possibilities for what the delimiter could be between columns; sometimes it will be simply a white space, other times it can be a custom character (such as a dash (-), or a bar ( | )…). In this case, the delimiter is actually a tab.
- Number of lines to skip from start to text: There might be cases in which the entire document strictly contains only the desired table. In this particular case, however, there are three lines at the beginning of the file that we need to ignore for the table conversion.
- Use First Row as Headers: This is an option that also appears when importing an Excel file, for instance. In many cases, what we want to use as the column headers or names is part of the first row or line in the input file. In this case, indeed, our desired column headers are located in the 1st line after we skip the three noisy rows as we just discussed.
Once we have specified these options for the “text to table” conversion, the preview pane will update and show the result of applying this task to our data.
We have successfully converted the imported text document into a table but, similar to what we had in the Products table, there are columns in this table that we don’t need. We are only interested in keeping the first three columns: SupplierID, CompanyName and ContactName. We can use Show Columns in order to perform this filtering task.
You can see that even when the data source for each resource is different in nature (Excel, text, OData, etc.) from the others, once we import the data into “Data Explorer” we have the same set of tools and the same expressivity over all of them. We believe this is one of the most powerful capabilities that “Data Explorer” provides for dealing with heterogeneous data sources: you can focus on the meaning and structure of your data and forget about the particular technicalities on how to access it.
Once we have done this we can work on the last resource that we need to prepare for our mashup: Order_Details. As we said earlier, this is another feed that we consume from the Northwind OData service. Similar to what we did with the other resources, we keep only a few columns of interest: OrderID, ProductID, UnitPrice and Quantity.
After doing this filtering, we start processing the information in this table. We would like to calculate the total sales for each product. We do that in two separate steps:
- First we need to calculate the line total by adding a new column that applies the formula Unit Price x Quantity on each row. We achieve this by adding a new column, in this case, a Custom Column and specifying the name and formula for the new column. We will get into more details about the formula language in a subsequent post.
- After calculating the line total we “Summarize” or group the rows by ProductID, by specifying an aggregate expression as a formula. For this example, we want our aggregate expression to be the sum of line totals for all the rows with the same ProductID.
Finally, we combine the information that we prepared in these different resources into a single table result we can easily share with others. To combine these resources (Products, Suppliers and Order_Details) we start by doing a Merge operation between the Products and Suppliers resources. We need to specify a few options in order to properly merge the two resources:
- Right Table: We are using the Products table as left table since we started the merge operation while that resource was selected, however, we can select the right table from all the existing resources available. In this case we use the Suppliers resource.
- Prefixes: To avoid column names collisions or to better keep a notion of where each column in the merged table comes from, we can specify a prefix to be automatically added to each column name. In this case, since we are dealing with only a few columns in each table and since none of them will collide, we simply skip this setting.
- Include rows that don’t match: We can specify that we want to include in the resulting table all the rows that don’t match from either the left or right table. In this case, we want to stick to the rows that match so we will not check any of these two options.
- Match condition: Above each column name from the left table in the preview, there is a dropdown menu that lets us pick the column from the right table that we would want to use in order to match values from each table. In this case, we use the SupplierID as the column to match in both the Products and the Suppliers table.
Once we have specified all these settings, the preview pane will update with the view of the merged table which includes information about Products and Suppliers (as well as Categories, since that was already in the Products as a lookup column we added earlier).
Note that the merged table has been automatically added as a new resource in the resource pane on the left. We can rename this resource to have a more descriptive name: Products&Suppliers.
Similar to what we did earlier with the Products table after adding the Category Name lookup column, we can hide the SupplierID column since we no longer need it.
Now we are left with the last operation we need to do as part of this mashup i.e. adding another lookup column with Order_Details information to the Products&Suppliers resource. The Order_Details resource has only two columns: ProductID and Total Sales per Product. As you can probably guess, we want to use this ProductID column as the match column for the lookup operation and display this Total Sales column in our final result.
Finally, we can rename this resource to “Total Sales per Product” as that better represents the contents of our mashup result.
In subsequent posts we explore the different publish alternatives that “Data Explorer” offers in order to share this result with others… Hope you enjoyed this mashup!
Stay tuned for more posts demonstrating various capabilities of codename “Data Explorer”, and don’t forget to sign up to try it if you like it!


<Return to section navigation list>
Windows Azure AppFabric: Apps, Access Control, WIF and Service Bus
Richard Seroter (@rseroter) described Testing Out the New AppFabric Service Bus Relay Load Balancing in a 10/27/2011 to his Architectural Musings blog:
The Windows Azure team made a change in the back end to support multiple listeners on a single relay endpoint. This solves a known challenge with the Service Bus. Up until now, we had to be creative when building highly available Service Bus solutions since only a single listener could be live at one time. For more on this change, see Sam Vanhoutte’s descriptive blog post. In this post, I’m going to walk through an example that tests out the new capability.
First off, I made sure that I had the v1.5 of the Azure AppFabric SDK. Then, in a VS2010 Console project, I built a very simple RESTful WCF service contract.
namespace Seroter.ServiceBusLoadBalanceDemo
{
    [ServiceContract]
    interface IHelloService
    {
        [WebGet(UriTemplate="/{name}")]
        [OperationContract]
        string SayHello(string name);
    }
}
My service implementation is nothing exciting.
public class HelloService : IHelloService
    {
        public string SayHello(string name)
        {
            Console.WriteLine("Service called for name: " + name);
            return "Hi there, " + name;
        }
    }
My application configuration for this service looks like this (note that I have all the Service Bus bindings here instead of machine.config):
<?xml version="1.0"?>
<configuration>
  <system.serviceModel>
    <behaviors>
      <endpointBehaviors>
        <behavior name="CloudBehavior">
          <webHttp />
          <serviceRegistrySettings discoveryMode="Public" displayName="HelloService" />
          <transportClientEndpointBehavior>
            <clientCredentials>
              <sharedSecret issuerName="ISSUER" issuerSecret="SECRET" />
            </clientCredentials>
            <!--<tokenProvider>
              <sharedSecret issuerName="" issuerSecret="" />
            </tokenProvider>-->
          </transportClientEndpointBehavior>
        </behavior>
      </endpointBehaviors>
    </behaviors>
    <bindings>
      <webHttpRelayBinding>
        <binding name="WebRelayBinding">
          <security relayClientAuthenticationType="None" />
        </binding>
      </webHttpRelayBinding>
    </bindings>
    <services>
      <service name="Seroter.ServiceBusLoadBalanceDemo.HelloService">
        <endpoint address="https://<namespace>.servicebus.windows.net/HelloService"
          behaviorConfiguration="CloudBehavior" binding="webHttpRelayBinding"
          bindingConfiguration="WebRelayBinding" name="SBEndpoint" contract="Seroter.ServiceBusLoadBalanceDemo.IHelloService" />
      </service>
    </services>
    <extensions>
      <!-- Adding all known service bus extensions. You can remove the ones you don't need. -->
      <behaviorExtensions>
        <add name="connectionStatusBehavior" type="Microsoft.ServiceBus.Configuration.ConnectionStatusElement, Microsoft.ServiceBus, Version=1.5.0.0, Culture=neutral, PublicKeyToken=31bf3856ad364e35"/>
        <add name="transportClientEndpointBehavior" type="Microsoft.ServiceBus.Configuration.TransportClientEndpointBehaviorElement, Microsoft.ServiceBus, Version=1.5.0.0, Culture=neutral, PublicKeyToken=31bf3856ad364e35"/>
        <add name="serviceRegistrySettings" type="Microsoft.ServiceBus.Configuration.ServiceRegistrySettingsElement, Microsoft.ServiceBus, Version=1.5.0.0, Culture=neutral, PublicKeyToken=31bf3856ad364e35"/>
      </behaviorExtensions>
      <bindingElementExtensions>
        <add name="netMessagingTransport" type="Microsoft.ServiceBus.Messaging.Configuration.NetMessagingTransportExtensionElement, Microsoft.ServiceBus, Version=1.5.0.0, Culture=neutral, PublicKeyToken=31bf3856ad364e35"/>
        <add name="tcpRelayTransport" type="Microsoft.ServiceBus.Configuration.TcpRelayTransportElement, Microsoft.ServiceBus, Version=1.5.0.0, Culture=neutral, PublicKeyToken=31bf3856ad364e35"/>
        <add name="httpRelayTransport" type="Microsoft.ServiceBus.Configuration.HttpRelayTransportElement, Microsoft.ServiceBus, Version=1.5.0.0, Culture=neutral, PublicKeyToken=31bf3856ad364e35"/>
        <add name="httpsRelayTransport" type="Microsoft.ServiceBus.Configuration.HttpsRelayTransportElement, Microsoft.ServiceBus, Version=1.5.0.0, Culture=neutral, PublicKeyToken=31bf3856ad364e35"/>
        <add name="onewayRelayTransport" type="Microsoft.ServiceBus.Configuration.RelayedOnewayTransportElement, Microsoft.ServiceBus, Version=1.5.0.0, Culture=neutral, PublicKeyToken=31bf3856ad364e35"/>
      </bindingElementExtensions>
      <bindingExtensions>
        <add name="basicHttpRelayBinding" type="Microsoft.ServiceBus.Configuration.BasicHttpRelayBindingCollectionElement, Microsoft.ServiceBus, Version=1.5.0.0, Culture=neutral, PublicKeyToken=31bf3856ad364e35"/>
        <add name="webHttpRelayBinding" type="Microsoft.ServiceBus.Configuration.WebHttpRelayBindingCollectionElement, Microsoft.ServiceBus, Version=1.5.0.0, Culture=neutral, PublicKeyToken=31bf3856ad364e35"/>
        <add name="ws2007HttpRelayBinding" type="Microsoft.ServiceBus.Configuration.WS2007HttpRelayBindingCollectionElement, Microsoft.ServiceBus, Version=1.5.0.0, Culture=neutral, PublicKeyToken=31bf3856ad364e35"/>
        <add name="netTcpRelayBinding" type="Microsoft.ServiceBus.Configuration.NetTcpRelayBindingCollectionElement, Microsoft.ServiceBus, Version=1.5.0.0, Culture=neutral, PublicKeyToken=31bf3856ad364e35"/>
        <add name="netOnewayRelayBinding" type="Microsoft.ServiceBus.Configuration.NetOnewayRelayBindingCollectionElement, Microsoft.ServiceBus, Version=1.5.0.0, Culture=neutral, PublicKeyToken=31bf3856ad364e35"/>
        <add name="netEventRelayBinding" type="Microsoft.ServiceBus.Configuration.NetEventRelayBindingCollectionElement, Microsoft.ServiceBus, Version=1.5.0.0, Culture=neutral, PublicKeyToken=31bf3856ad364e35"/>
        <add name="netMessagingBinding" type="Microsoft.ServiceBus.Messaging.Configuration.NetMessagingBindingCollectionElement, Microsoft.ServiceBus, Version=1.5.0.0, Culture=neutral, PublicKeyToken=31bf3856ad364e35"/>
      </bindingExtensions>
    </extensions>
  </system.serviceModel>
<startup><supportedRuntime version="v4.0" sku=".NETFramework,Version=v4.0"/></startup></configuration>
A few things to note there. I’m using the legacy access control strategy for the TransportClientEndpointBehavior. But the biggest thing to notice is that there is nothing in this configuration that deals with load balancing. Solutions built with the 1.5 SDK should automatically get this capability.
I went and started up a single instance and called my RESTful service from a browser instance.
I then started up ANOTHER instance of the same service, and it appears connected as well.
When I invoke my service, ONE of the available listeners will get it (not both).
Very cool. Automatic load balancing. You do pay per connection, so you don’t want to set up a ton of these. But, this goes a long way to make the AppFabric Service Bus a truly reliable, internet-scale messaging tool. Note that this capability hasn’t been rolled out everywhere yet (as of 10/27/2011 9AM), so you may not yet have this working for your service.


<Return to section navigation list>
Windows Azure VM Role, Virtual Network, Connect, RDP, Traffic Manager and CDN
Pablo M. Cibraro (@cibrax) described Using Windows Azure Regions efficiently in a 10/26/2011 post:
Moving your application to the cloud might not be easy as it sounds. The typical sample we always see in documentation or demos about an ASP.NET application created from the Visual Studio template and deploy it in Azure as a package is definitely very far from reality. There are multiple factors that can affect the response time and availability of your applications in the cloud but you can not easily see until you embark on a real project. Application distribution and deployment is one of those factors, and the one we are going to discuss in this post.
There is another abstraction layer on top of regions called "Affinity Groups", which simply tells the Fabric controller to do its best to ensure groups of related services are deployed in close proximity whenever possible to ensure optimization for inter-app communication. For example, in a typical web application with a database, you will want to deploy the web application as close as possible to the database server.
Finally, another important concept you need to understand in this deployment model is the idea of “hosted service”. A hosted service basically represents an unit of deployment associated to a public DNS in the cloud. You deploy your applications in a hosted service, which is also tied to a region or affinity group. What Azure gives you is a public address for reaching that hosted service in the cloud, which is “[you app name].cloudapp.net” for applications hosted in the production environment and an auto generated guid for applications hosted in the staging environment. You can also think in a hosted service as a load balancer that forwards requests from that public address to one of the instances or VMs associated to it.
Let’s discuss the aspects you need to consider for selecting the right regions for deploying your application.
- Network latency: reducing the network latency is very important as it will impact directly on the response time for your applications. You will want to have your users as close as possible physically from your applications and data. For example, if you have some potential users in the US and Europe, you will want to deploy two exact replicas from your application and data in the US and Europe data centers. As you might guess, this is not as easy as it sounds and there are a lot of challenges you need to address, how you can effectively redirect the users to the right region, or how you can synchronize your data across regions are typical questions or concerns you have to tackle first.
- Availability: you will want to have your applications available all the time. Many things can happen, but you need to understand that a region or data center might become offline and your application should be prepared to handle that scenario. Your applications and data should be replicated across multiple regions to not be affected when things like this occur.
Microsoft already offers a set of tools or technologies you can use to address these two aspects, so let’s discuss some of them in detail in the next paragraphs.
Windows Azure Traffic Manager
While this technology is still a CTP and not available for all public in general, it will provide several methods for distributing internet traffic among two or more hosted services in different Windows Azure datacenters. It is in essence a distributed DNS service that knows which Windows Azure Services are sitting behind the traffic manager URL and distributes requests based on different policies or modes you can configure. It will initially support three modes, “Failover”, “Performance” and “Round-Robin”.
In the “Failover” mode, all the traffic is redirected to a single hosted service, unless it fails. If the redirection fails because the hosted service is not longer available, it then directs the traffic to the hosted service configured as failover. For example, you can configure the South Central US region as a backup for the North Central US region and vice versa. If any of those regions go offline, the other one will take its place.
In the “Performance” mode, all traffic is mapped to the hosted service “closest” to the client requesting it. For example, this will direct users from the US to one of the US datacenters and European users will probably end up in one of the European datacenters.
Finally, in the “Round-robin” mode, the traffic is distributed in a round robin fashion across several hosted services configured in the policy.
As you can see, this tool only tackles the two aspects mentioned before from the point of view of traffic redirection. However, you also need to make sure the data is also consistently available in all the regions, and that’s something this tool won’t solve. For example, if the users are redirected from North US to Central US, you need to make sure the data they get access look the same.
Content Delivery Network (CDN)
You can imagine the Windows Azure Content Delivery Network as a huge http cache spread across the globe for content such as images, files, scripts, or static html to name a few. You can either configure CDN for a blob storage account or an http endpoint in your application (and endpoint with an url ending in “cdn”, for example xxx.cloudapp.net/cdn). All that content will be cached in the nodes that are part of the network using standard Http caching. The CDN will serve later the cached copy closest to the user requesting it, improving in this way the response time.
There are today more than 18 locations or nodes globally (United States, Europe, Asia, Australia and South America) and this number keeps growing.
SQL Azure Data Sync
If you want to support that scenario, the SQL Azure Data Sync is the tool that will help you in this matter. In a nutshell, SQL Azure Data Sync is a cloud-based data synchronization service built on the Microsoft Sync Framework technologies. It provides bi-directional data synchronization and data management capabilities allowing data to be easily shared across SQL Azure databases within multiple data centers.
There are a few things you will have to configure in this tool
- The databases you want to keep in sync, and also the tables and columns in those databases
- The schedule or frequency for doing the synchronization.
- How you want to resolve any conflict that might occur during the synchronization.
As you can see, the combination of this tool with the traffic manager will help you to keep applications and data in sync between different region for the most common scenarios.

Vladyslav Romanenko responded to Microsoft partner MadCat Consulting Ltd’s Traffic Manager issues - SSL monitoring endpoint and status descriptions in a 10/25/2011 thread in the Connectivity and Messaging - Windows Azure Platform forum:
In order to get SSL working with Windows Azure Traffic Manager you have few options:
- Provision a certificate for your traffic management domain (xyz.ctp.trafficmgr.com) and set the alternate name to your vanity domain (www.yourwebsite.com). This is probably the best option at the moment.
- Leave the default unsecured binding for the port 80 and configure the probe to be non SSL.
This simplifies not having to maintain an additional cert for the same service but it leaves all the communications un-encrypted and will have to be taken into account by the security review of your service.- Leave the probe as HTTPS changing its port (E.g. to 444) and create an additional binding is IIS for that port with the needed certificate by the probes (i.e. xyz.ctp.trafficmgr.com to minimize the number of SSL certs you need).
This creates the burden of having an additional cert, but will keep communications encrypted.Please let us know if any of the above options work for you.
Vlad is PM for Windows Azure Traffic Manager

<Return to section navigation list>
Live Windows Azure Apps, APIs, Tools and Test Harnesses
Alex Armstrong reviewed Roberto Brunetti’s Windows Azure Step by Step book in a 10/27/2011 post to the I Programmer blog:
Author: Roberto Brunetti (@robertobrunetti)
- Publisher:Microsoft Press
- Pages: 315
- ISBN: 978-0735649729
- Aimed at: Developers and managers
- Rating: 4
- Pros: A useful overview
- Cons: Reads too much like an advertising pitch.
- Reviewed by: Alex Armstrong
This particular book is sort of half pitched at the programmer and half at management. It starts off with a look at cloud computing in general. This reads like a management justification check list. If you know anything about Azure, or cloud computing in general you can skip it as it mostly reads like propaganda.
The book really gets going at Chapter 2 with an introduction to Azure. It covers setting up an account and your first interactions with the web-based management system. You also find out about storage, the worker role and the new virtual machine role. You also discover that the author is keen on quoting authoritative bits of the documentation, which simply say exactly what has been said already. This is a lightning, but quite useful, overview of what sorts of things lurk in Azure.
Chapter 3 begins the process of focusing on different aspects of Azure. It starts of quiet reasonably with the Web Role. As a web role is basically an ASP.NET app that you deploy to Azure most of the chapter is about using the standard tools to create a simple ASP.NET app. Chapter 4 moves on to consider storage and this is where things start to be different from standard ASP.NET development. Chapter 5 covers tables, queues and worker roles in much the same style.
Chapter 6 looks in detail at the Azure operating system and some of the almost non-developer issues - billing, content delivery networks, certificates, diagnostics and logging. Of course, not understanding these features will make development harder.
Next we move on to building an AppFabric solution, which increases the level of abstraction. This is about using WCF in the cloud and the service bus. Chapter 8 details WCF data services and OData. Chapter 9 introduces SQL Azure and its is a fairly short chapter for such a complex service.
Chapter 10 deals with accessing Azure services from a range of clients and, finally, Chapter 11 sums everything up with a look at the overall architecture.
The book does read a bit like propaganda for Azure in places and it is a very superficial overview with just enough code, in C#, to show you how things work. On the other hand, if you are looking for an overview this one isn't bad.


Andrew Brust (@andrewbrust) explained Nokia and Windows Phone: What Could Still Go Wrong in a 10/26/2011 post:
The much ballyhooed release of Nokia’s first Windows Phone handsets finally took place Wednesday at the Nokia World event in London. There had been a lot of anticipation building up to this “reveal,” and it is genuinely a watershed moment for the Windows Phone platform. That’s because Nokia’s adoption of Windows Phone brings several firsts:
For the first time, a major mobile phone player has standardized on Windows Phone as its exclusive smartphone platform.
- For the first time (apparently) an OEM will be working actively with carriers to see to it that Windows Phone will be well-promoted and featured prominently at retail points of sale
- For the first time, a Windows Phone OEM has within its comfort zone the ability to push products out to numerous global markets (not just North America, Asia and Western Europe) and to manufacture handsets at price points that can work in those markets
- For the first time, a major mobile hardware company has a self-interest, if not its self-preservation, at stake in the success of Windows Phone.
Now that the first two Nokia Windows Phone handsets, the Lumia 800 and 710, have come out, Windows Phone can stop waiting. But it also has to stop merely hoping, and start actually achieving. This is a big deal, but this is not finish line. And make no mistake, the odds are still stacked in against Windows Phone. The challenges are not insurmountable, but they are numerous and they are formidable. Among them:
- Windows Phone needs to be an express stop for apps developers; right now it’s local station open during limited hours. Although there are now over 35,000 apps for Windows Phone – a very impressive number for a phone that’s a bit less than 1 year old – there are numerous major or important apps that aren’t on the platform. Even apps that are on Windows Phone have more token representation than on iOS or Android. Compare the lone ESPN Score Center on Windows Phone to ESPN’s app presence on the iTunes App Store, or try searching for “ESPN” on the Android Market and see what comes up. Likewise, Windows Phone has Angry Birds, but only one version of it, as opposed to the three versions on the other two major smartphone platforms. Will this situation improve? Will Windows Phone become a mandatory channel for apps developers? Or will we keep looking forward better app availability tomorrow?
- Windows Phone doesn’t have a carrier champion. Apple may not have needed one, given its own retail network, but it had one nonetheless in AT&T. (An)droid had a champion in Verizon. An OEM champion is good, but carriers may be even more important worldwide, and they definitely are in the United States. Will Nokia make this better, especially in the US, where it has so little influence?
- The Smartphone landscape is no longer a green field, and even in “the Enterprise,” preferences and prejudices are in evidence. IT may have a disincentive in deploying Windows Phone handsets to employees, because those employees may have a strong preference for something else. That was not true for Blackberry/RIM in the last decade, and it’s not true for iOS in this one. It may or may not be true for Android. Microsoft has an uphill battle even in allegedly friendly territory. It has no home field advantage. Anywhere.
- Windows Phone hardware has been lackluster. What we’ve seen so far is mostly repurposed Android chasses with three haptic buttons on the bottom instead of four. What Nokia showed today is better, at least stylistically in the case of the Lumia 800 (pun intended), but features are still inferior with no front-facing camera and limited on-board memory. Today was a good start. Will the next phones be even better, or will the momentum slow?
- Marketing of Windows Phone by Microsoft has been weak, and inconsistent. There was a media blast last year, when the phones were launched, and then things petered out. AT&T stores had a Windows Phone section early on, but that seems to have been withdrawn too. Without strong, sustained marketing, Windows Phone needs to rely on grass roots popularity and word of mouth for growth. I’m skeptical that such viral popularity will spontaneously appear and build. Will Nokia fill the void? I think so, at least in Europe, but will that build momentum for the Windows Phone platform overall?
Windows Phone has many hurdles ahead. It would be easy for any one of them to foil Microsoft (and Nokia) in the smartphone market. But I (a Windows Phone user) am not sure that it would be so hard climb these hurdles and even transcend them, either. Microsoft and Nokia can seed the Marketplace with more major, high-quality apps. Nokia can come out with a second wave of handsets that could kick some butt, in looks and in technology. Microsoft can now (finally) integrate Skype into the Windows Phone OS to create consumer appeal and help “bring your own device” Enterprise employees save on their calling plan minutes. Microsoft could decide tomorrow to market and advertise Windows Phone aggressively, and hire the right agency to do this in a hip way, and hopefully in coordination with Nokia. And with that combination of positive changes, a carrier could finally become interested. For example, Verizon (rumored to have had employees on site in London today), and its 45% London-based owner, Vodafone.
Would such a turnaround take perfect alignment of the stars to pull off? Maybe. But determination to win would make this outcome most likely


<Return to section navigation list>
Visual Studio LightSwitch and Entity Framework 4.1+
Beth Massi (@bethmassi) explained How to Connect to and Diagram your SQL Express Database in Visual Studio LightSwitch in a 10/27/2011 post:
Visual Studio LightSwitch makes it easy to create and model database tables using the Data Designer. With this designer you have a simple interface into the Tables, Columns and Relationships that make up your data model. When you create tables this way, under the covers LightSwitch creates a SQL Express database file at design time. SQL Express is installed with Visual Studio LightSwitch and is required for it to work properly. When you are ready to deploy your application you can choose to deploy it to any version of SQL Server, including SQL Azure, however during development time the LightSwitch development environment manages your database through SQL Express. We call this the Intrinsic Database.
Many folks have asked me how I created the database diagram in the last article I wrote and I’ve seen the question in other Visual Studio forums as well. All versions of Visual Studio (not just LightSwitch) allow you to connect to SQL Server from the Server Explorer window. This allows you to browse the tables and data. However getting the diagramming support to work is somewhat of a mystery for folks so in this post I’ll show you how you can get it to work on your local development machines.
PLEASE NOTE: This technique requires you be an administrator of your machine and you installed Visual Studio (and thus SQL Express) under that administrator login. This technique should only be used for development environments.
Connecting to the Server Explorer
To connect to the intrinsic database open the Server Explorer (Ctrl+Alt+S).
Then right-click on the Data Connections and select “Add Connection…” to add a new connection.
We need to connect to a specific database file on disk, not an attached database. During development time LightSwitch creates what’s called a User Instance database that is dynamically attached to the SQL Express service when it is accessed. This makes it possible for you to copy LightSwitch development solutions and samples from machine to machine and not lose any of the critical data information.
So when the “Add Connection” dialog comes up click the “Change…” button.
Then change the data source to “Microsoft SQL Server Database File” and click OK.
Now you need to specify the file location of the database. The database file is always named ApplicationDatabase and it is located in the \bin\Data folder under your solution. Select the ApplicationDatabase.mdf file and click OK.
Use Windows Authentication and click the Test Connection button. If it succeeds click OK. (If it doesn’t, make sure you are logged into the machine as the same administrator you used to install Visual Studio).
Now you can see all the internal tables that LightSwitch has created for you based on your model in the Data Designer.
The Server Explorer lets you make any number of changes to not only the data stored in the tables but also the structure (schema). BE CAREFUL here. Any changes you make directly to the database structure WILL NOT automatically be reflected in your data model and you could break it. The Data Designer makes sure your changes to the model stay in sync with the database but if you modify the database outside the Data Designer all bets are off. You have been warned! :-)
Setting Up Diagramming Support
However there are other nifty things you can do in the Server Explorer like enter more records of data as well as create database diagrams. In order to create a database diagram expand the “Database Diagrams” node. You will be presented with the following dialog:
Click Yes and another dialog will be presented:
Click Yes again. If the message goes away you’re all set. However, a lot of times it’s not that easy. Usually an error message appears similar to the following:
In order to get diagramming support working, the owner of the database must be a local login and a valid db_owner, not a domain login like I am above. So in order to fix this we need to change the database owner to a local account. When Visual Studio installs SQL Express, the service logs on as NETWORK SERVICE. You can check this by going to Services (Windows Start, search “Services”) and looking at the SQLEXPRESS service entry.
So if we change the database owner to this login, the diagramming will work. Although you can do this in SQL Server Management Studio, it’s not installed out of the box with Visual Studio so I’m going to show you how to get this working without installing anything else. First go back to the bin\Data folder where your intrinsic database is located and make a backup (just in case :-)).
Then grant the NETWORK SERVICE permissions to the folder, allowing Full Control. (Right click on the \Data folder, select properties, security tab, click the Add button, enter NETWORK SERVICE, OK, then check off Full Control.)
Now we need to create a small SQL script to attach the database to the SQL Express service, change the owner and then detach it again. Open notepad and paste the following into a new text file, modifying the path to your database files.
USE master
GO
-- Change the path to your database files!
-- Make sure the login that runs your SQLEXPRESS service (i.e. NETWORK SERVICE) has file access to this folder

CREATE DATABASE ApplicationData ON
( FILENAME = N'C:\...\Projects\MyApplication\MyApplication\bin\Data\ApplicationDatabase.mdf' ),
( FILENAME = N'C:\...\Projects\MyApplication\MyApplication\bin\Data\ApplicationDatabase_log.ldf' )
FOR ATTACH
GO

ALTER AUTHORIZATION ON DATABASE::ApplicationData TO [NT AUTHORITY\SYSTEM]
GO

USE master
GO
EXEC master.dbo.sp_detach_db @dbname = N'ApplicationData'
GO
Save the file as C:\Temp\ChangeOwner.sql – with the SQL extension. Next open an administrator command prompt.
First close Visual Studio in order to close all connections to the database file. Then type the following to execute the script:
sqlcmd -S .\SQLEXPRESS –i "C:\Temp\ChangeOwner.sql"
Creating a Diagram
Now that’s all done open up Visual Studio again and you should see the ApplicationDatabase still sitting in the Server Explorer. To connect just expand the database node and then right click on the Database Diagrams folder and select “Add New Diagram”. Everything should be working now.
When you add a new diagram it will ask you what tables you want to include. In a LightSwitch database all the tables that start with “aspnet_” as well as the “RolePermissions” are internal and related to the authentication & authorization system. They cannot be modified so you can omit these from your diagram.
Click Add and the diagram will be generated based on the tables you chose.
In order to save the diagram just close the window by clicking on the “X” on the tab and you will be prompted to save the diagram back to the database.
REMEMBER
Using the Server Explorer against your intrinsic LightSwitch database can be useful for entering data or generating diagrams but anytime you want to make changes to the actual structure/schema of your tables you MUST do that in the Data Designer otherwise you risk getting your model out of sync.
I hope this helps not only LightSwitch users but also other Visual Studio users get diagramming support working on their databases.


Return to section navigation list>
Windows Azure Infrastructure and DevOps
Anant Sundaram posted Announcing New System Center 2012 Pre-Releases: Delivering Self-Service Application Management with the Microsoft Private Cloud about App Controller (formerly Project “Concero”), Service Manager and Orchestrator in a 10/27/2011 post to the Microsoft Server and Platform team blog:
Before I was a software product manager, I led line-of-business application engineering teams, both here and at other companies. Back then, I was always amazed at how much conversation and negotiation with datacenter IT managers were required before we could land even small changes to production. Think lengthy change forms, capacity reservation requests, hardware lead times etc. It was work required for every new application request. Sound familiar? It turns out that everyone was trying to do the right thing, but we didn’t have the right tools to deliver IT services more effectively.
But cloud computing is making things much easier. As a “consumer” of datacenter services, I can now go back to datacenter IT (or “provider”) and ask for faster, cheaper and more reliable services to deploy my applications. Cloud computing also makes it possible for IT to offer datacenter infrastructure on-demand, in the same way that I can order up a piece of equipment online on my own.
Based on many recent conversations we’ve had with CIOs, cloud computing has indeed opened up an accelerated path for service consumers and service providers to better collaborate and deliver “IT as a Service” to their business counterparts.
Why? Because service consumers really want simplified ways to deploy and manage applications by themselves. And the service provider needs the automation to efficiently enable this experience along with the control and oversight to ensure applications are deployed where and how they should be.
A private cloud helps you deliver what the service consumer and the service provider want by providing a simple and effective way to deliver “IT as a Service” and today we are releasing three new products in our System Center 2012 lineup that help make your private cloud experience real - specifically App Controller, Service Manager & Orchestrator. As of today, App Controller and Service Manager are in public beta while Orchestrator is available as a public release candidate.
Think of App Controller as the service consumer’s single view to manage applications across the Microsoft private cloud and the Windows Azure public cloud. They can configure, deploy, visualize and update multi-tier application components in the context of the holistic service delivered to the business. This is consistent with the mental model of managing services, not servers. Service consumers have visibility across all the applications they’re responsible for in one view. This approach enables a world of standardized application blueprints (or service templates, as we call them in System Center 2012) which can be easily configured to specific application needs before deployment. Sounds cool, right? I wish these capabilities were around when I was a service consumer.
Of course, before getting to deploying applications, service consumers need to ensure that their private cloud infrastructure meets their applications’ requirements. Service Manager enables them to do that – again, in a self-service mode - through a Service Catalog which contains a set of pre-defined service offerings.
This goes a long way to make service consumers’ lives easier, but how does it help the service provider make this experience a reality? And further, how does it help the service provider who is managing the diverse underlying physical and virtual datacenter infrastructure? At the heart of the solution is Service Manager, which contains a Configuration Management Database (CMDB). This database leverages information from all kinds of IT resources which the service provider has configured, such as virtual machine templates, service templates, runbook automations and user roles from Active Directory. This makes it easy for the service provider to publish a Service Catalog of offerings to the service consumer, ensuring that resources are standardized according to business needs and only made available to the appropriate, designated users.
Finally, to connect and automate all the moving parts, System Center Orchestrator offers the necessary automation for service providers to integrate and extend their existing toolsets and build flexible workflows (or runbooks) that can span across multiple organizational silos and IT systems. By leveraging the capabilities of Service Manager and Orchestrator, a service provider can create a standardized and automated self-service experience that helps reduce human error and manual processes. The end result is simplification of datacenter management while enabling private cloud readiness and self-service across your business.
Go here to download and evaluate how App Controller, Service Manager and Orchestrator can enable your private cloud experience. We’d love to hear your feedback!
Stay tuned for additional blogs on this topic in the coming days!
No significant articles today.
<Return to section navigation list>
Windows Azure Platform Appliance (WAPA), Hyper-V and Private/Hybrid Clouds
Avkash Chauhan (@avkashchauhan) reminded potential users of the availability of Windows HPC with Windows Azure Burst Training Kit Version 1.6 on 10/27/2011:
Windows HPC Server with Burst to Azure is ideal for compute intensive applications that demand 1000s of Cores. The HPC/Azure hybrid solution allows both novice users and skilled developers to quickly deploy their existing windows binary executable, HPC SOA code, or MPI-based HPC code. The HPC job scheduler automatically batch scales your code by allowing cloud nodes to be added to an on-premise head node. These comprehensive samples should get your Windows/non-Windows users up and running quickly on Azure for their compute-intensive workload needs.
Download: Windows HPC with Windows Azure burst training kit v1.6.
along witha paper: Windows HPC with Burst to Windows Azure: Application Models and Data ConsiderationsSamples include:
- CPU spinner
- Image rendering on Renderman format files (Console client) - Updated!
- Image rendering on Renderman files (Windows Phone 7 client) - New!
- BLAST on Azure! - New!
2. SOA
- Square Service
- Asian Options service using VSTO and Excel
- Word-association service using SQL Azure - New!
3. Message Passing Interface (MPI)
- Pi (π) Calculator - New!
- Tachyon ray-tracing - New!
- Asian Options UDF -- an UDF implementation of sample 2b.


The downloadable files are dated 9/8/2011.
<Return to section navigation list>
Cloud Security and Governance
Ryan Francis and Christine Burns asserted “But steady progress is being made to address security concerns of enterprise IT” in a deck for their Cloud security: Mission impossible article for Network World of 10/26/2011:
The term "cloud" connotes things floating around freely – which is not something you necessarily want your data doing. That is the common perception of cloud computing today, leaving many leery about trusting that their business-critical information is safe despite no clear security in place.
The hesitation over security in the public cloud centers on several factors that are just starting to be addressed:
• Concerns about securing the communications channels within multi-tenant virtual networks.
• Uncertainty about how the exploding number of heterogeneous mobile devices will be securely supported in the cloud.
• An inconsistent path for extending the current identity and access control mechanisms used in the enterprise up into the cloud.
• Questions on how trusted encryption and tokenization models need to change to adequately protect sensitive data stored in the public cloud.
In a new PDF, Network World provides tips for securing your data in the cloud, such as making sure your provider has VM-specific security or find ways to lock down endpoints. Experts also explain threats to cloud security, such as application-layer denial-of-service attacks and downtime due to a cloud outage.
Become an Insider today (free registration required) to download the PDF and find out the cloud security companies worth watching and how you can become a cloud expert. …
To continue reading, register here to become an Insider. You'll get free access to premium content from CIO, Computerworld, CSO, InfoWorld, and Network World. See more Insider content or sign in.
<Return to section navigation list>
Cloud Computing Events
No significant articles today.
<Return to section navigation list>
Other Cloud Computing Platforms and Services
Jeff Barr (@jeffbarr) reported New - AWS Management Console Support for the Simple Email Service in a 10/27/2011 post:
The Amazon Simple Email Service gives you a simple and cost-effective way to send any volume of bulk or transactional email. We send millions of emails on behalf of thousands of Amazon SES customers each and every day.
You can now access Amazon SES through the AWS Management Console. The new SES tab provides you will access to all of the important features of SES (you'll still need to call the Amazon SES API to send your production emails). You don't have to install and configure the Amazon SES command line tools anymore.
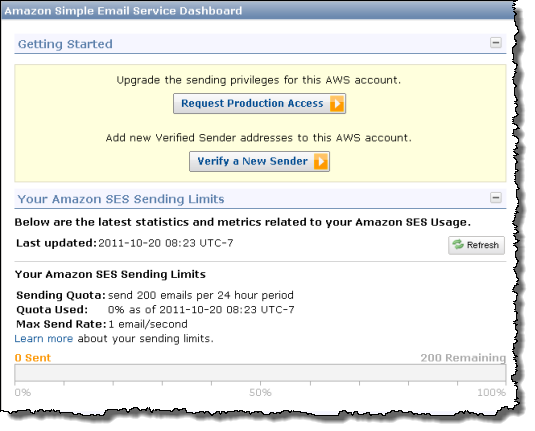
The Dashboard allows you to request production access so that you can send email to unverified addresses. You can verify addresses during your testing phase, and you can also view your statistics and limits:
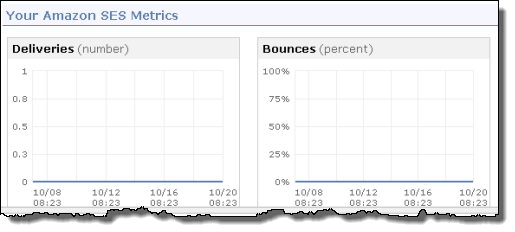
You can also see detailed metrics on your Amazon SES activity:
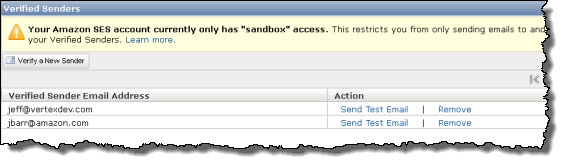
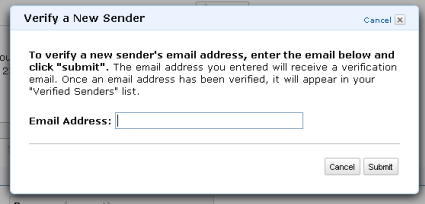
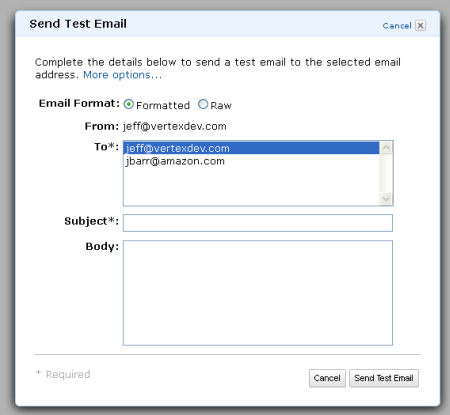
You can verify new senders by simply entering an email address. A verification email will be sent to the address; when the recipient clicks on a link in the email the address will be marked as verified:
You can also view the list of verified senders and send test emails to them:
I hope you've found this brief tour of the newest tab of the AWS Management Console to be of value.
If you are not yet using Amazon SES to send your bulk or transactional email, today is the perfect time to get started. Our mobile SDKs (the AWS SDK for Android and the AWS SDK for iOS) include complete support for SES. The AWS SDK for Java, the AWS SDK for PHP, the AWS SDK for Ruby, and the AWS SDK for .Net also support SES.

Windows Azure should provide a similar service.
Jeff Barr (@jeffbarr) described Elastic Load Balancing: More IPv6 Support, More Metrics, More IP Addresses in a 10/26/2011 post:
We have made some improvements to our Elastic Load Balancing product:
- IPv6 is now supported in the Asia Pacific (Singapore) and Asia Pacific (Tokyo) regions.
- Each Elastic Load Balancer reports six new metrics to Amazon CloudWatch.
- The DNS entry associated with an Elastic Load Balancer can now return up to eight IP addresses.
IPv6 Support
Earlier this year I announced our support for IPv6 in our US East (Northern Virginia) and EU (Ireland) regions. We are now supporting IPv6 in our Asia Pacific (Singapore) and Asia Pacific (Tokyo) regions. Read my original post to learn more about this much-requested feature.More Metrics
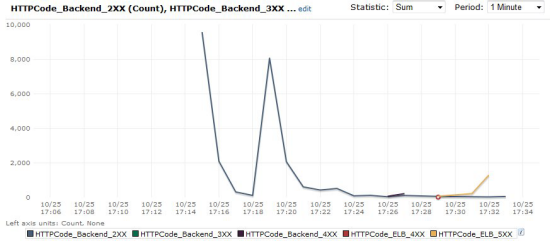
Each Elastic Load Balancer now reports six new metrics to CloudWatch. Two of the metrics provide information about the load balancer; the other four provide information about the instances that are attached to it. These metrics provide you with additional information about the HTTP status codes returned by the load balancer and by the EC2 instances behind it.The new load balancer metrics report on the number of HTTP 4xx (client error) and 5xx (server error) responses generated within and returned by the load balancer. The metrics are named HTTPCode_ELB_4XX and HTTPCode_ELB_5XX. These metrics were not previously available from the instance logs or through other AWS APIs.
The new instance metrics report on the number of HTTP 2xx (success), 3xx (redirection), 4xx (client error), and 5xx (server error) responses returned by the EC2 instances behind the load balancer. These metrics do not include the responses that were counted in the load balancer metrics described in the previous paragraph.
You can view these metrics in the AWS Management Console. Here's a sample:
Additional IP Addresses
A DNS lookup on the DNS name of an Elastic Load Balancer will now return up to eight IP addresses, depending on the current capacity of the load balancer and the number of Availability Zones supported by the load balancer. By providing these additional addresses, clients are able to retry their connection without re-resolving the DNS name. This change will apply to all new Elastic Load Balancers. It will be applied to existing Elastic Load Balancers over the nexte three weeks.You can learn about all of these features in the Elastic Load Balancing Documentation.


<Return to section navigation list>


0 comments:
Post a Comment